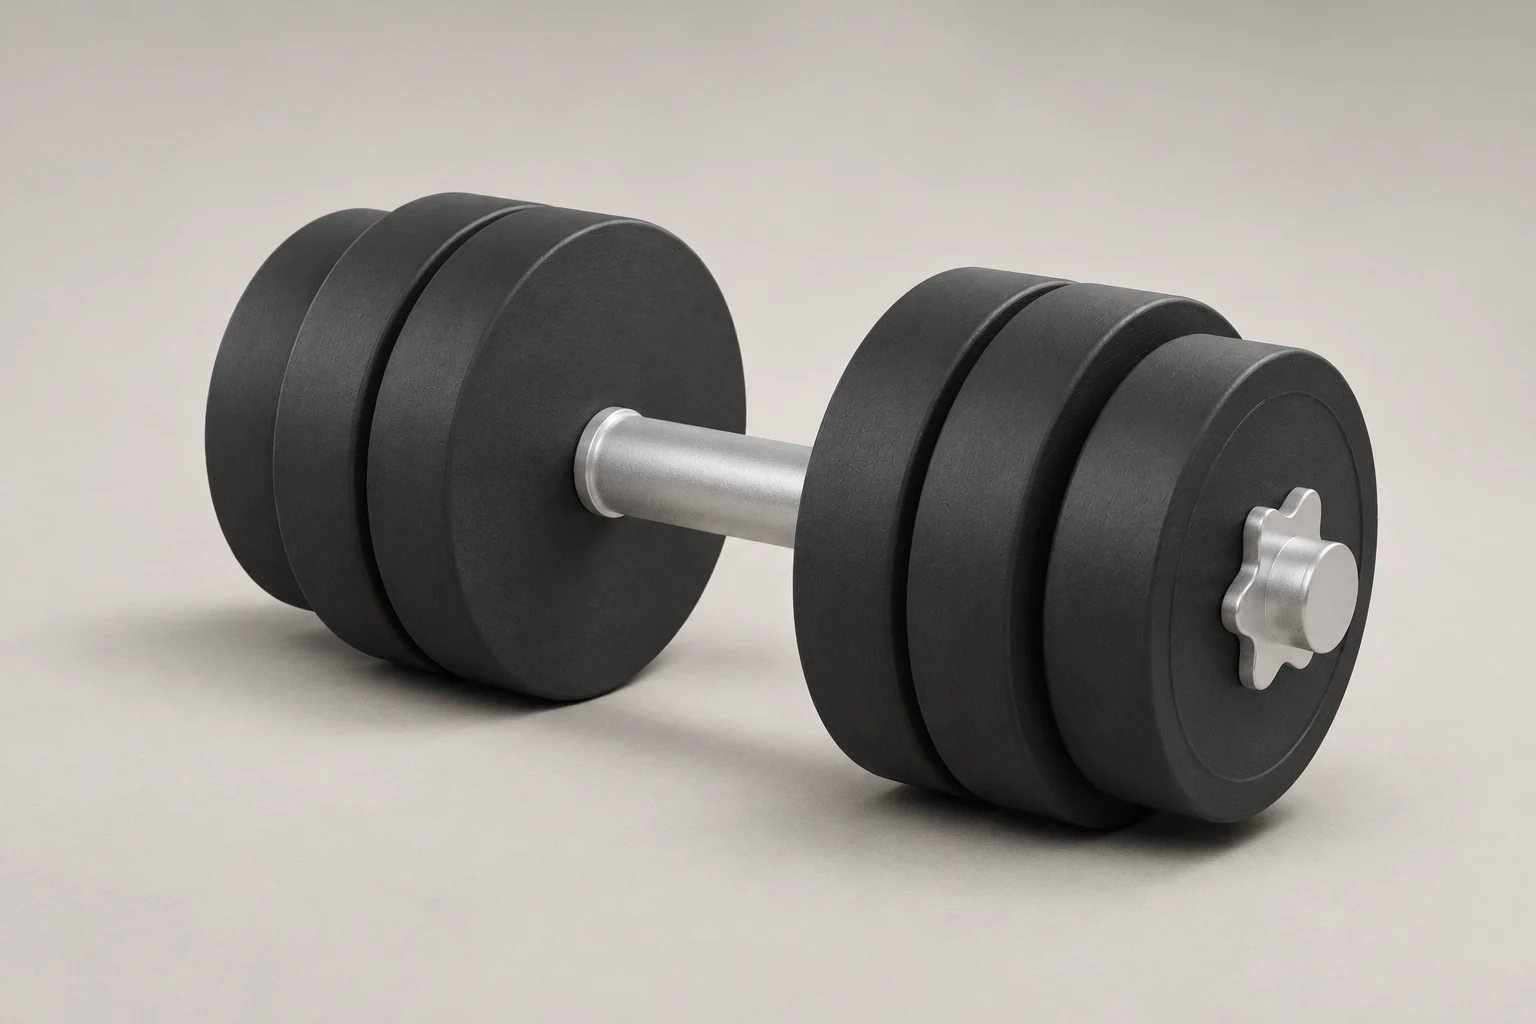
To make a fake dumbbell for cosplay, cut six plates from corrugated cardboard, slide them onto a PVC pipe, and space them with small hidden rings. Black craft foam covers the rims. Silver star collars give the prop the look of an adjustable dumbbell. It’s designed to be held for costume photos, stage work, and display.
These measurements make one prop, about 40 cm (15¾ in) long. The product images are simulations and the diagrams show the intended build. The dimensions were checked on the plan. A physical prototype has yet to be tested.
In this guide
- Materials for one dumbbell
- Basic tools
- Dimensions and templates
- How to make the cardboard and PVC dumbbell
- How to paint cast iron, steel, and rubber
- How to make fake weights look heavier
- Five finishes for different costumes
- Common mistakes and how to fix them
- Taking the prop to a convention
- Frequently asked questions
- Take one test photo
Materials for one dumbbell
| Material | Approximate amount | Purpose | Budget option | Colombian price reference |
|---|---|---|---|---|
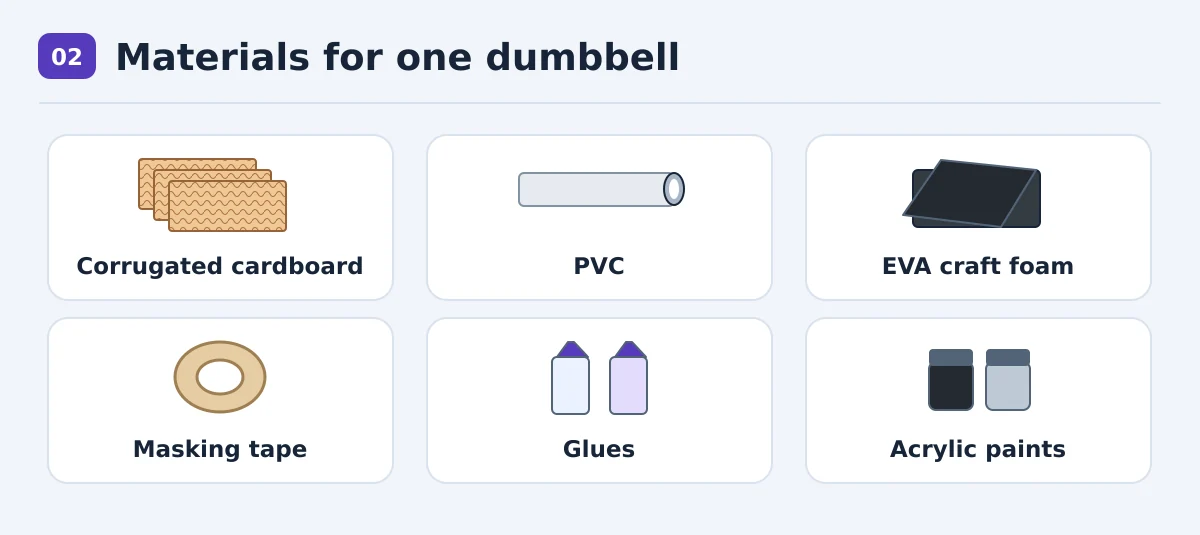
| Flat corrugated cardboard | Four large stacks, two small stacks, and four spacers. At 5 mm thick, plan on 42 large and small circles in total. | Forms the six plates. | Clean, dry shipping boxes. | COP 0 if reclaimed. |
| Straight rigid PVC pipe | One 39.6 cm (15.6 in) piece, about 30–34 mm (1.2–1.3 in) outside diameter. | Makes the handle and runs through all six plates. | An offcut from a hardware store. | COP 9,900 for a sample 3 m retail pipe. Ask about offcuts. |
| Plain black 2 mm EVA craft foam | One 90 × 70 cm (35.4 × 27.6 in) sheet. The six rim strips use about 2.9 m (9½ ft) of material in total. | Covers the rims and makes the collars and caps. | Plain foam scraps. | COP 7,500 for a sample sheet. |
| White PVA craft glue | One small bottle. | Laminates the cardboard. | White glue you already have. | Check local prices. |
| Adhesive for EVA and adhesive for bonding cardboard to rigid PVC | One small package of each. One product can do both jobs if its instructions cover both bonds. | Attaches the foam and secures the stacks to the pipe. | Use compatible leftovers that pass a scrap test. | Check local prices. |
| Paper masking tape | One small roll. Wide tape can be cut down. | Wraps the grip and holds rim strips during drying. | Leftover paper tape. | Check local prices. |
| Water-based acrylics | Matte black and silver. Dark gray is optional. | Simulates rubber, cast iron, and steel. | Mix black and a little silver to make gray. | COP 2,539 per 30 mL of black and COP 6,324 per 30 mL of silver. |
Sample subtotal in Colombia: COP 26,263 for a full 3 m pipe, a 90 × 70 cm foam sheet, and one 30 mL pot of each paint. Glue, masking tape, tools, and delivery are extra. A second pot of black brings that subtotal to COP 28,802. Reclaimed cardboard and a PVC offcut can bring the cost down. Prices checked on November 9, 2026. Pipe · Foam · Black paint · Silver paint.
Which material works best?
| Method | Ease of building | Expected handling | Relative cost |
|---|---|---|---|
| Corrugated cardboard and PVC | Repetitive cutting, followed by straightforward assembly. | Laminated plates keep their shape in dry conditions. The handle is rigid. | Low with reclaimed cardboard and pipe. |
| Thick EVA foam with a lightweight handle | Cuts readily with a sharp blade. Layers still need to be stacked and glued. | Softer edges and lightweight construction. Thin EVA works best as a covering. | Higher if you need to buy several thick sheets. |
| Flat cardboard silhouette | Quickest to cut. | Very light and looks flat from the side. | Minimal if you reuse a box. |
Foam dumbbells are also used for photoshoots. The laminated cardboard here lets you build six distinct plates from common materials. Example of EVA foam dumbbells for cosplay.
Basic tools
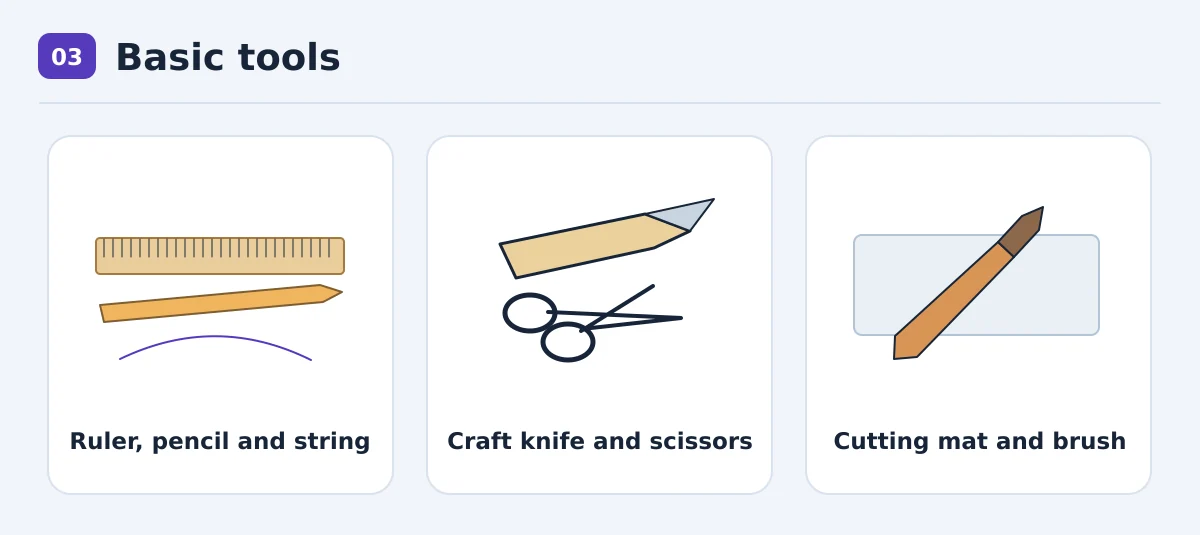
Gather a ruler, pencil, string, scissors, a sharp craft knife, a cutting mat, and paintbrushes. A heavy book and two flat scraps make a simple press. Ask the hardware store to cut the PVC square and smooth the edges. That leaves the rest of the build to ordinary craft tools.
Dimensions and templates
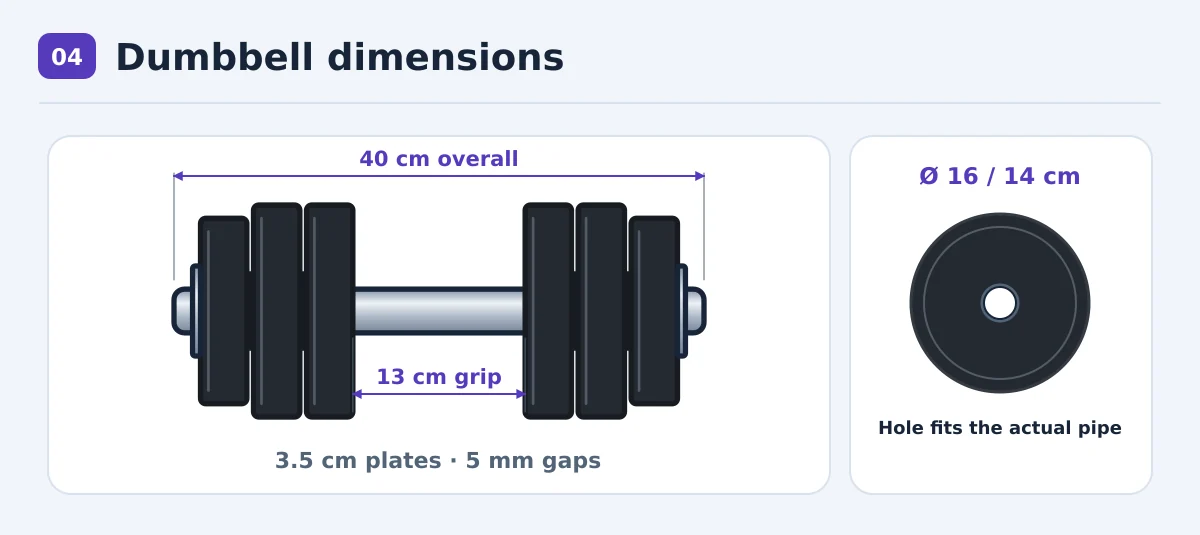
| Part | Size and quantity |
|---|---|
| Center pipe | 39.6 cm (15.6 in). Two 2 mm EVA end caps bring the length to 40 cm (15¾ in). |
| Exposed grip | 13 cm (5.1 in), centered. Each mark sits 13.3 cm (5.24 in) in from the end of the bare pipe. |
| Large plates | Four at 16 cm (6.3 in) finished diameter. Cardboard cores measure 15.6 cm (6.14 in). |
| Outer plates | Two at 14 cm (5.5 in) finished diameter. Cardboard cores measure 13.6 cm (5.35 in). |
| Plate thickness | About 3.5 cm (1⅜ in) each. Aim for six matching thicknesses. |
| Spacers | Four at about 6 cm (2.36 in) outside diameter and 5 mm (0.2 in) thick. |
| Star collars | Two at about 6 cm (2.36 in) across. Three layers of 2 mm EVA per collar. |
| Center holes | Trace the actual outside diameter of the pipe and check the fit on scrap cardboard. |
Each side has three 3.5 cm plates and two 5 mm spacers, for a stack 11.5 cm (4.53 in) wide. Add a 2 cm (0.79 in) capped end on either side of the 13 cm grip to reach 40 cm. The stars slip over those ends and sit against the outer plates. If your cardboard builds up differently, measure the dry stack and check symmetry before gluing.
How to make the cardboard and PVC dumbbell
1. Draw the two plate templates
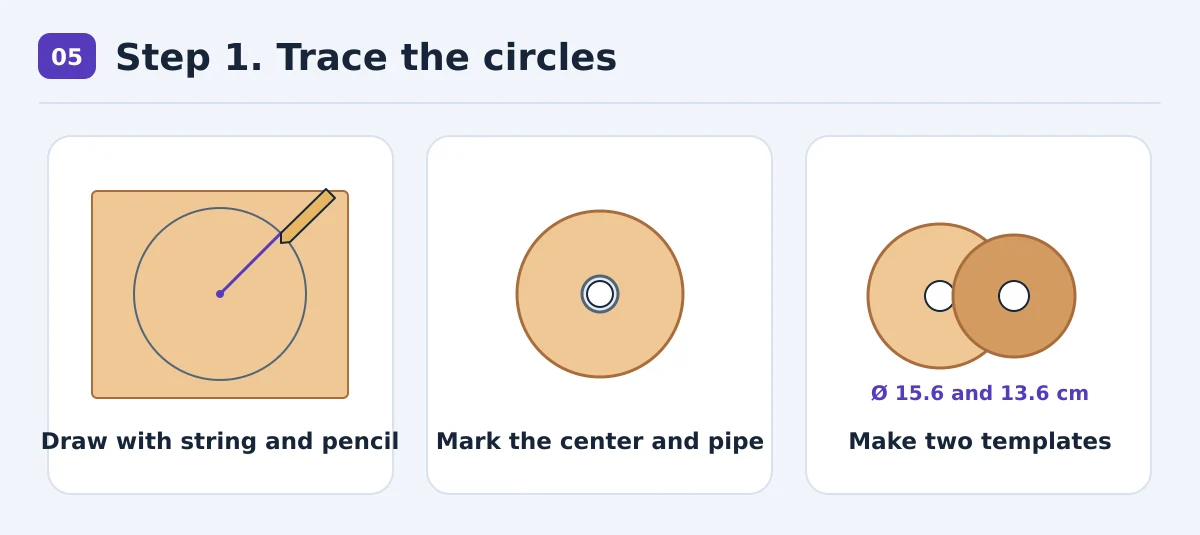
Open clean, dry boxes into flat panels. Tie string to a pencil and tape its other end to the center of the cardboard. Pull it taut as you draw. Use radii of 7.8 cm and 6.8 cm (3.07 and 2.68 in). Trace the end of your actual pipe at the center. Make a third template, 6 cm (2.36 in) across, for the spacers.
2. Cut the circles and test the holes
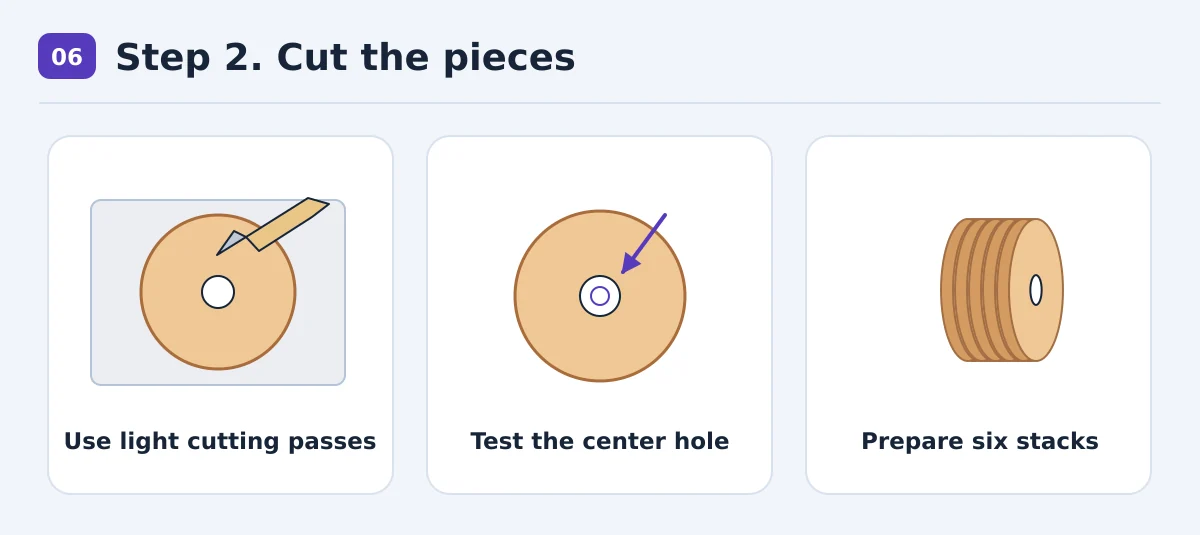
Cut a test hole in scrap cardboard. Start slightly undersized and trim gradually. The piece should slide onto the PVC with light friction and sit square. Copy the hole onto the other pieces once the test fits. Use several light cuts on the mat. Keep your free hand clear of the blade’s path and put the knife away when you finish.
Make four large stacks and two small ones. Seven layers of 5 mm board give the target 3.5 cm thickness before pressing. Cut the four spacer rings from board of the specified thickness or laminate scraps to build it up.
3. Glue and press the cardboard stacks
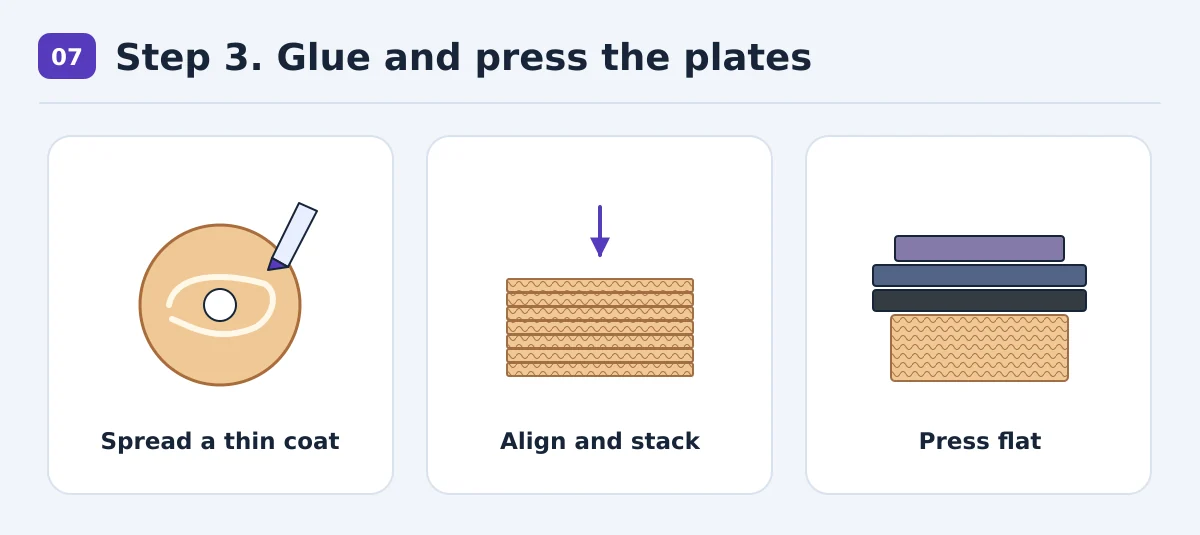
Spread a thin coat of white glue between layers. Rotate the direction of the corrugations as you stack, and align the holes. Use the clean pipe to check the alignment, then remove it before pressing. Press each stack between flat surfaces under a book. Follow the glue label for drying, then measure all six stacks.
4. Prepare the PVC handle
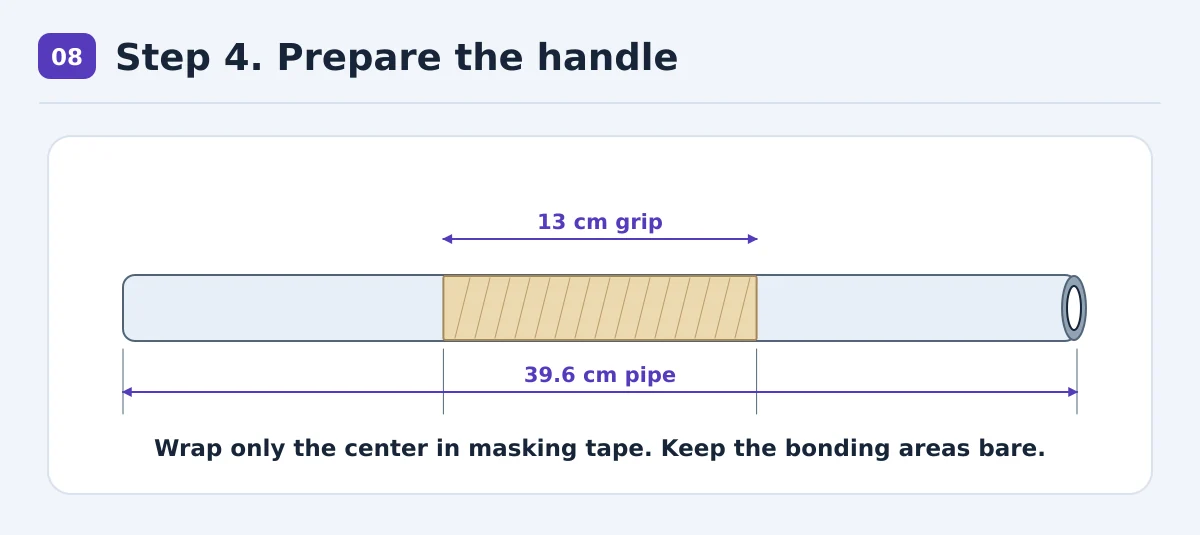
Mark the 13 cm (5.1 in) grip at the center and wrap only that section with paper tape. Smooth wrinkles as you go. Leave the pipe bare and clean where the plates and collars will bond. Prepare it as directed on the adhesive label. Test both the PVC-to-cardboard and the EVA-to-cardboard joints on scraps. Follow label directions for ventilation and handling if the adhesive contains solvents.
5. Slide on and secure all six plates
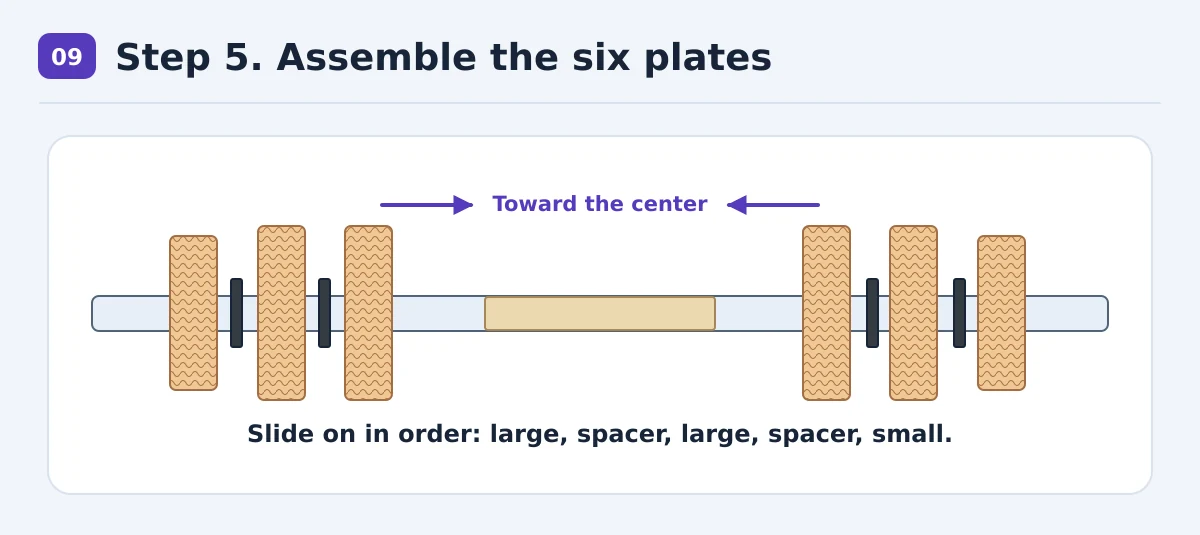
Dry-fit the parts first. Work from each end toward the center in this order: large plate, spacer, large plate, spacer, small plate. The first plate stops at the grip mark. Set the prop down to check that both stacks are square to the pipe and equally spaced. About 18 mm (0.71 in) of bare PVC should extend beyond each stack before capping.
Take the pieces off. If a brush will not fit in the gaps, paint only the outer edge of each spacer first and leave its flat faces bare for glue. Repeat the sequence with adhesive rated for rigid PVC and cardboard. Apply it in the center holes or at their final position on the pipe, as directed by the manufacturer. Glue the cardboard faces that meet the spacers, too. Remove squeeze-out according to the label and hold everything still until fully cured. If a disc shifts under gentle handling, fix the joint before bringing the prop out.
6. Cover the rims and add the mock star collars
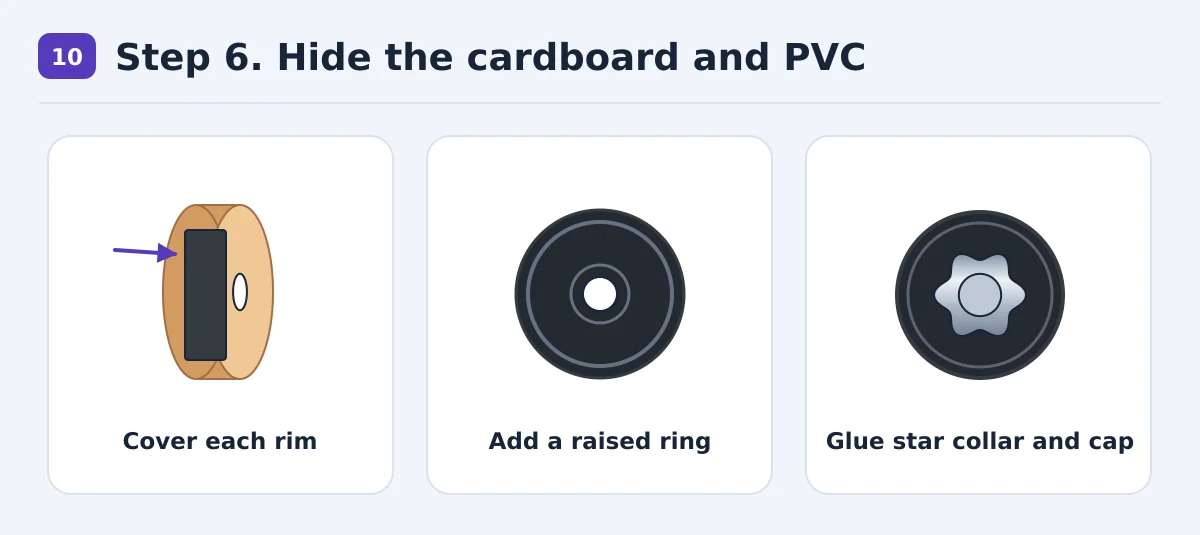
Cut EVA strips to match the width of each plate and leave a little extra length. Start with about 50 cm (19.7 in) for each large plate and 44 cm (17.3 in) for each small plate. Dry-wrap, trim, and glue the strip so the ends meet flush. Cover the six rims individually so the gaps stay open. Hold the strips with masking tape if needed while the adhesive sets. Put the seams on the side least likely to face the camera.
Cut six small rounded stars with center holes. Laminate three per collar and glue one against each outer plate. Cut two flat 2 mm foam circles to the pipe’s outside diameter and bond one to the full rim of each pipe opening. An optional thin foam ring on the outer face suggests a cast plate. Test the adhesive and paint on an EVA scrap first.
7. Paint the prop and let it cure
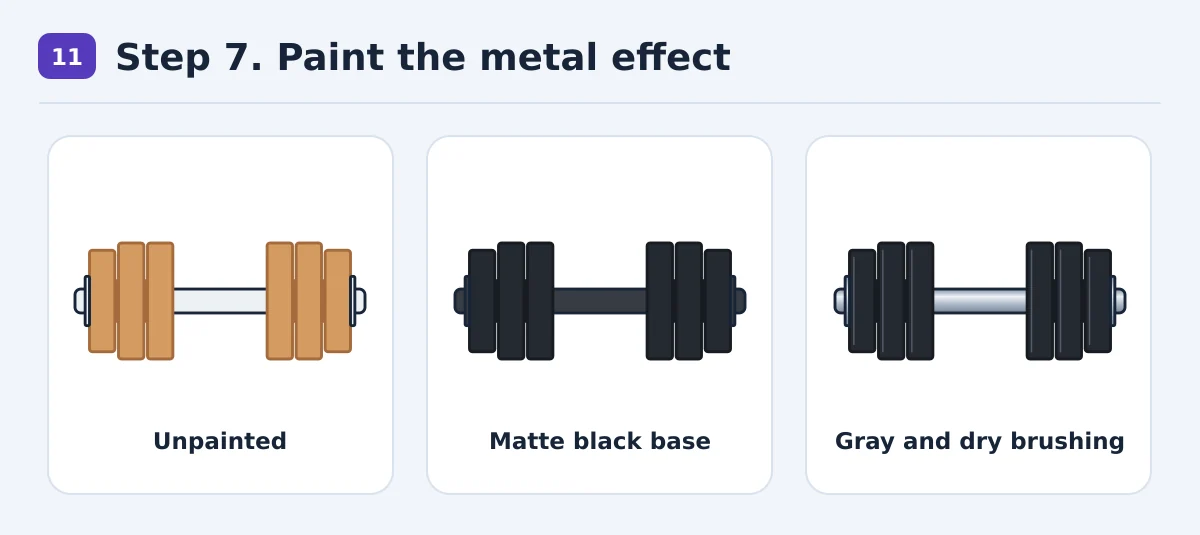
Brush thin coats of matte black onto exposed cardboard, the spacers, and areas that should look like iron. Use dark gray followed by silver on the taped grip, collars, and caps. For any exposed PVC you want to paint, wrap it with paper tape once the joints are cured or use a primer rated for the plastic. Allow coats to dry and follow the paint maker’s instructions before packing the prop.
What the finished prop looks like
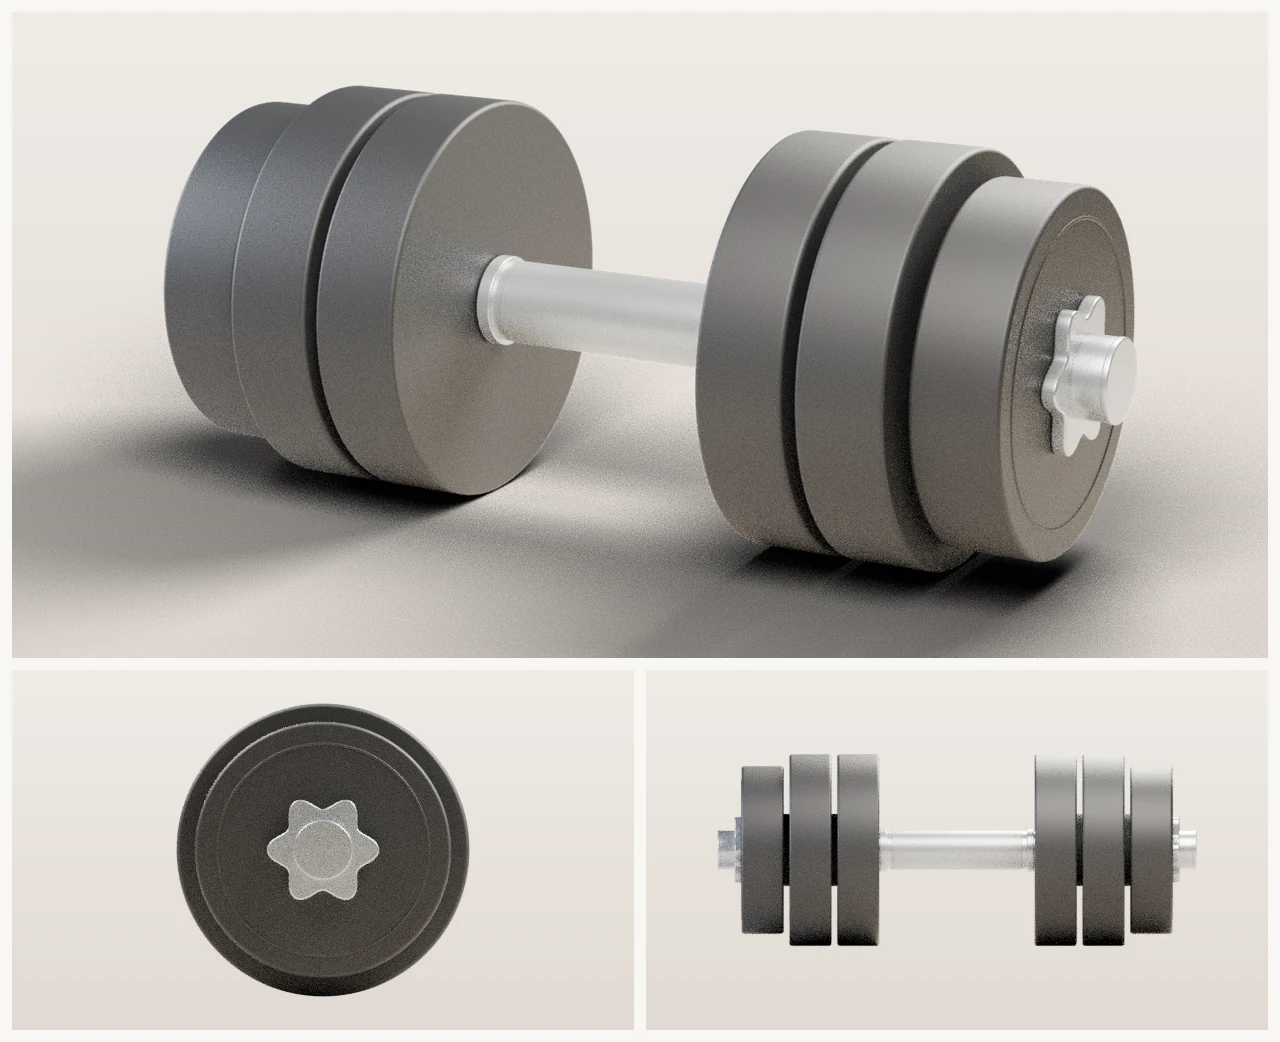
The two gaps on each side and the smaller outer plate create the adjustable profile. Hold the dumbbell by the center and look at it head-on and from the side. Check that the cardboard and pipe edges are covered and that the discs stay put during gentle handling.
How to paint cast iron, steel, and rubber
- Cast iron. Keep the faces matte black and pick out the rims in graphite gray. Load a brush with a little silver, wipe almost all of it off on paper, and skim a few raised edges. This is dry brushing.
- Steel. Start the grip in medium gray and brush on thin silver coats in one direction. A dark gray line where each plate meets the handle suggests depth. Dab the dry base with a nearly dry sponge for a hint of grip texture.
- Rubber. Leave the EVA matte black. Stipple it with a little dark gray to create a fine texture without a metallic shine.
- Wear. Add silver where a real dumbbell would rub, such as the outside rim or the rounded lobes of the collars. Keep the gaps dark so the plate edges remain distinct.
Prop painting demonstration by Punished Props Academy.
How to make fake weights look heavier
The large plates give the prop volume. The smaller outer ones add a visible step. Optional numbers cut from card stock or thin EVA read like cast markings with a touch of gray. If you add a decorative weight number, label the inner face or handle PROP as well. For photos, angle the dumbbell so the camera can see both gaps on the closer side.
Five finishes for different costumes
| Style | Finish |
|---|---|
| Classic gym | Matte black plates, graphite rings, and a satin silver grip. |
| Futuristic | Bright accent stripes on the rings and cool gray on the grip. |
| Superhero | Two costume colors and a custom EVA emblem. |
| Retro | Iron gray, cream numbers, and lightly worn rims. |
| Fantasy or villain | Aged bronze and raised symbols made of soft EVA. |
Common mistakes and how to fix them
| Problem | Fix |
|---|---|
| Crooked plates | Use the same hole pattern, dry-fit on the pipe, and press each stack flat. |
| Visible glue | Apply thin coats, wipe away squeeze-out as directed, and butt the foam seams. |
| Uneven paint | Use light coats, allow them to dry, and try your finish on scrap. |
| Loose or spinning plates | Check the fit and the adhesive’s compatibility. Wait for full cure and repair any loose joints before using the prop. |
| One solid-looking block | Wrap the rims separately and keep all four gaps clear and dark. |
Taking the prop to a convention
Check the current prop policy for your venue. If you find a cosplay contest rulebook, ask whether general admission has separate rules. Keep a photo of the build or the materials handy in case staff ask. Admission depends on the event’s own inspection and rules. Comic Con Medellín’s official site.
Pack the prop in a padded bag or box and keep it dry. Carry it close to your body in crowded aisles. Use it for controlled poses and avoid throwing, striking, letting others test their strength with it, or holding it over anyone. Pack it away if it gets wet, a rim opens, or a plate shifts.
Frequently asked questions
Can I use a cardboard tube instead of PVC?
A thick mailing tube can work for display or careful photos. Size the holes and choose the adhesive to suit the tube. Cardboard can crush under a tight grip and loses stiffness if it gets wet.
How much does it weigh?
The finished weight depends on the pipe, cardboard, and glue. Weigh it on a kitchen scale if you need a number. Any plate markings are decorative.
How sturdy is it?
It is designed to be held by the grip for controlled poses. Keep it away from loads, drops, and contact choreography. Check the joints after building it and before each use.
How long does the build take?
Split it into three sessions if you like: cutting and gluing layers, assembly and wrapping, and painting. Drying and curing times vary with the products and board thickness. Start well before the event.
How much does it cost to make?
That depends on your supplies. Reclaim shipping boxes and ask for a short PVC offcut first. The materials table separates reference prices from items you can price locally.
Do I need spray paint?
Water-based acrylics, a brush, and a test scrap are enough for matte rubber, dark cast iron, or satin steel. Build the black, gray, and silver in light coats.
Can I reuse it for another costume?
Yes. Store it dry and repaint accents with compatible paint. Inspect the joints and edges after storage. Keep the structural parts permanently attached.
Take one test photo
Once the grip is centered, the rims are covered, and the gaps are visible, take a test shot from the side. Add a little silver if the rim details disappear under your lighting.
For another take on handcrafted effects, see how the 1990 Ninja Turtles movie brought its costumes to life.