
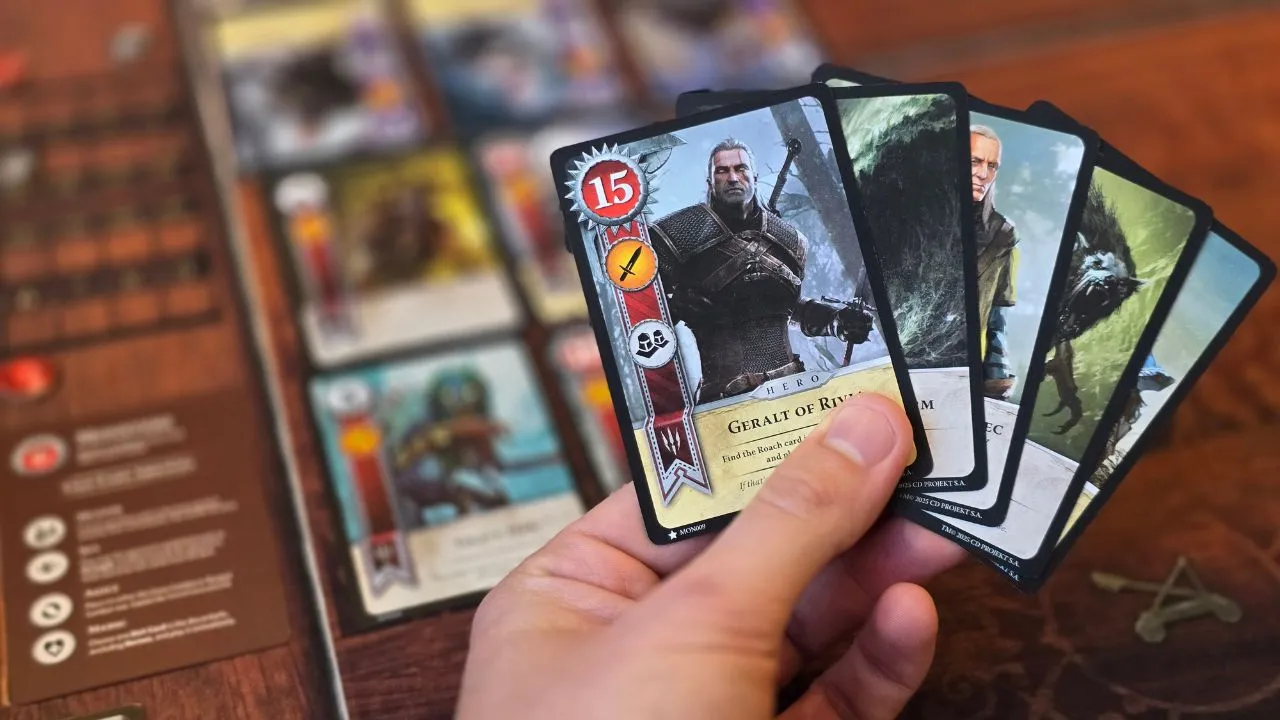
Gwent is easier to learn with a card in front of you. We will look at its numbers and symbols, place it on the board, and play a very simple round. You do not need any previous experience with card games.
The first part teaches Gwent in The Witcher 3. Farther down, you will find a separate tutorial for standalone GWENT, which has different rules. Follow one version at a time.
Start with these three lessons: reading a card → recognizing card types → playing your first round. Save the history and advanced strategies for later.
Full contents: tutorials, collecting, and history
Before you play a card: what is the goal?
Two players take turns placing cards on their own sides of the table. Many of these cards have a number showing how many points they contribute. At the end of a round, both players’ scores are compared. The player with more points wins that round.
A round is one part of a match. The match is the entire contest. You normally need to win two rounds to win the match: you can win 2–0, or lose the first round and come back to win 2–1. We will cover ties later.
The main decision is how many resources to spend winning each round. You do not receive a fresh hand of ten cards whenever a new round starts: the cards you save are what you will use later.
Lesson 1. Understanding each part of a card
First, look at this sample unit. A unit is a card representing someone or something in your army: a soldier, sorceress, monster, or machine. You usually place it in a row on your side, where it adds points.
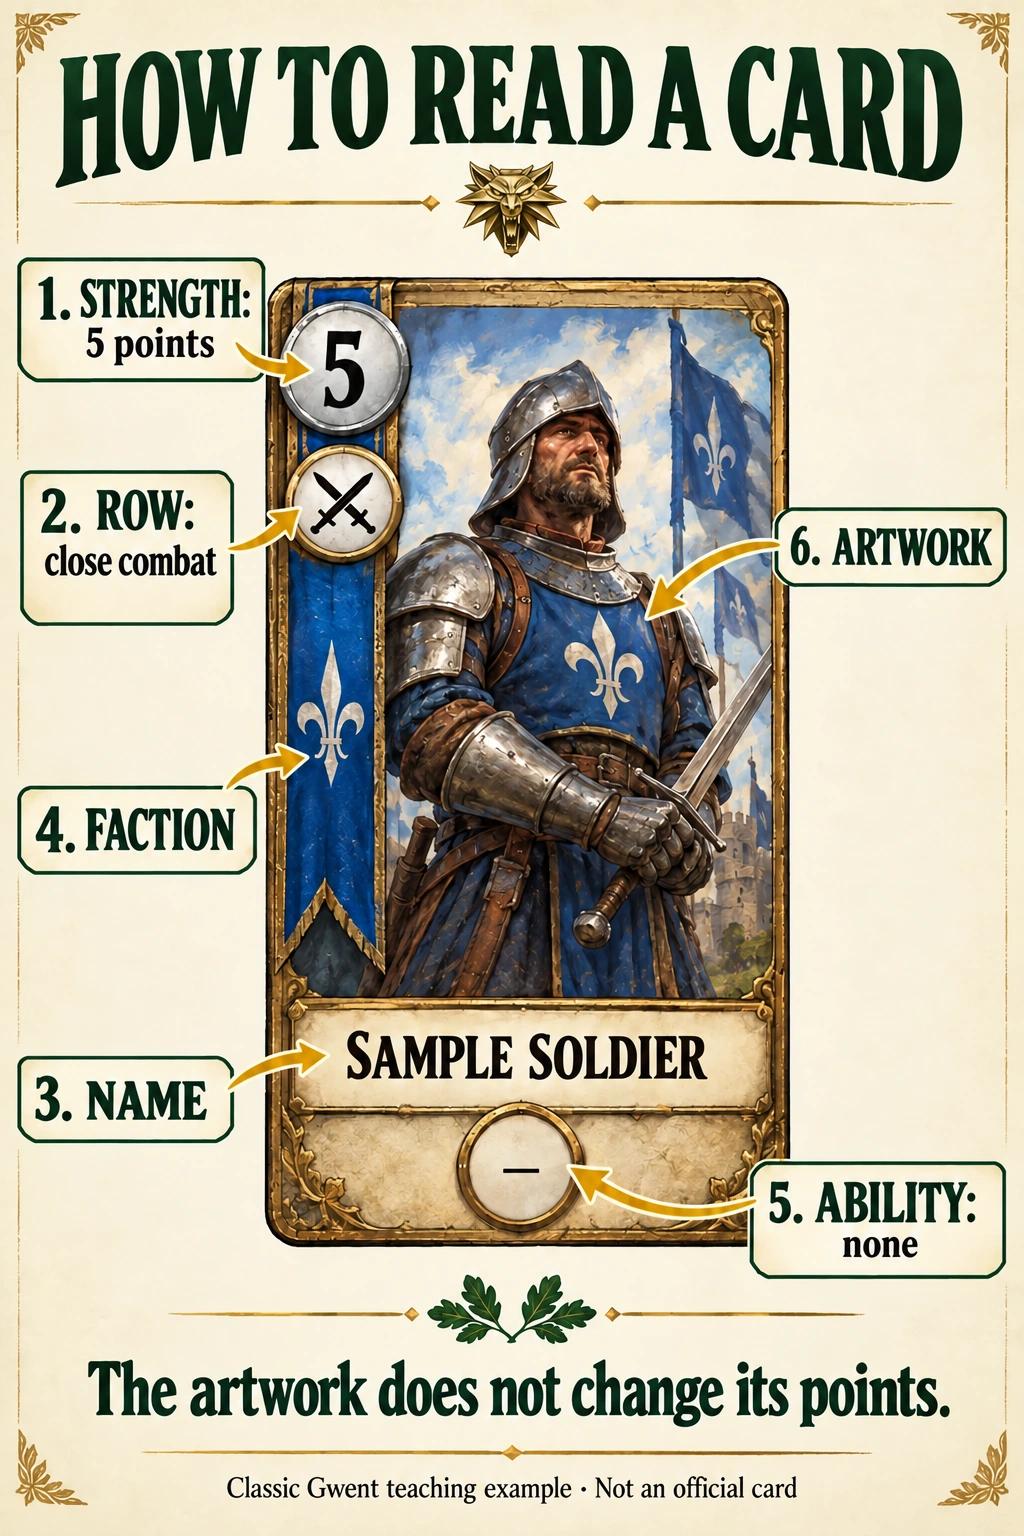
1. The large number is its strength
The 5 in the corner means this card contributes five points unless an effect changes it. If you already have a 4-strength unit and add this 5-strength unit, your total becomes 9.
It does not mean five lives or five attack points. Cards do not automatically hit each other. A 5-strength swordsman does not destroy a 4-strength archer: both stay on the board, adding points for their respective players.
The printed number is the starting strength. An effect may increase or reduce it during a round; check the value the game displays after the change.
2. The small symbol tells you where to place it
A sword or crossed swords: the close combat row. A bow: the ranged combat row. A siege engine: the siege row. These symbols tell you where the card belongs, not what it should attack.
If a card allows both close and ranged combat, you can choose either row when playing it. This ability is called Agile. It does not let you move the card freely afterward.
3. The name identifies the card
Two cards with similar artwork can do different things. Check the full name when comparing a card with this guide. In our illustrations, “Sample Soldier” identifies an invented card used to explain a rule; you do not need to find it in The Witcher 3.
4. The faction is the army it belongs to
A faction is a group of cards that can form an army. Northern Realms, for example, has its own cards and a faction ability. Its symbol and colors help identify it. You cannot freely mix units from every faction when preparing your deck.
Neutral cards can accompany any of the classic factions. Geralt is one example. The game shows which cards you can select for your army.
5. An ability is an additional instruction
Some units do more than add points. One might bring back another card; another might let you draw two. The ability symbol flags that extra instruction. A card without an ability simply contributes its strength.
Do not confuse the row symbol with the ability symbol. “Siege” tells you where to place a card. “Medic” tells you what happens when you play it. Read the in-game card description before confirming your move.
6. The artwork helps you recognize it
The illustration does not determine strength or abilities. A huge monster may contribute fewer points than a small character. Read the card’s information to find out what it does.
Quick check: a card has 5 strength and a bow symbol. What do you do with it?
Place it in your ranged combat row. It contributes five points unless another effect changes it. It does not automatically shoot anyone.
Lesson 2. The different card types
Start by learning to distinguish these four possibilities. A Hero is a special kind of unit. Spy and Medic, which we will cover later, are abilities: they do not replace this classification.
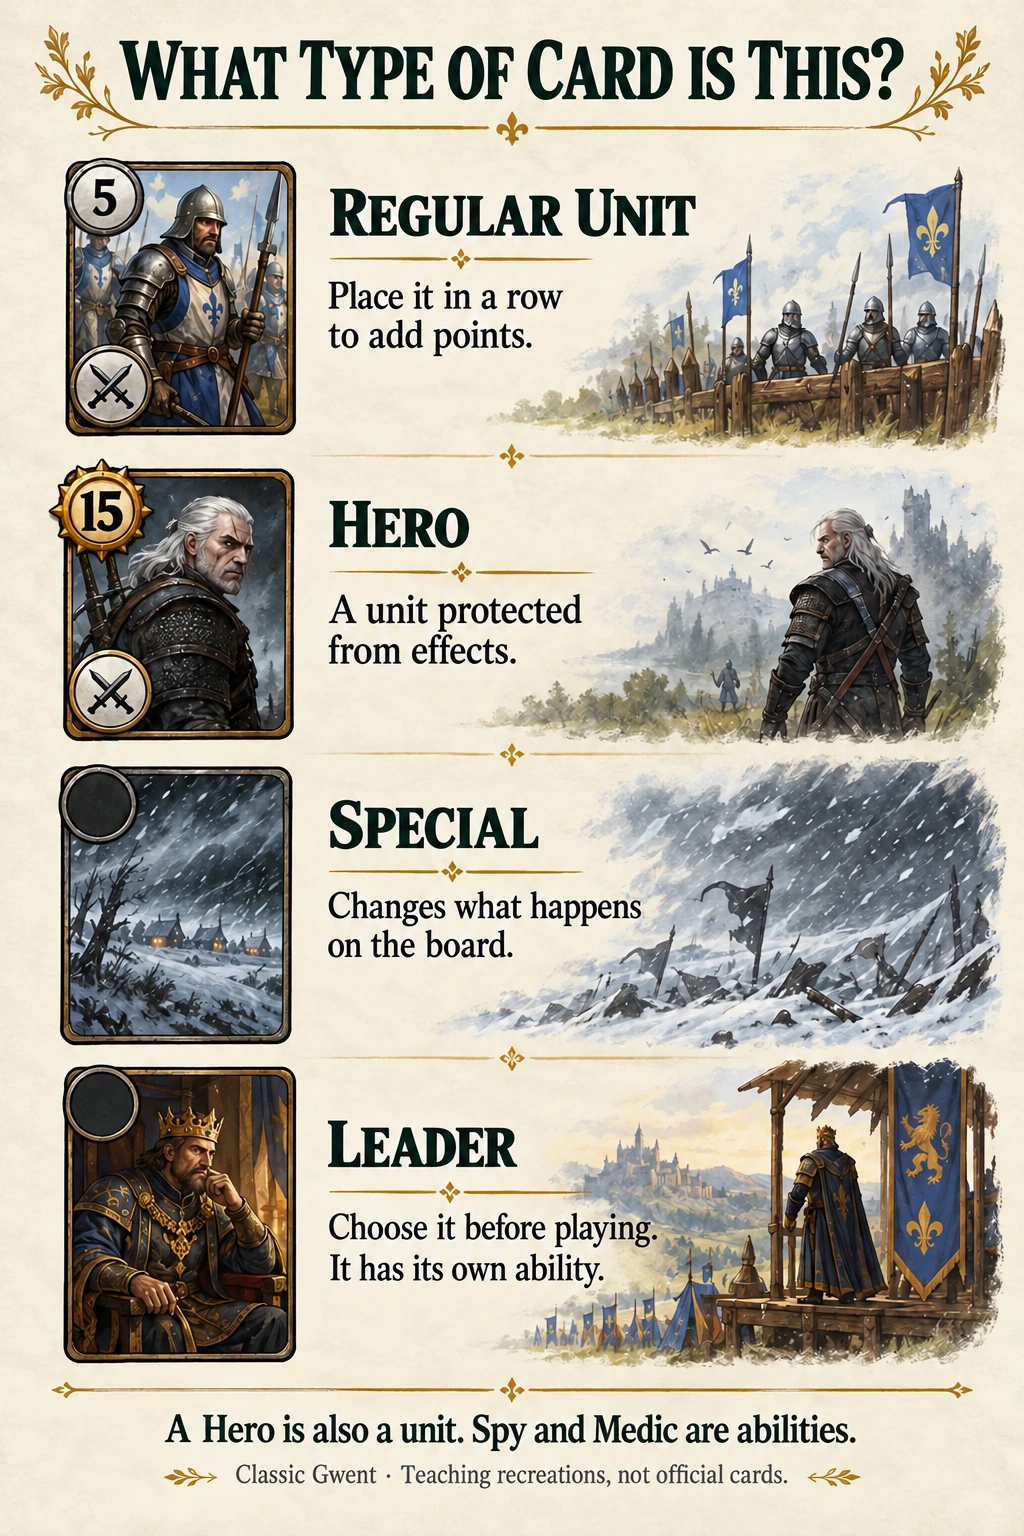
Regular unit: a card that adds points
Play it from your hand and leave it in the indicated row. Its strength is added to your score. A regular unit may have an ability or none at all.
Example: Ves is a 5-strength close combat unit. Playing her adds five points. A Ballista is a 6-strength siege unit, adding six in that row. If both are on your side and nothing modifies them, you have 11 points.
“Regular” does not mean weak. Some of the best combinations use regular units because certain effects can increase their points.
Hero: a unit protected from effects
A Hero card is also played in a row and contributes points. The difference is its immunity to effects that normally modify or remove units. In classic Gwent, look for the Hero marking around its number: a distinctive outline with rays or points. On screen, this usually has a gold treatment. A famous character in the artwork does not automatically make a card a Hero.
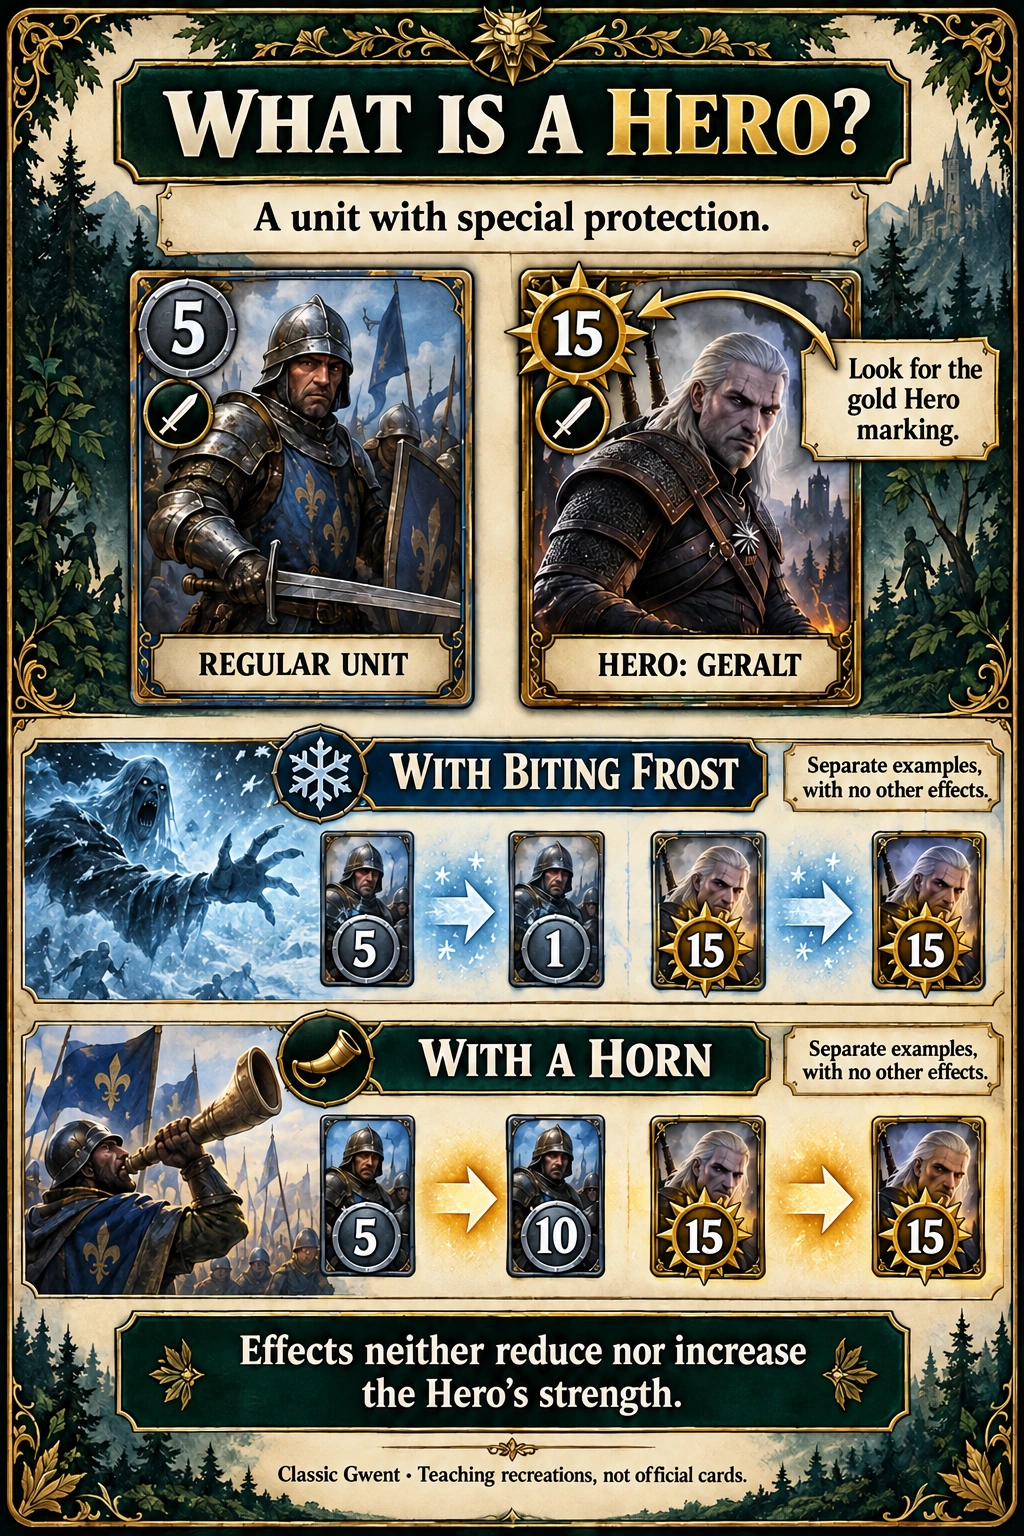
Real example: Geralt is a 15-strength Hero. Playing him in his close combat row adds fifteen points. With Biting Frost, he stays at fifteen. With a Commander’s Horn, he also stays at fifteen: his protection prevents both those reductions and those increases.
Scorch does not destroy Geralt. You cannot return him to your hand with a Decoy or retrieve him from the discard pile with a Medic. His protection does not mean he stays forever: he leaves the board at the end of a round according to the rules.
A Hero can also have an ability of its own. Yennefer, for example, is both a Hero and a Medic: she contributes eight points and can bring back an eligible unit. Her immunity does not cancel that ability. Nor is every Hero worth fifteen points.
Remember: “Hero” describes a card rule, not the character’s importance to the story. This immunity belongs to classic Gwent; a gold card in standalone GWENT works differently.
Special card: an effect instead of strength of its own
A special card does not have a strength number like a unit. You use it to trigger an effect. It does not always go in one of your rows: the game asks for the appropriate target or area.
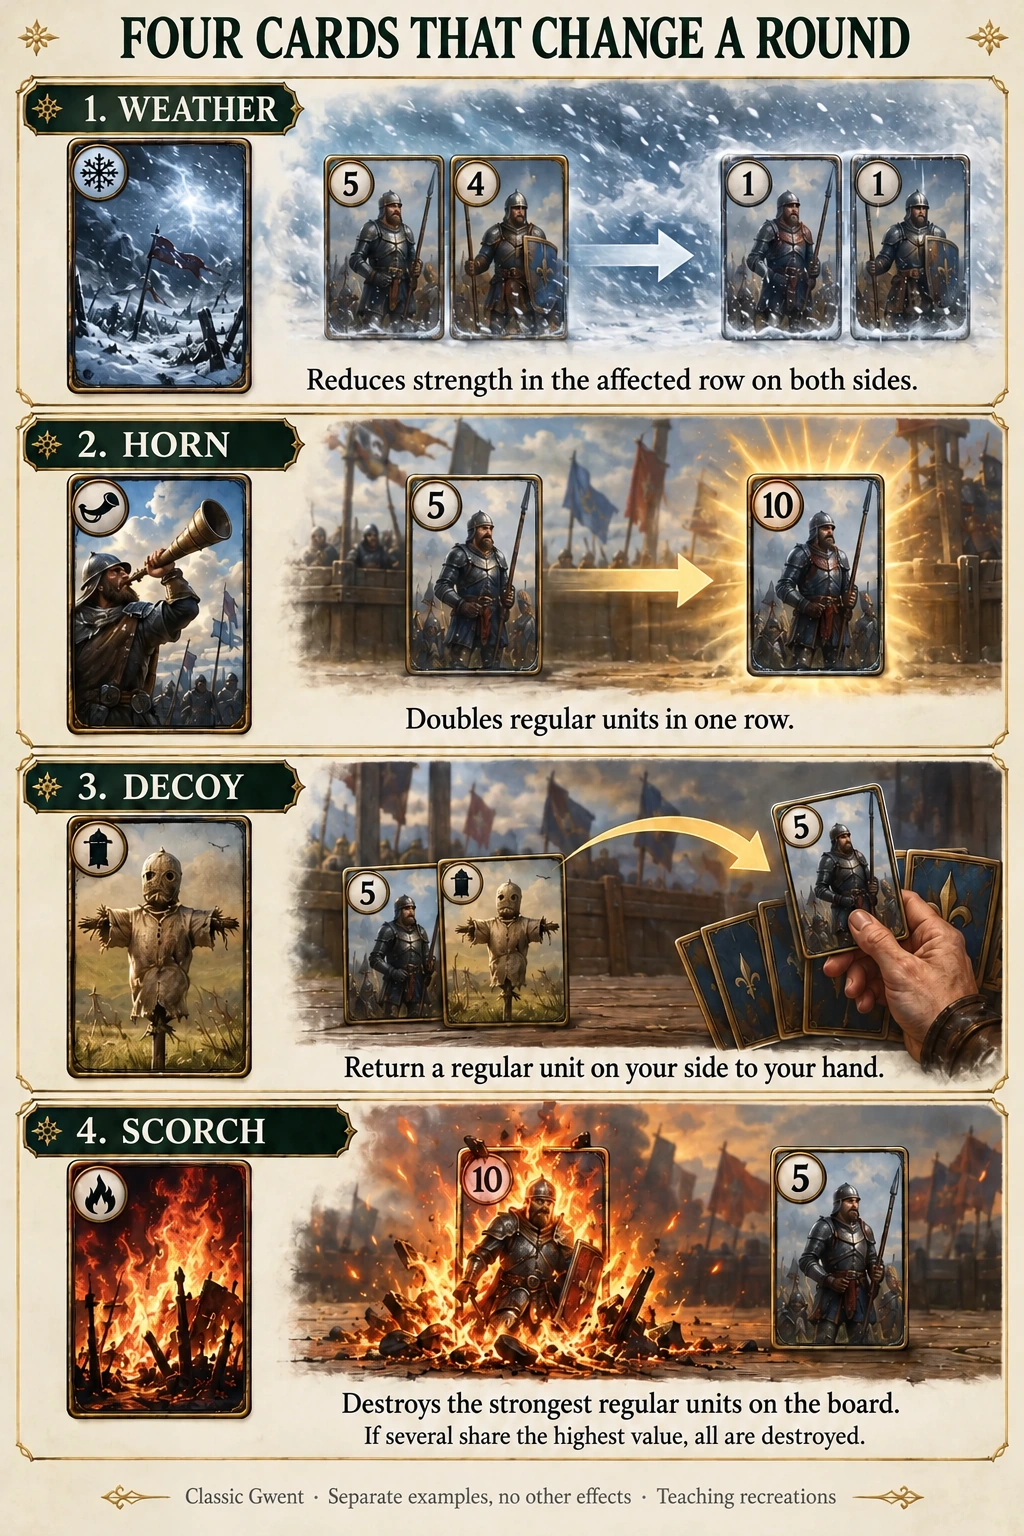
Weather: changes regular units’ strength in a particular row on both sides. Horn: doubles regular units’ points in one of your rows. Decoy: returns an eligible unit on your side to your hand. Scorch: removes the regular units with the highest strength on the board. Below, you will learn when to use each.
Leader: selected before the game begins
The leader heads your deck. You choose it during preparation, and it appears separately from your opening ten cards. You do not have to wait to draw it. Its ability may be a button you activate or a rule that works automatically.
In classic Gwent, activating an available leader ability takes your action for that turn: you do not also play a regular card that turn. Active abilities are used once per match; passive effects do not require that activation button.
There are several Foltest cards with different abilities. Read the title and description of the version you selected. A Foltest who clears weather does not do the same thing as one who doubles siege strength.
Rules cross-checked against the official classic manual and Prima’s ability guide. Illustrations are educational recreations, not screenshots or official cards.
Lesson 3. Your hand, deck, and board rows
Before playing, locate three things: the cards you can use now, the reserve you can still draw from, and the area where you will place cards.
Your hand: the cards available to play. They are called your hand even when the video game displays them along the bottom of the screen. Your deck: the pile of cards you prepared before starting. You cannot freely choose a card that is still inside that pile.
Drawing a card means taking it from your deck and adding it to your hand. You are not taking it from your opponent. The discard pile contains used or destroyed cards. You cannot play cards from there unless an effect lets you retrieve them.
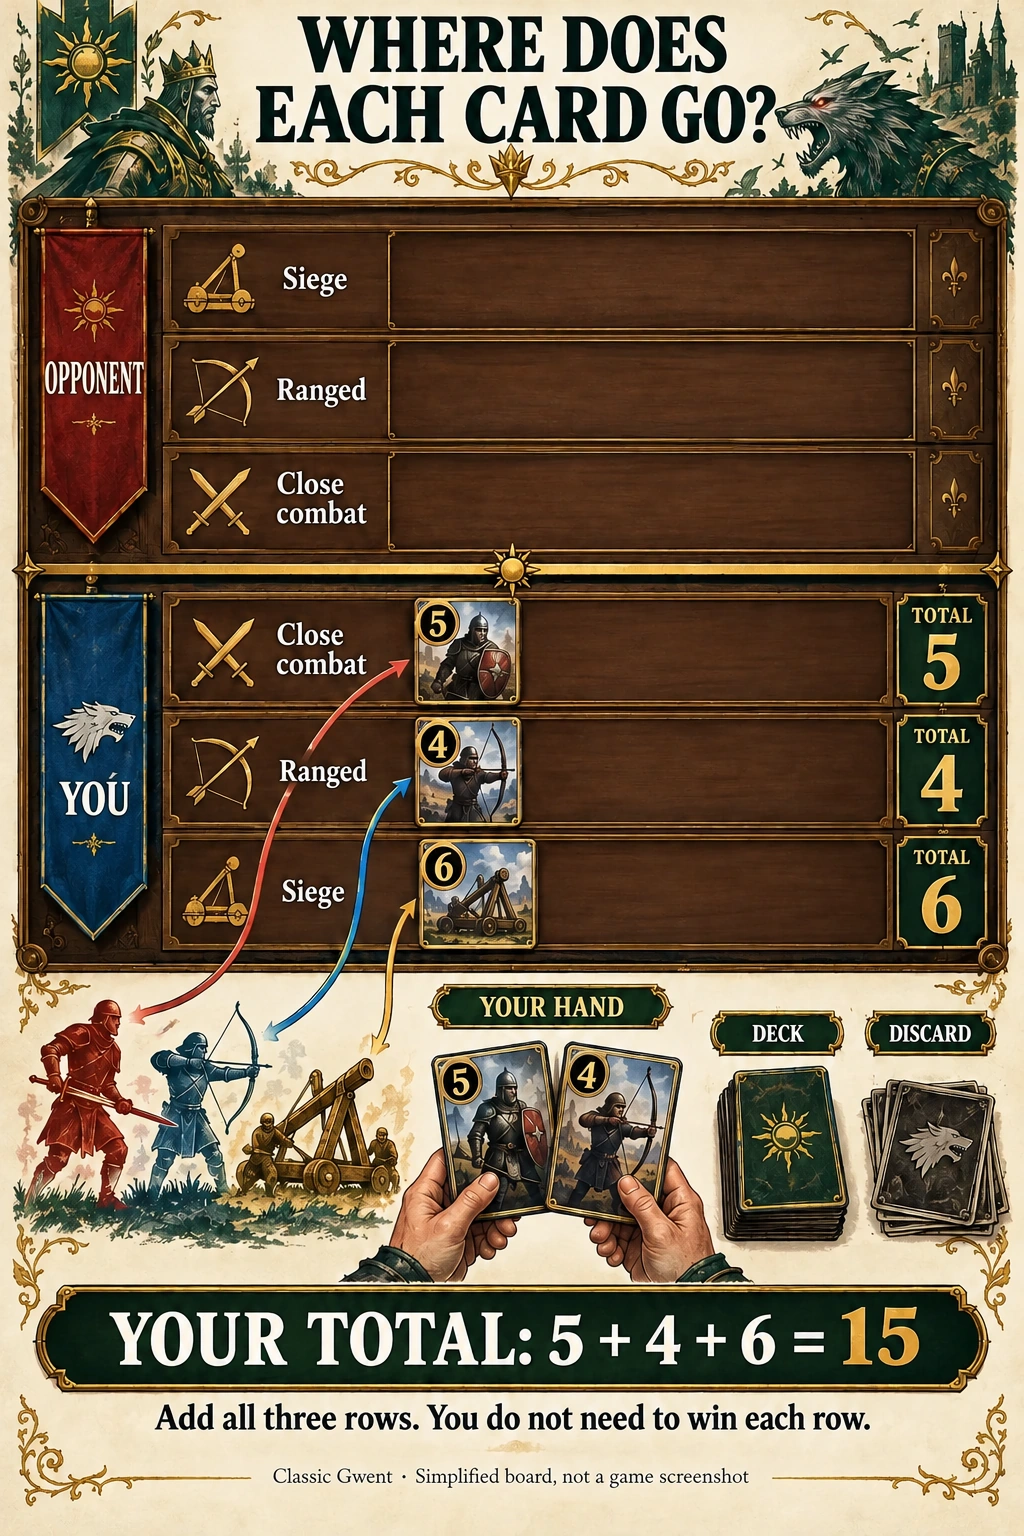
Your side has three rows
Close combat is the row nearest the center. Ranged combat is behind it. Siege is nearest your hand. Your opponent has the same three rows, facing yours.
Place each unit in the row indicated by its symbol. A siege engine cannot go in close combat simply because you need more points there. Agile units are the exception, allowing a choice between two rows when played.
Then add all three of your rows. In the illustration, 5 + 4 + 6 = 15 points. Compare that total with your opponent’s total. It does not matter whether you lose an individual row or leave one empty.
What the gems and weather area mean
Each player’s two gems represent the rounds they can lose. Losing a round costs one gem. Lose both gems and you lose the match.
Weather cards go in their shared area. Their effects reach the indicated row on both sides. Leaders have their own space outside the unit rows.
Quick check: you have 5 in close combat, 4 in ranged combat, and 6 in siege. Your opponent has 14 total. Who is ahead?
You are, 15 to 14. Compare total scores, not individual row results. The round can still change if someone plays more cards or modifies those already in play.
Lesson 4. Playing a round without abilities
A turn is your opportunity to act. One player acts, then the other. For this first demonstration, we will use only regular units without abilities. These are invented cards with simple values, not a full deck.
Suppose you go first. Both players have other cards in hand, but will only spend the ones shown. No leader or ability modifies the scores.
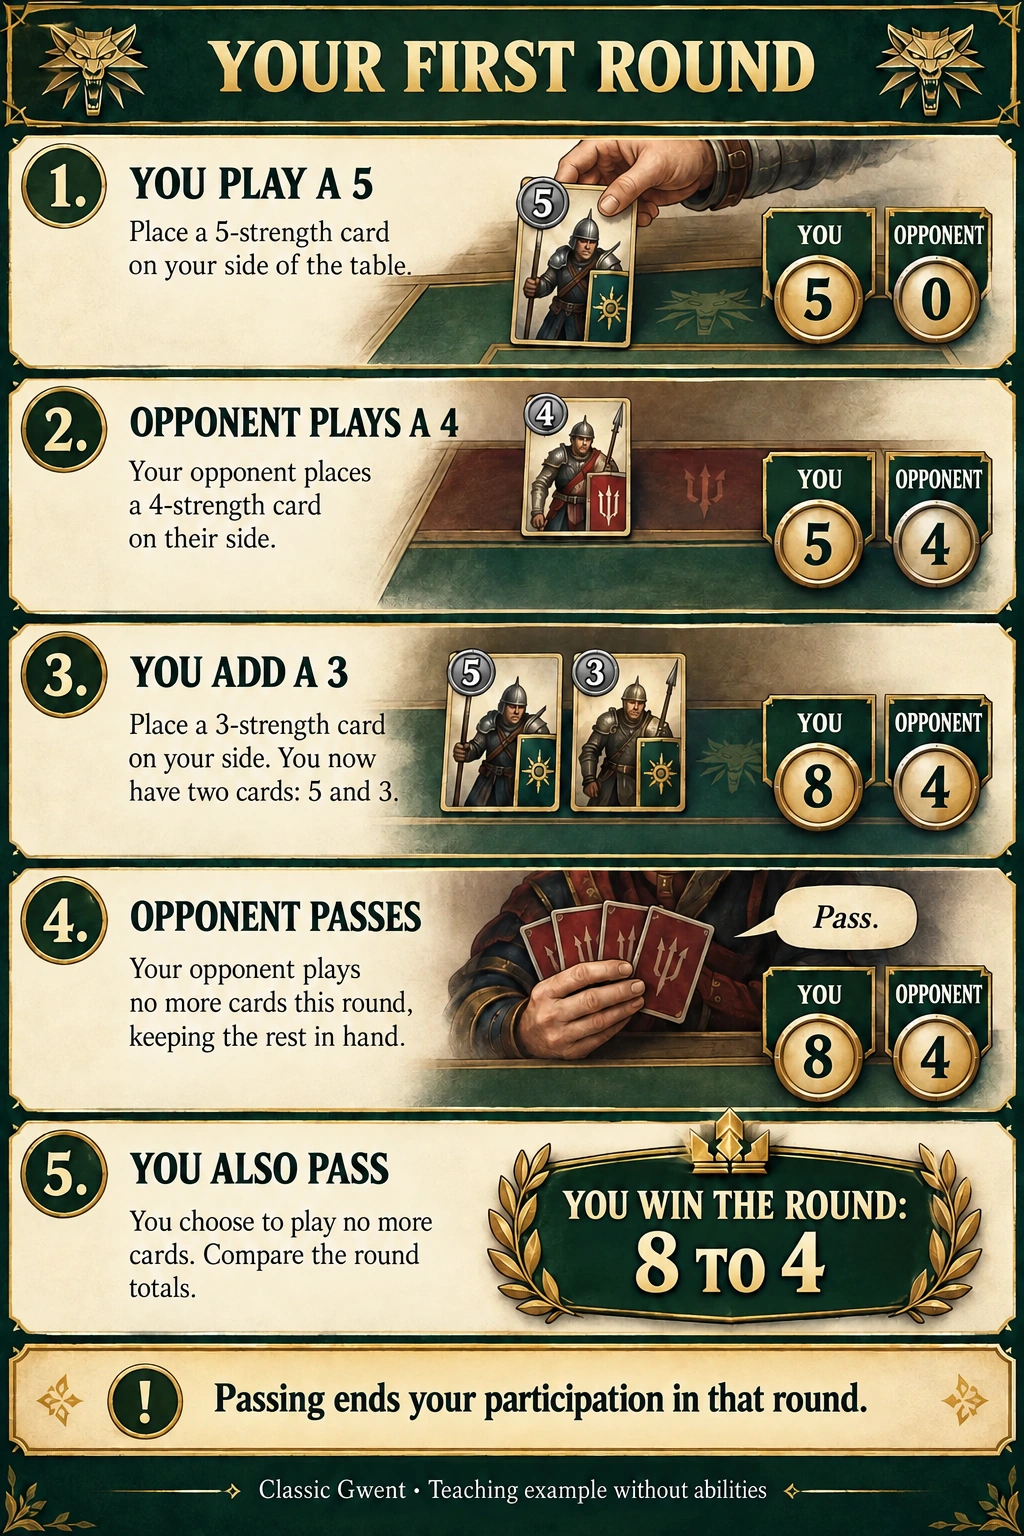
Step 1. Play a card
Choose the 5-strength card from your hand and place it in its row. It leaves your hand and stays on the board. You now have five points. You cannot play as many cards as you want all at once.
Step 2. Your opponent responds
Your opponent plays a 4-strength card on their side. The score is you 5, opponent 4. Both units stay on the board: they do not subtract from or attack each other.
Step 3. Add another card
It is your turn again. You play a 3-strength unit. Keep your previous five points and add three more. You now lead 8 to 4. You have spent two cards from your hand.
Step 4. Your opponent passes
Your opponent decides not to spend more and passes. This means “I will take no more actions this round,” not “I will skip one turn and come back later.” Their played cards still count, and their unplayed cards are saved for later rounds.
When one player passes, the other can keep playing alone. In this example, you are already ahead. Spending another unit just to go from eight to thirteen does not win you an extra round.
Step 5. You pass too, and the scores are compared
You decide to pass. Both players have now passed, so the round ends. Your eight beats their four: you win this round. Your opponent has one gem left. Without carryover effects, units on the board go to the discard piles and the score resets.
In the next round, you play with the cards you saved. You do not automatically receive another ten. Some abilities do let you draw: Northern Realms, for example, draws one card after winning a round. That is its faction bonus, not a rule shared by all players.
What if you pass while you are losing?
You can do that too. Suppose your opponent already has thirty points and you have only five. If you do not want to spend lots of cards catching up, you can pass and accept losing that round. If you still have both gems, you can try to win the next two.
If you have already lost one round, losing another ends the match. Saving cards for a fourth round is pointless: there is no fourth round.
Two details to learn once you understand the basics
Ties: both players normally lose a gem; classic Nilfgaard wins ties through its faction ability. After passing: your opponent can still change your points with weather or destroy cards. Passing while ahead does not freeze the score or guarantee a win.
What would you do? You lead 8 to 4 and your opponent has passed. There are no pending effects.
Passing saves your cards and secures an 8–4 round win. Any extra cards played unnecessarily are spent and will not return to your hand by themselves.
Rules cross-checked against the official classic manual and Prima’s ability guide. Illustrations are educational recreations, not screenshots or official cards.
Lesson 5. Learn one ability at a time
Now that you know how to add points and finish a round, add these rules one at a time. An ability is a card’s extra instruction. Its icon helps identify it; also read the description to confirm its scope.
Spy: give away points to gain cards
Look for the Spy ability, represented by an eye. This unit is placed on your opponent’s side in its corresponding row. Playing it draws two cards from your own deck.
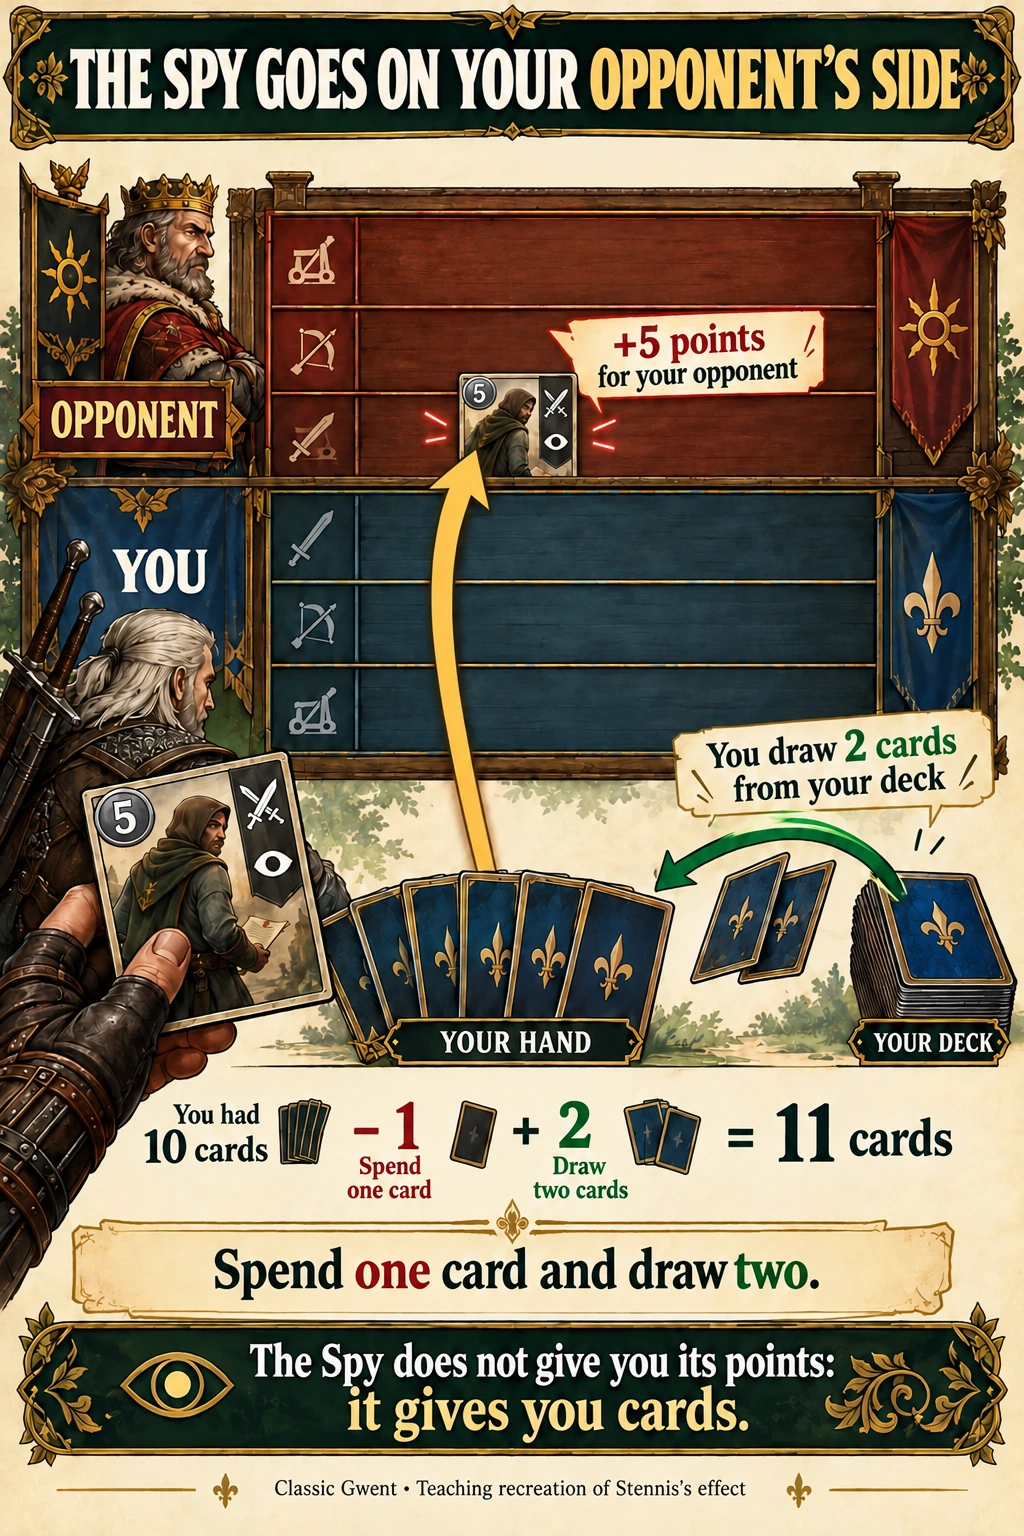
With Stennis: you had ten cards. Playing the Spy spends one, leaving nine. Draw two and you reach eleven. Your opponent receives Stennis’s five points. You gain more options for the rest of the match.
When to try it: early in a match, when you can afford to lose a round in exchange for more cards. When to think twice: in the final round, if the points you give away might cost you the match. If your deck is empty, you cannot draw two new cards from it.
The Mysterious Elf is also a Spy, but is a Hero with zero strength. It keeps its Hero protection; do not assume you can pick it up with a Decoy.
Medic: bring back a unit you have already used
The healing icon identifies the Medic ability. You do not need to heal injuries. When you play a Medic, choose an eligible unit from your discard pile and immediately place it on the board.
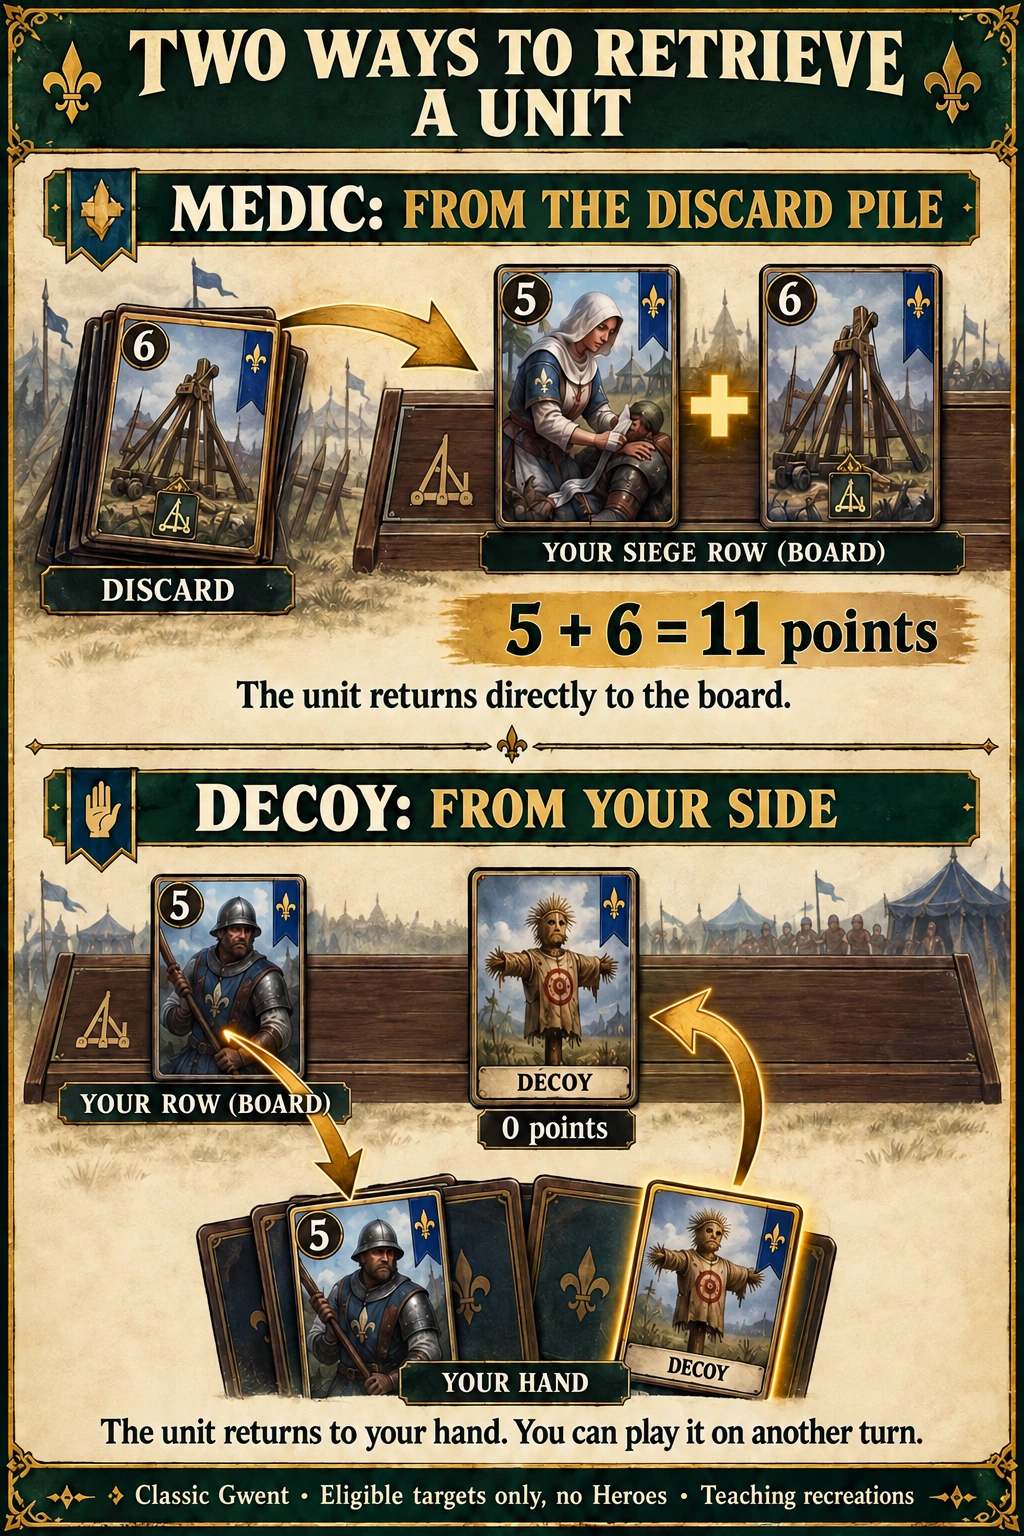
Example: you used a 6-strength Trebuchet in an earlier round. It is now in your discard pile. Play the Dun Banner Medic, a 5-strength siege unit, and bring back that Trebuchet. Together they contribute 11 points, with no other effects.
The Trebuchet does not pass through your hand: it goes straight onto the board. An ordinary Medic cannot retrieve Heroes or special cards. If your discard pile has no eligible unit, there is nothing to bring back.
Decoy: pick up a unit on your side
A Decoy is a special card with a dummy as its visual reference. It replaces an eligible unit on your side of the board. The unit returns to your hand; the Decoy stays in its place and is worth zero.
Example: you have a regular 5-strength unit on the board. Pick it up with a Decoy. You lose its five points for now, but regain the card. Playing it again takes a later turn.
A useful trick: if your opponent placed a regular Spy on your side, you can pick it up and play it yourself later to draw cards. You cannot pick up a Spy you placed on your opponent’s side. You cannot pick up Heroes either.
Tight Bond: copies strengthen each other
Look for the joined-hands symbol and the Tight Bond ability. It only works with compatible copies that have this ability and occupy the same row. It does not work between two arbitrary soldiers.
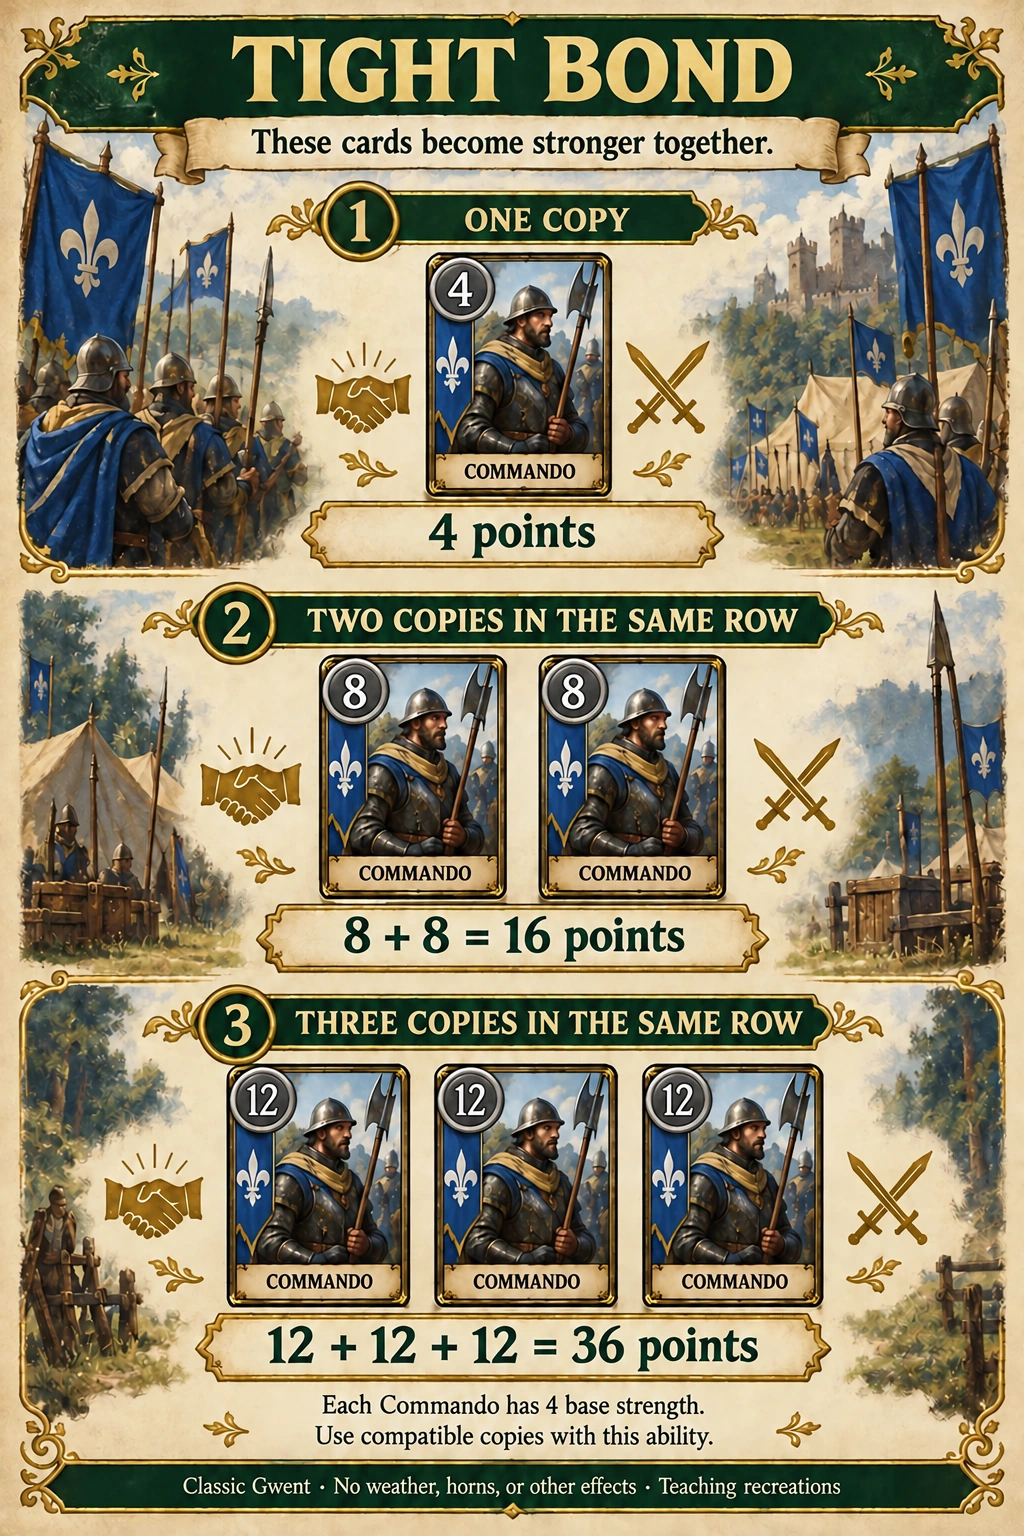
With Blue Stripes Commandos: play one and it adds four. When you play a second compatible copy, both become worth eight, for sixteen total. With three, each is worth twelve, for thirty-six total.
You are not just adding four points each time. The number of copies multiplies each card’s strength. While learning, watch how the score changes when you play the second before attempting a larger combination.
Weather: weakens a row on both sides
Weather is a special card. Biting Frost affects close combat. Impenetrable Fog affects ranged combat. Torrential Rain affects siege. In affected rows, regular units’ base strength becomes one. Heroes keep their points.
Simple example: your opponent has regular 5- and 4-strength close combat units, totaling nine. You have no units in that row. Play Biting Frost. Their units become 1 and 1, totaling two. If you also had a regular 6-strength unit in your front row, it would drop to one too.
Clear Weather removes active weather. It helps both players: check who would regain more points before using it. Skellige Storm, added with Blood and Wine, affects ranged combat and siege.
These weather calculations assume no other boosts. Tight Bond, Morale Boost, or horns can change the final result. That is why affected cards do not always show exactly one point in an advanced game.
Horn: multiply the points in one of your rows
The Commander’s Horn special card goes in a row and doubles the strength of its regular units. It does not double Heroes.
Example: you have two regular 6-strength siege engines, totaling twelve. Place a Horn in that row and each becomes twelve, for twenty-four total. If a 10-strength Hero is also there, its ten stays unchanged, making the row total thirty-four.
Do not spend a second Horn on the same row expecting another doubling. Two do not quadruple that row. If a unit such as Dandelion supplies the effect, its own card has additional rules: do not assume it doubles itself.
Scorch: watch out, it can destroy your cards too
The Scorch special card, recognizable by its fire effect, finds the regular units with the highest current strength anywhere on the board. It destroys them whether they are yours or your opponent’s. Heroes are protected.
Example: your strongest regular unit is worth 6 and your opponent’s is worth 10. If nothing is stronger, Scorch destroys the 10. But if you also have a regular 10, both are destroyed. If three units share that highest value, all three are destroyed.
Some units have their own Scorch ability with a different scope or condition. Villentretenmerth checks the enemy close combat row and its threshold. Do not automatically apply the special card’s explanation to every fire ability.
Muster: one card calls in its group
When you play a unit with Muster, it brings compatible members of its group from your hand and deck. It does not bring them from the discard pile.
Example: you have one member of a group in hand and two compatible members in your deck. Play the first and all three arrive on the board. If one companion was already in your hand, it leaves your hand too. The ability does not give you a new copy.
This is not Tight Bond: Muster brings cards into play; Tight Bond changes their points. Check the family specified by each card: sharing a faction or similar artwork is not enough.
Morale Boost: add one point to the other regular units in its row
With Morale Boost, a unit helps the other regular units in its row, but does not give that point to itself or to Heroes.
Example: a 1-strength Kaedweni Siege Expert accompanies a 6-strength Ballista. The Expert stays at one and the Ballista rises to seven, making eight total. Without Morale Boost they would total seven. No other effects apply in this example.
Agile and transformations: learn these later
Agile lets you choose close or ranged combat when placing the unit. You can avoid one of those rows if harmful weather affects it, for example. You cannot freely move the unit once it is placed.
Berserker and Mardroeme form a Skellige combination: transformation replaces the Berserker with another card. Without a compatible unit in the row, Mardroeme will not trigger that transformation. Cards such as Cow or Kambi have a different ability: they leave a creature behind when removed. Study these exceptions once you understand the earlier abilities.
Before continuing: what is the difference between a Medic and a Decoy?
A Medic retrieves an eligible unit from the discard pile and places it on the board. A Decoy picks up an eligible unit from your side of the board and returns it to your hand.
Rules cross-checked against the official classic manual and Prima’s ability guide. Illustrations are educational recreations, not screenshots or official cards.
Your first real game: what to do on each screen
1. Find an opponent. In White Orchard, talk to Aldert Geert at the inn and choose the Gwent dialogue option. He is the first teacher you can meet. Other characters offer their own option to play later.
2. Check your deck. Choose Northern Realms on the preparation screen. Select your leader separately. You need at least twenty-two units; Heroes count as units, special cards do not. Do not add every card just because you own it.
3. Receive your hand. You will see ten cards. You can swap up to two before starting. For your first practice, keep units you can place and avoid holding too many special cards you do not yet know how to use. Swapping does not increase your card count.
4. Wait for your turn. Play a simple unit in its indicated row. Watch your total rise and see what your opponent does. Exact controls depend on whether you use a mouse, controller, or touchscreen: follow the game’s prompts.
5. Do not empty your hand out of habit. If your opponent has passed and you are already ahead, passing can secure the round while saving cards. If they are far ahead and you can still afford to lose a round, consider keeping your best units.
6. Continue until someone loses both gems. The winner of a round starts the next. Afterward, review which cards you spent and which you needed. The next section shows a possible early deck; farther down is a complete three-round match.
Rules cross-checked against the official classic manual and Prima’s ability guide. Illustrations are educational recreations, not screenshots or official cards.
How to build your first deck
Building a deck means choosing which cards from your collection to bring into a match. Getting a new card does not oblige you to include it. Meet the minimum unit count first, then learn to replace weaker cards with options you understand.
- In White Orchard, speak to the scholar at the inn and accept the learning match. You will get started with the Northern Realms starter set.
- Open the Gwent section of the game menu. Access and controls vary between PC and console; follow the on-screen prompts.
- Select a faction and a leader belonging to it. Owning another faction’s leader does not automatically give you its units.
- Include at least 22 units. Heroes count as units; your leader and special cards do not count toward that minimum. You can include up to ten special cards.
- Buy improvements and remove weak units once you have replacements. Cards left in your collection still belong to you.
- Before each match, check the unit total, number of special cards, and whether your leader still fits your plan.
A realistic White Orchard starter list
You can prepare this list with the starter set and purchases at the first inn. Use the English card names to identify them if your localization differs. It does not require late-game Heroes, two Catapults, or Skellige cards.
Close combat. Included units: Ves; Siegfried of Denesle; Prince Stennis; Blue Stripes Commando ×3; Yarpen Zigrin; Poor Fucking Infantry ×2. Count: 9.
Ranged combat. Included units: Dethmold; Keira Metz; Síle de Tansarville; Sabrina Glevissig; Sheldon Skaggs; Crinfrid Reavers Dragon Hunter. Count: 6.
Siege. Included units: Trebuchet ×2; Ballista ×2; Dun Banner Medic; Kaedweni Siege Expert; Catapult. Count: 7.
Total units. Included: 22, including the three unit purchases at the inn. Count: 22.
Suggested specials. Included cards: Decoy ×1; Clear Weather ×1; Biting Frost ×1. Count: 3.
Leader. Selected card: Foltest: King of Temeria, available at the start. Placement: outside the draw deck.
Buy the third Commando, the Catapult, the Dragon Hunter, and a Decoy from Elsa before leaving the area. Guides also document a recovery inventory for several cards at Bram; since its conditions can depend on the version and what you already bought, the safe route is to buy from Elsa when you meet her. Beat Aldert Geert to obtain Zoltan: you can replace Yarpen with him without increasing deck size.
This is an early foundation, not a final deck. Keep Stennis for card draw and the Medic for later utility. The two weak Infantry cards preserve a Tight Bond pair while meeting the minimum; replace them when you get better-performing units. If mods or account rewards give you a different starter collection, check that you have 22 units before adopting the list.
With 25 cards in your draw deck and an opening hand of ten, any individual card has a 10/25 = 40% chance of appearing before swaps. With 35 cards, that falls to about 28.6%. This illustrates why adding cards without a purpose dilutes your best options; it does not prove that every deck must have exactly the same size.
Sources: White Orchard Gwent, Gamer Guides · Collect ’Em All and locations · Prima: deck building · Prima: White Orchard players
Your first full match: Northern Realms vs. Nilfgaard
This match adds Spy, Tight Bond, and Medic to the rules you have learned. If you are still practicing, return to the simple illustrated round. Open the full example when you want to study how to manage cards over three rounds.
Open the three-round match, action by action
This is an editorial simulation using real cards, not a recorded match against a particular character. The opponent’s decisions are simplified for teaching. Both decks meet their requirements; we detail only the opening hands, draws, and plays. Neither player activates a leader, and there is no weather or any effect beyond those specified. The coin toss gives you the first move.
Your ten-card hand: Stennis, Ves, Siegfried, Commando ×2, Trebuchet ×2, Ballista, Dun Banner Medic, and Dethmold. You choose not to swap any. Your Spy will draw Keira and Síle; winning round two will draw another Ballista. These are distinct cards or permitted copies from the classic collection.
Nilfgaard’s hand: Black Infantry Archer ×2, Assire, Fringilla, Renuald, Cynthia, Vanhemar, Puttkammer, Albrich, and Sweers. No swaps. Nilfgaard wins ties, but none of this demonstration’s round results is a tie.
Round 1 · losing with a plan
Action 1. You play Stennis in your opponent’s close combat row. Draw Keira and Síle.
Classic · round 1 · action 1 · open board
Action 2. Your opponent plays a 10-strength Black Infantry Archer in the ranged row.
Classic · round 1 · action 2 · open board
Action 3. You play Ves, with 5 strength, in close combat.
Classic · round 1 · action 3 · open board
Action 4. Your opponent plays Assire, worth 6, in the ranged row.
Classic · round 1 · action 4 · open board
Action 5. You play a 6-strength Trebuchet in siege.
Classic · round 1 · action 5 · open board
Action 6. Your opponent adds Fringilla, worth 6, in the ranged row.
Classic · round 1 · action 6 · open board
Action 7. You pass: catching up would take more cards than you want to spend.
Classic · round 1 · action 7 · open board
Action 8. Your opponent passes and wins 27 to 11. You keep nine cards.
Classic · round 1 · action 8 · open board
Round 2 · taking back control
Action 9. Nilfgaard opens the round with Cynthia, worth 4, in the ranged row.
Classic · round 2 · action 9 · open board
Action 10. You play a 4-strength Commando in close combat.
Classic · round 2 · action 10 · open board
Action 11. Your opponent plays Vanhemar, worth 4, in the ranged row.
Classic · round 2 · action 11 · open board
Action 12. You play the second Commando: Tight Bond makes both worth 8.
Classic · round 2 · action 12 · open board
Action 13. Your opponent adds Renuald, worth 5, in the ranged row.
Classic · round 2 · action 13 · open board
Action 14. You pass with 16. Your opponent would have to commit another card.
Classic · round 2 · action 14 · open board
Action 15. Nilfgaard passes. You win 16 to 13 and draw a Ballista through your faction ability.
Classic · round 2 · action 15 · open board
Round 3 · turning the discard pile into points
Action 16. You open with the 5-strength Medic; it brings back the 6-strength Trebuchet from your discard pile.
Classic · round 3 · action 16 · open board
Action 17. Your opponent plays their second 10-strength Black Infantry Archer.
Classic · round 3 · action 17 · open board
Action 18. You play a 6-strength Ballista in siege.
Classic · round 3 · action 18 · open board
Action 19. Your opponent plays Puttkammer, worth 3, in the ranged row.
Classic · round 3 · action 19 · open board
Action 20. You play your second 6-strength Trebuchet in siege.
Classic · round 3 · action 20 · open board
Action 21. Your opponent plays Albrich, worth 2, in the ranged row.
Classic · round 3 · action 21 · open board
Action 22. You play Dethmold, worth 6, in the ranged row.
Classic · round 3 · action 22 · open board
Action 23. Your opponent plays Sweers, worth 2. Their hand is empty and they have no more card plays.
Classic · round 3 · action 23 · open board
Action 24. You pass. Your opponent has no cards and does not use a leader: the round ends, 29 to 17.
Classic · round 3 · action 24 · open board
Result: you win 2–1. Losing the first round created a useful discard pile and left enough cards to finish. The Commando pair won round two with two cards; the Medic produced eleven points using just one card from your hand. You finished with four unspent cards: you do not have to empty your hand or reach the highest possible score.
Card accounting matters: you started with ten, gained two through Stennis, and one for winning round two; you spent nine cards from your hand. 10 + 2 + 1 − 9 = 4. The revived Trebuchet is not subtracted from your hand a second time, because it was already in the discard pile.
Sources: Prima: card and value table · Prima: Northern Realms cards · Official classic manual and credits
The five factions in classic Gwent
Northern Realms: draw a card after winning a round. Typical plan and notable cards: Spies, Medics, Tight Bond, and siege. Stennis, Dijkstra, Thaler, Commandos, Catapults. Strength, risk, and first tip: Recovers resources and combines points. Watch for weather and Scorch. The easiest place to start, because you already have its starter collection.
Nilfgaard: wins ties. Typical plan and notable cards: Plenty of Spies, Medics, and strong units. Vattier, Stefan Skellen, Menno Coehoorn. Strength, risk, and first tip: Excellent card circulation with a complete collection. A high-strength Spy gives away too many points in a short third round. Use the tie advantage without pursuing it at any cost.
Scoia’tael: chooses who starts. Typical plan and notable cards: Agile units, Muster groups, and Medics. Eithné, Saesenthessis, Yaevinn. Strength, risk, and first tip: Can spread units between rows, but Agile does not move cards already played. Avoid spending an entire Muster family in a round you were already winning.
Monsters: keeps one random regular unit between rounds. Typical plan and notable cards: Muster families: Vampires, Crones, and Arachas. Strength, risk, and first tip: Deploys lots of strength in few actions. Biting Frost and Scorch punish its concentrations. Do not rely on exactly the unit you need surviving.
Skellige: brings back two random regular units at the start of round three. Typical plan and notable cards: Cerys and Shield Maidens, Berserkers and Mardroeme, Tight Bond, and summons. Strength, risk, and first tip: Strong recovery in a well-prepared third round. Its bonus does not help if you lose 0–2. Accept the randomness of your discard pile and save resources to reach round three.
How to get Skellige: you need Blood and Wine and access to Toussaint. Count Monnier at the Pheasantry in Beauclair provides the foundation of the deck during the tournament introduction. Complete the Toussaint player chain to strengthen it; the tournament requires this faction. Traveling to the Skellige islands in the base game does not unlock the deck: it was added in the expansion.
Sources: Prima: tactics and factions · Prima: card and value table · Blood and Wine developer diary
Winning strategies: decisions and consequences
Count useful cards as well as points
Having seven cards against four is valuable if they produce enough points or answers. Four special cards without targets can do less than two good units. After each exchange, check the score, gems, and hands. If your opponent has already committed their best group and you would still need three cards to catch up, compare that cost with your chances of winning the next two rounds.
A Spy is often easier to use in a round you can concede: you draw resources without immediately needing to beat the points you gave away. In the final round, giving your opponent nine points to draw two cards can be excellent or disastrous depending on what remains in your deck. Do not use Spies just because you have them.
Pass when the cost of catching you supports your plan
If you lead 18 to 6 and know your opponent needs two units to overtake you, passing turns your lead into a cost for them. If they can overtake you with one card and you have already spent a lot, you may just be handing them control. Once you have lost a round, you cannot sacrifice the second in the same way: losing it ends the match.
Conceding a round is not free against Monsters either: a unit may stay behind. Against Skellige, reaching round three activates its recovery; against Northern Realms, allowing a win also gives it a card. Consider those benefits alongside the score.
Decoys and Medics: think two actions ahead
Picking up a Medic with a Decoy lowers your score now to enable another revival later. If your opponent has passed, calculate whether you have room to perform both actions. Otherwise, you give them a chance to respond. A Hero Medic can bring back other units, but you cannot pick up that Hero with a Decoy to repeat the ability.
Do not automatically revive a Muster card: check whether its family is still in your deck. Nor should you fill your discard pile assuming you can choose any card later: Skellige revives randomly, while an ordinary Medic chooses among eligible targets.
Weather and Scorch: check both sides
Before playing Biting Frost, calculate how much each player loses. If you lose 20 and your opponent loses 8, weakening their front row does not help you. Save Clear Weather for a moment when the actual balance improves; clearing too early lets another weather card affect you again.
Against Scorch, staggering your highest unit values can prevent an entire row of identically valued cards from being destroyed. Playing three Tight Bond cards and doubling them immediately creates lots of points, but leaves a huge target. If your opponent still has cards, consider setting up other plays first or waiting for them to spend their answer. Heroes offer resilient points, although they do not benefit from your multipliers.
The final round needs a different calculation
You no longer need to save cards for a fourth round. Units without later abilities can be played last to hide your ceiling; Medics, Spies, and support effects need the right sequence. Judge a Horn by the extra points it adds: doubling two 6-strength units adds 12; doubling a single 4 adds 4. If an opposing answer can break the combination, include that risk.
Exercise: you lead 18 to 12 and your opponent has passed. Should you play your 15-strength Hero?
Without pending effects that change the outcome, you can pass and win 18 to 12. Playing the Hero does not add another round win: it spends a resource you may need later. If an end-of-round transformation or special rule is pending, check its resolution first.
18 common mistakes and how to fix them
Emptying your hand in round one. Why it hurts: The score resets; your resources do not. Fix: Win by spending only what you need.
Thinking passing means skipping one turn. Why it hurts: You cannot act again that round. Fix: Pass when you accept the consequences.
Trying to win every row. Why it hurts: Rows do not award separate victories. Fix: Compare totals.
Playing a Spy on your own side. Why it hurts: It does not work like an ordinary unit. Fix: Place it where its ability specifies.
Counting two draws as a net +2. Why it hurts: The Spy card already left your hand. Fix: Calculate −1 + 2 = +1.
Using a Decoy on a Hero. Why it hurts: It is not a valid target. Fix: Pick up an eligible regular unit on your side.
Trying to Decoy a card on your opponent’s side. Why it hurts: The target must be on your half. Fix: Pick up Spies your opponent gave you.
Using a Medic with an empty discard pile. Why it hurts: There is no unit to retrieve. Fix: Save it or accept playing it for strength alone.
Expecting a Medic to revive Heroes. Why it hurts: They are excluded. Fix: Choose a useful regular unit.
Boosting Heroes with a Horn. Why it hurts: Their strength does not increase. Fix: Count only regular units’ points.
Piling up specials without targets. Why it hurts: You may draw tools without units. Fix: Cut cards that rarely provide value.
Including every new card. Why it hurts: You draw your best cards less often. Fix: Replace before expanding.
Confusing Muster with Tight Bond. Why it hurts: One deploys cards; the other multiplies strength. Fix: Read the family’s specific ability.
Ignoring that Muster consumes cards from hand. Why it hurts: You spend more reserves than expected. Fix: Swap redundant copies before playing.
Playing weather without counting your losses. Why it hurts: It may help your opponent more. Fix: Calculate the change on both sides.
Using Scorch when your cards share the highest value. Why it hurts: You may destroy them too. Fix: Check every current strength value.
Sacrificing a second losing round. Why it hurts: The match ends before your comeback. Fix: Save cards without giving away the final loss.
Applying standalone rules. Why it hurts: Draws, rows, and deck building differ. Fix: Identify the version before following a guide.
How to get cards and complete your collection
There are three main routes: buying cards, earning fixed quest rewards, and beating ordinary players for the first time. The last group awards cards from a reward pool; replaying the same merchant does not produce new cards indefinitely. If a guide assigns a random card to a particular blacksmith, it may simply describe the result its author received.
A progression route that covers the essentials
- White Orchard: Aldert Geert’s tutorial, Zoltan’s card, and purchases from Elsa. Check inventories before leaving.
- Vizima: the Nilfgaardian nobleman at the palace awards a Foltest variant when defeated. You can return once your deck is stronger.
- Velen: follow the player chain through the Baron, the Oreton boatwright, the Benek soothsayer, and Haddy in Midcopse. Buy from innkeepers and merchants as you travel.
- Oxenfurt and Novigrad: combine the innkeeper, Big City Players, and Old Pals quests. Do not wait until the end of the story to challenge them.
- Skellige islands: complete the Skellige Style chain and buy cards at inns. Some matches require completing the character’s earlier quests.
- Toussaint: work on Blood and Wine’s Skellige collection separately. It is not needed to complete the base collection.
Especially useful cards and where to get them
Sigismund Dijkstra. Documented source: beat the Bloody Baron in Velen; later recovery in his office is documented if you can no longer challenge him. What it adds: a 4-strength Northern Realms Spy.
Yennefer of Vengerberg. Documented source: beat Stjepan at the Alchemy inn in Oxenfurt. What it adds: a neutral Hero and Medic; she cannot revive herself.
Geralt of Rivia. Documented source: beat Thaler, available after the quest involving the plot against Radovid, along the Old Pals chain. What it adds: 15 immune neutral points.
Ciri. Documented source: beat the Scoia’tael merchant in the Novigrad Big City Players chain. What it adds: another 15-strength neutral Hero.
Mysterious Elf. Documented source: beat Gremist after completing his advanced alchemy training in Skellige. What it adds: a zero-strength neutral Hero Spy.
Thaler, the card. Documented source: buy it from the Arinbjorn innkeeper in Skellige. What it adds: a 1-strength Northern Realms siege Spy.
Vernon Roche, the card. Documented source: beat Haddy in Midcopse during the Velen chain. What it adds: a Northern Realms Hero. You do not obtain it by beating Roche himself.
Triss, the card. Documented source: beat Lambert through the Old Pals chain; use an available dialogue opportunity before his story advances. What it adds: a neutral Hero; it is not a reward for beating Triss.
These are selected milestones for improving a deck, not an inventory of every copy and merchant. For the rest, consult the regional list and Prima’s card index. Check whether a source covers the base game or an expansion.
Quests, tournaments, and missable cards
A Matter of Life and Death. What to do: play and win the small tournament during the Vegelbud party. It awards Milva, Vampire: Bruxa, and Dandelion. Risk: if you miss this opportunity, do not assume these cards will reappear in a shop.
A Dangerous Game. What to do: help Zoltan and choose the cards as your reward: John Natalis, Isengrim, and Fringilla. Risk: choosing money complicates completing the collection; do not rely on possible later recovery routes.
High Stakes. What to do: save before entering the Passiflora tournament and bring a solid deck. Entry costs 1,000 crowns and your collection must be accepted. Risk: its four wins award leaders; losing a match can prevent you from obtaining them in that playthrough.
Old Pals. What to do: play these characters when they are available and follow your journal. Risk: availability changes with the story.
Collect ’Em All. What to do: obtain the base-set cards and consult the regional tracking book. Scope: Hearts of Stone and Blood and Wine cards are not required for this base-game quest.
The Skellige tournament in Toussaint. What to do: obtain the deck, strengthen it, and enter using Skellige. Scope: this Blood and Wine chain is separate from Novigrad’s tournament.
Use A Miraculous Guide to Gwent to learn which regions still have cards. It helps locate gaps but does not list every missing name. Save before parties, tournaments, and decisions affecting character availability. Updates added some recovery routes; that does not promise that no card is missable.
Sources: Collect ’Em All and locations · White Orchard Gwent, Gamer Guides · Prima: White Orchard players
How to play GWENT: The Witcher Card Game
What you do: play against another person—or practice against the computer—and aim to win two rounds on points. Each player has two rows: melee and ranged. There is no siege row.
1. Start with the deck the game gives you
Install GWENT through its official website, complete the tutorial, and choose a starter deck. You do not need to craft cards or copy a competitive deck to learn. Practice with those cards first.
2. Read a card: power, text, and provisions
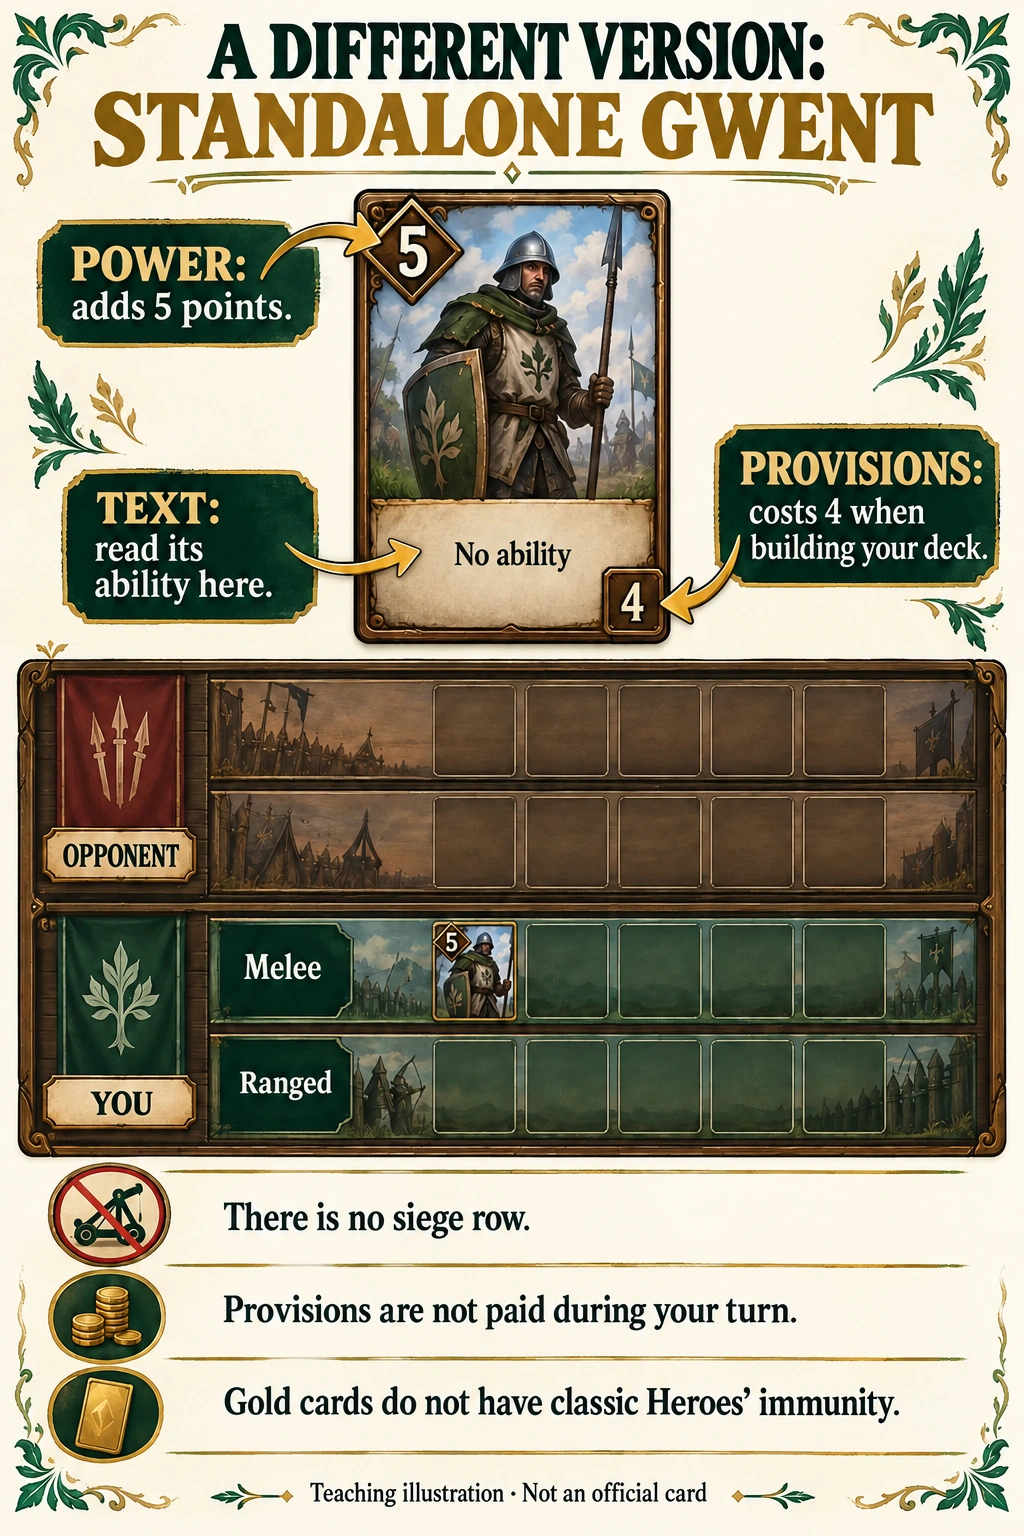
Power: the points a unit adds to your score. Text: what its ability does. Provisions: the cost of including it in your deck before playing; you do not pay this number during a turn.
Unit: stays in a row and contributes power. Special: resolves an effect and normally goes to the graveyard. Artifact: stays in a row without contributing power of its own. Your leader ability is separate from your hand.
A gold border does not grant the immunity of The Witcher 3’s Heroes. A gold unit can take damage or receive effects according to its rules. Armor protects against damage but does not add points to your total.
3. Play your turn and let your opponent respond
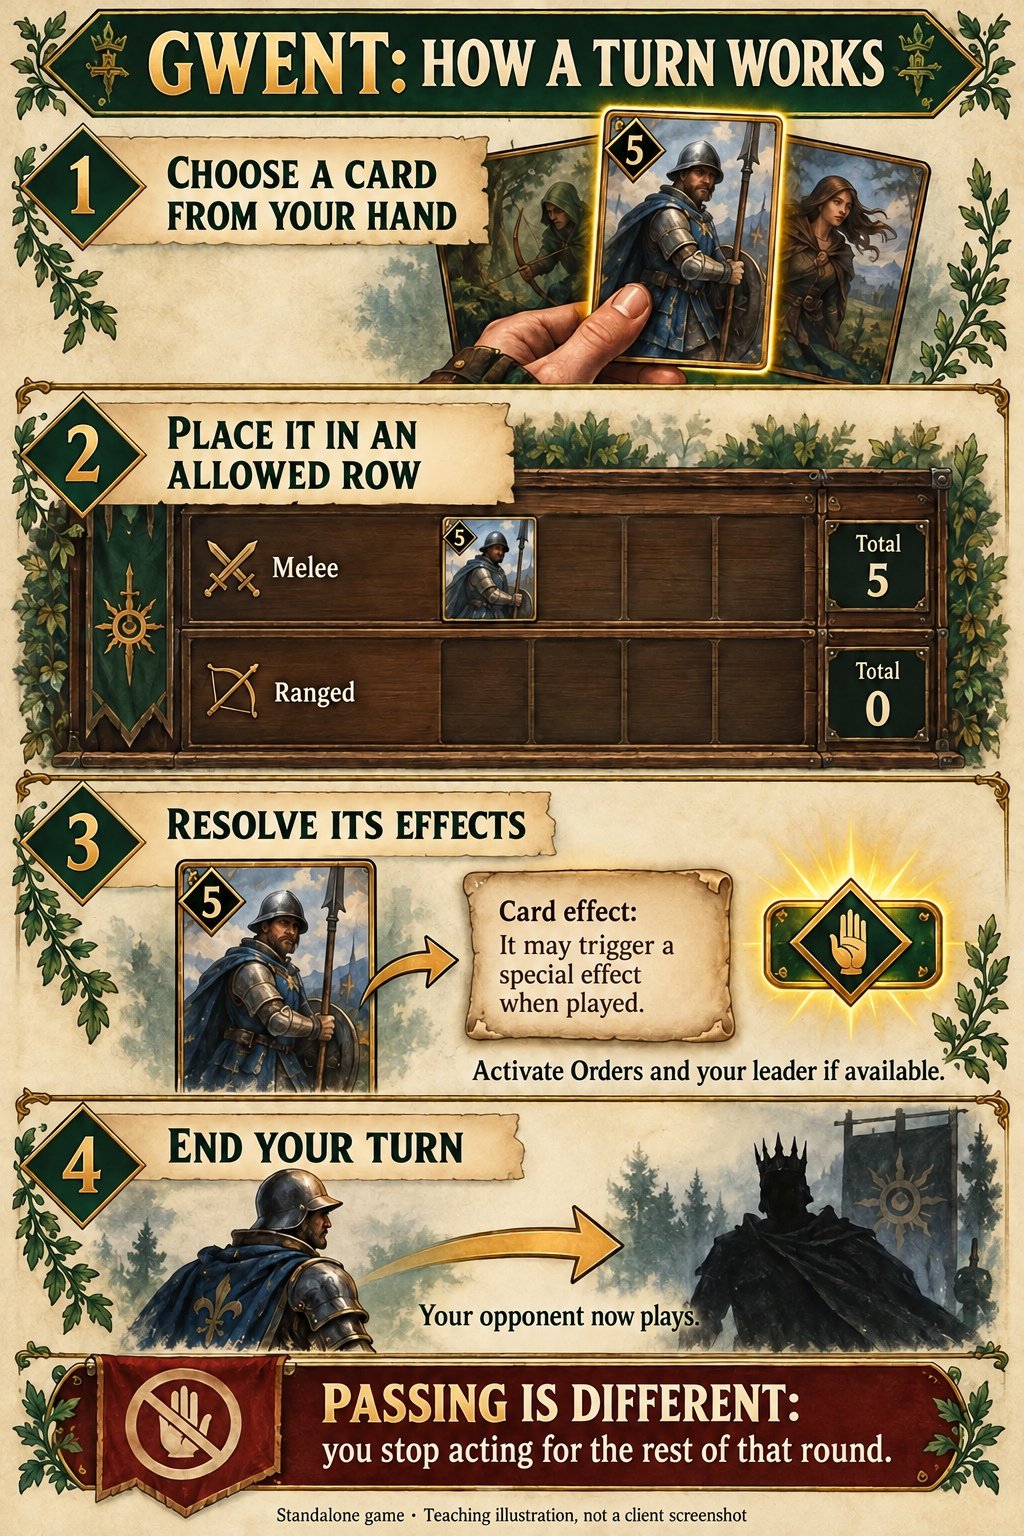
- Choose a card from your hand. If it is a unit, place it in an allowed row. Many allow either; check whether its ability requires a particular one. Each row has room for up to nine positions.
- Resolve its text. Select a target if required. Without an ability, it simply contributes points.
- Use other available activations. You can combine your card play with Orders and your leader; the leader does not replace your card for the turn.
- End your turn. Your opponent then acts. Passing is a separate decision: you stop acting for the rest of that round.
Deploy triggers automatically when the card is played. Order must be activated: normally you wait until a later turn; Zeal allows immediate use. If a button is unavailable, check its condition or counter.
4. Win rounds without spending every card
After both players pass, whoever finishes with more points wins the round. Used units normally go to the graveyard. Unplayed cards stay in hand. Aim for two round wins; a tie can award a round to both players and can also produce a drawn match.
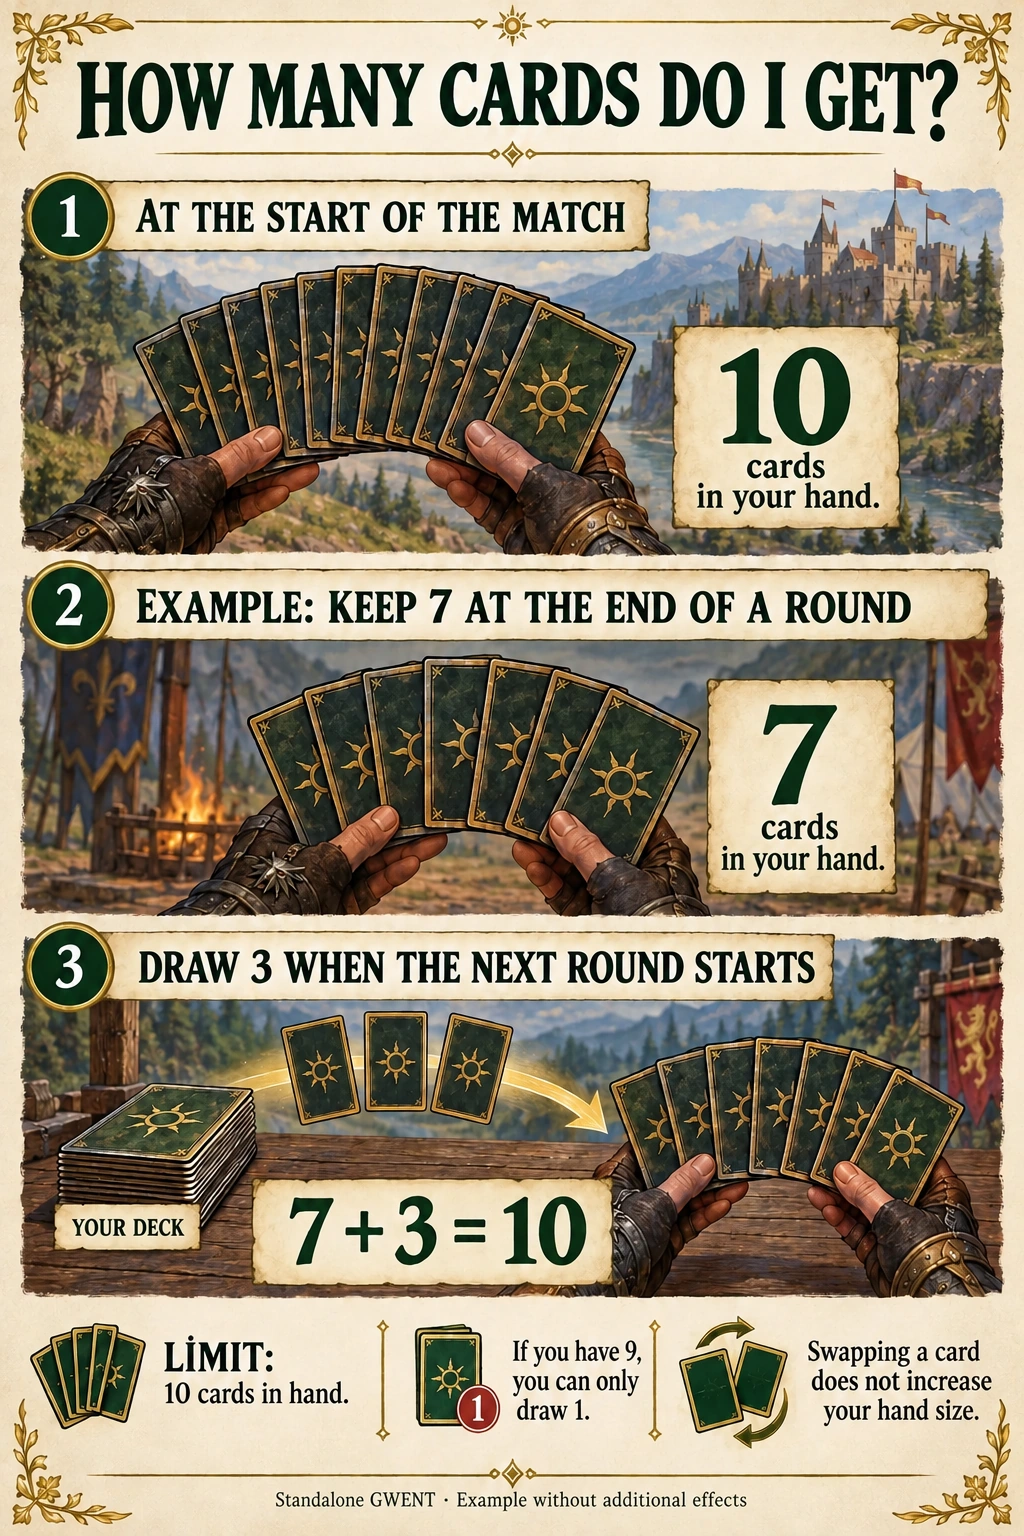
You start with ten cards. Before playing, you can swap cards: three swaps if you go first and two if you go second. Swapping replaces a card with another from your deck; it does not increase your hand size.
At the start of rounds two and three, draw up to three, without exceeding ten cards in hand. You have two basic swaps; each draw that cannot fit adds another swap. Example: with nine cards, you draw one and get four swaps, because two draws could not fit.
A simple decision: you lead 12 to 9 and your opponent has passed. With no pending effects, passing secures the win and saves your cards. If your opponent can still act, those twelve points can still change.
5. Build your own deck once you understand the starter
Choose a faction and leader. You need at least 25 cards, including 13 units. You can include up to two copies of each bronze and one of each gold. Add up provisions: the limit is 150 plus your leader’s bonus, shown in the deck builder.
For example, a leader adding fifteen allows 165 provisions. A 166-provision list is invalid even if it has twenty-five cards. Fifteen is only an example here, not a value assigned to a specific leader.
For later: the six factions and their playstyles
The six standalone factions
Northern Realms. Example plans: Orders, machines, and engines needing protection. Learn first: activation order and when to use Zeal.
Nilfgaard. Example plans: control, statuses, copies, and manipulation. Learn first: identifying which enemy piece to disrupt.
Monsters. Example plans: large units, Consume, swarms, and growth. Learn first: separating immediate value from future growth.
Scoia’tael. Example plans: Nature, Symbiosis, Harmony, movement, and traps. Learn first: reading categories and row requirements.
Skellige. Example plans: damage, discards, graveyard, Warriors, and Pirates. Learn first: distinguishing what you want to play, discard, or retrieve.
Syndicate. Example plans: Coins, Fees, Tributes, and other faction systems. Learn first: balancing coin generators and spenders.
Each faction supports several archetypes. These examples describe possibilities, not an October 2026 ranking. Syndicate requires learning an extra resource; for a first collection, exploring a starter deck with a plan you can explain in one sentence is easier. “I want protected units to generate points every turn” is a plan; “I include my most expensive cards” is not.
Sources: GWENT: official introduction · Official standalone FAQ (Spanish)
Source: official explanation of hands and mulligans.
Source: official provision design article.
Source: official beginner resources (Spanish).
A full standalone match, without hidden combos
Open this example once you understand turns and draws. It covers three complete rounds; you do not need to read it before your first practice.
Open the standalone match, step by step
A deliberately simple demonstration for learning rounds, draws, and damage. Both players use legal 25-card decks with at least 13 units; the neutral cards shown fit any faction. No bronze has more than two copies. Leaders and the stratagem remain unused. Cards not mentioned stay in hand or deck and have no effects from those zones in this example. This is not a competitive deck recommendation.
Values used: Elder Bear, 5 power, no ability; Peasant Militia, 5 power and an engine triggered by playing units with Deploy; Swallow boosts by six; Alzur’s Thunder deals five damage. Data checked on October 26, 2026. No unit with Deploy is played in this match, so Militia gains no power. English names identify the exact database entries.
Your opening hand includes Elder Bear ×2, Militia, Swallow, Thunder, and five other legal cards you will not use. Your opponent has Elder Bear ×2, Militia, Thunder, and six others. Between-round draws are distinct unused cards. Neither player swaps. You open the match; passing with cards still in hand is legal, although your opponent uses it here to simplify the demonstration.
Standalone round 1
Action 1. You play Elder Bear: five points.
Standalone · round 1 · action 1 · open board
Action 2. Your opponent plays Militia: five points. Without units with Deploy, it does not grow.
Standalone · round 1 · action 2 · open board
Action 3. You play Swallow on your Bear: 5 + 6 = 11.
Standalone · round 1 · action 3 · open board
Action 4. Your opponent passes with five.
Standalone · round 1 · action 4 · open board
Action 5. You pass and win 11 to 5.
Standalone · round 1 · action 5 · open board
Standalone round 2
You enter with eight cards and draw two; you have three swaps and use none. Your opponent enters with nine and draws one, with four swaps available. Both start with ten.
Action 6. After drawing, you open by passing without playing a card.
Standalone · round 2 · action 6 · open board
Action 7. Your opponent plays an Elder Bear and scores five.
Standalone · round 2 · action 7 · open board
Action 8. Your opponent passes and wins 5 to 0. You cannot reopen the round.
Standalone · round 2 · action 8 · open board
Standalone round 3
You enter with ten cards: no draws and five swaps. Your opponent enters with nine: one draw and four swaps. Neither swaps. Previous boards have been cleared; there is no Resilience.
Action 9. Your opponent won round two, so now opens with their second Elder Bear.
Standalone · round 3 · action 9 · open board
Action 10. You play your second Elder Bear and tie the score at five.
Standalone · round 3 · action 10 · open board
Action 11. Your opponent’s Thunder destroys your Bear: five damage to a unit without armor.
Standalone · round 3 · action 11 · open board
Action 12. Your Thunder destroys the enemy Bear. The score is 0 to 0.
Standalone · round 3 · action 12 · open board
Action 13. Your opponent passes with zero. This is a decision made for this simulation.
Standalone · round 3 · action 13 · open board
Action 14. You have not passed yet: you play Militia and score five.
Standalone · round 3 · action 14 · open board
Action 15. You pass and win round three 5 to 0: a 2–1 match victory.
Standalone · round 3 · action 15 · open board
This match shows why you should not pass before securing the result: your opponent still has eight cards, but once they pass they cannot answer your Militia. It also demonstrates voluntarily losing round two. In a real match, that plan depends on both decks: saving cards does not justify surrendering control without evaluating their strongest combinations.
Sources: Elder Bear, game-extracted data · Peasant Militia, game data · Alzur’s Thunder, game data · Swallow, game data · Mulligan Update, January 10, 2019
Advanced concepts: tempo, control, engines, and bleeding
Tempo. Teaching example: a play adds many points immediately. Practical decision: helps catch up before your opponent passes; does not always produce more total value.
Engine. Teaching example: a 4-power unit gaining +1 over four triggers can produce 8. Practical decision: playing it early creates more opportunities, but also more time to destroy it. These are illustrative numbers, not an official card.
Control. Teaching example: removing a 4-power engine also prevents its future points. Practical decision: compare immediate damage with the value prevented, not just target size.
Bleeding, or round-two pressure. Teaching example: after winning round one, keep playing to force your opponent to spend their best combo. Practical decision: can weaken their third round, but excessive pressure can cost card advantage.
Carryover. Teaching example: a deck buff or persistent piece prepares the next round. Practical decision: this does not mean keeping the previous score; check exactly what remains.
Card advantage. Teaching example: entering the final round with one extra card action. Practical decision: its value depends on that card’s quality and whether you can play it effectively.
Last say. Teaching example: your opponent can no longer answer your finisher. Practical decision: especially useful for effects punishing the largest unit; not every deck needs it equally.
Long and short rounds. Teaching example: an engine gets more turns in a long round; an immediate combo can work in a short one. Practical decision: choose when to pass based on both decks’ plans.
Strategic bleeding is different from the Bleeding status: one describes pressure in round two; the status deals damage over time. Check which meaning a guide is using.
Bad pressure example: you win round one with fewer cards, spend your whole hand trying to force round two, and lose; your opponent enters round three with an extra card and their finisher intact. A reasonable example: you know their combination needs several cards, force an essential piece in round two, and stop in time with enough resources. Outcomes depend on hands, tutors, and available answers, not a universal “always bleed” rule.
Gwentfinity: who changes the balance?
The Gwentfinity phase began with the 2023 transition: patch 11.10 was the final content update of that development phase, and the Balance Council was introduced. Numerical balance can continue changing through community votes. This does not mean the game immediately became unavailable or that players can freely write new abilities.
The official document published in January 2024 describes four voting categories: increasing or decreasing power and increasing or decreasing provisions. Players can propose up to three cards per category, weighted at three, two, and one votes by position. Adjustments change numerical values; they do not replace card text with an ability written by the voter.
That document requires Prestige 1 plus either Pro Rank or fifty ranked wins during the season. These are the requirements in the cited official documentation, not an account eligibility check for October 2026. Consult the in-game panel for the current cycle and operating limits. The learning implication is lasting: a concepts guide can remain useful for years, but provision lists and deck rankings need dates.
Sources: Gwentfinity and the Balance Council, official explanation · Patch notes 11.10
How to play Thronebreaker: The Witcher Tales
What you do: lead Queen Meve through an adventure. Explore the map, make decisions, and fight with cards. Your cards represent your campaign army; you do not use your multiplayer GWENT collection.
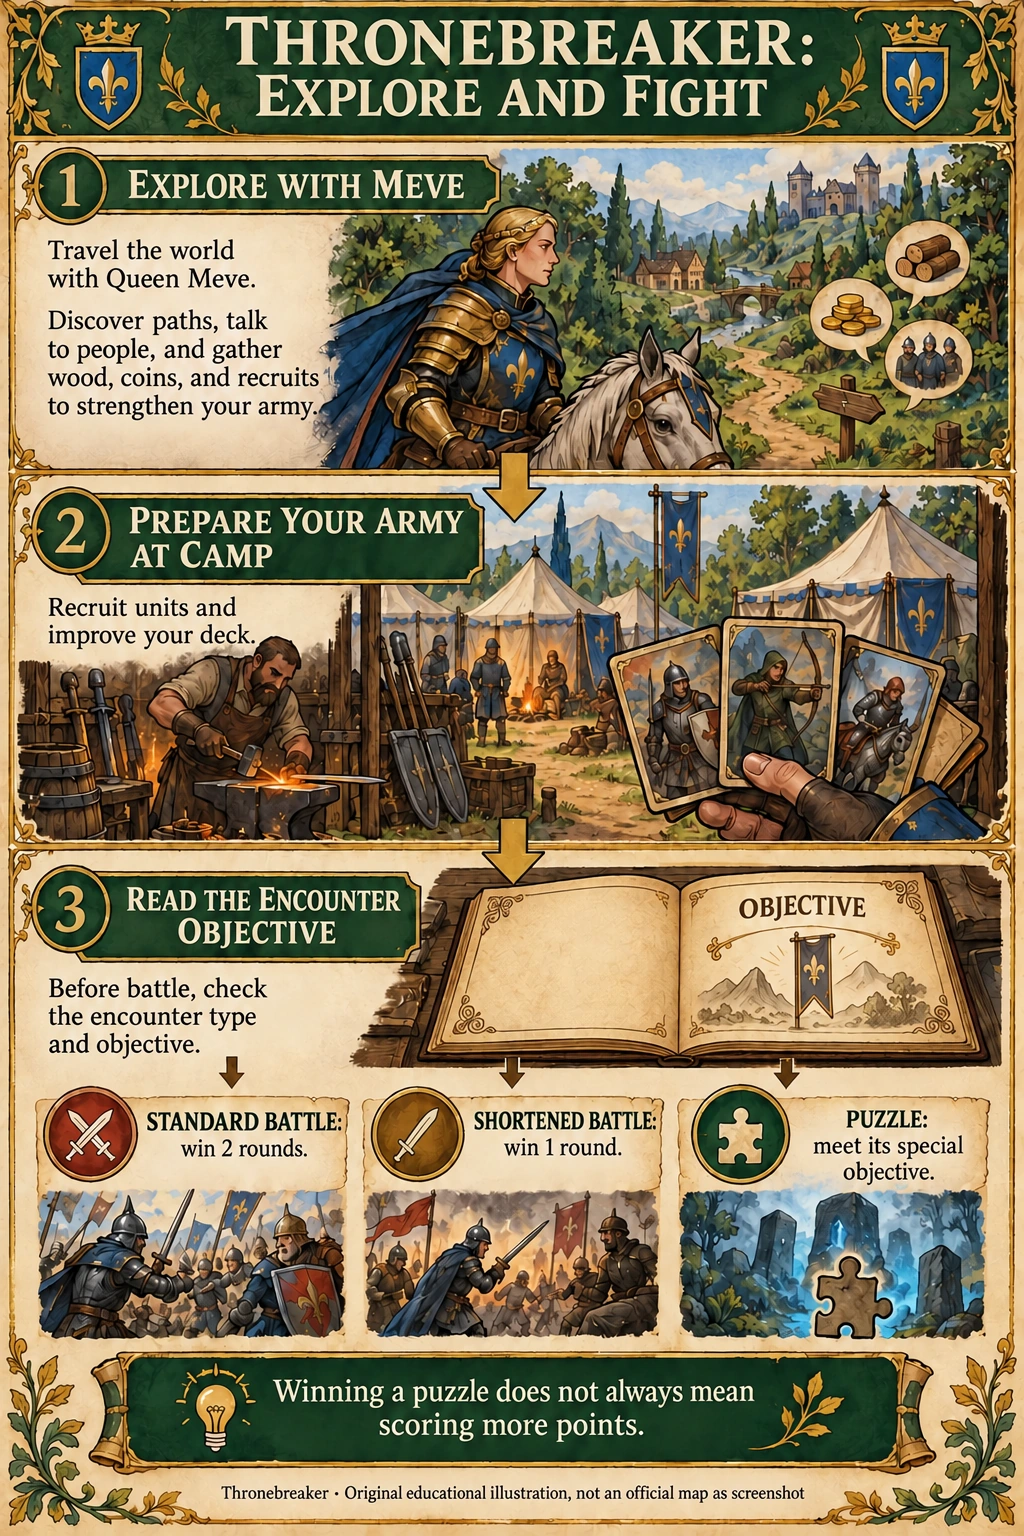
1. Explore and prepare your army
Collect gold, wood, and recruits. Open camp to obtain units, upgrade buildings, and change your deck. Normal battles require at least twenty-five cards and compliance with the recruitment cap shown in the builder. The competitive 150-provision budget does not automatically apply.
2. Check the encounter’s objective
- Standard battle: win two rounds. Save cards for later ones.
- Shortened battle: there is only one round. Do not sacrifice it expecting another.
- Puzzle: meet the written objective with the assigned hand and rules. Having more points may not be enough.
Reading example: if a puzzle asks you to eliminate every enemy, you are not finished while one remains, even if your score is higher. Solve that condition instead of following a three-round duel strategy.
3. Place a card, resolve its ability, and end your turn
Each player has two rows. Add your units’ current power across both to calculate your score. On your turn, play a card from hand and follow its text. If an ability mentions the unit “to its right,” it means the neighboring card in that same row, not any ally.
Activate any ready Orders—your cards’ manual abilities—and Meve’s ability when its counter allows. The hourglass shows how many turns you must wait to use it again. Then end your turn so the enemy can act. Passing ends your actions for that round.
4. Manage your hand for the battle type
In a standard battle, start with ten cards and swap up to six. In later rounds, draw three and swap up to one. Your hand holds ten: excess draws are lost. Puzzles may give you a fixed hand and different conditions.
After both players pass, points decide an ordinary round. In a puzzle, its objective takes priority. After the encounter, review rewards and continue across the map. Campaign morale can modify your army; it is not the classic ability that adds one point to a row.
Source: official Thronebreaker introduction.
Source: board, Meve, and hand guide.
Source: Thronebreaker setup and round rules.
How to play GWENT: Rogue Mage
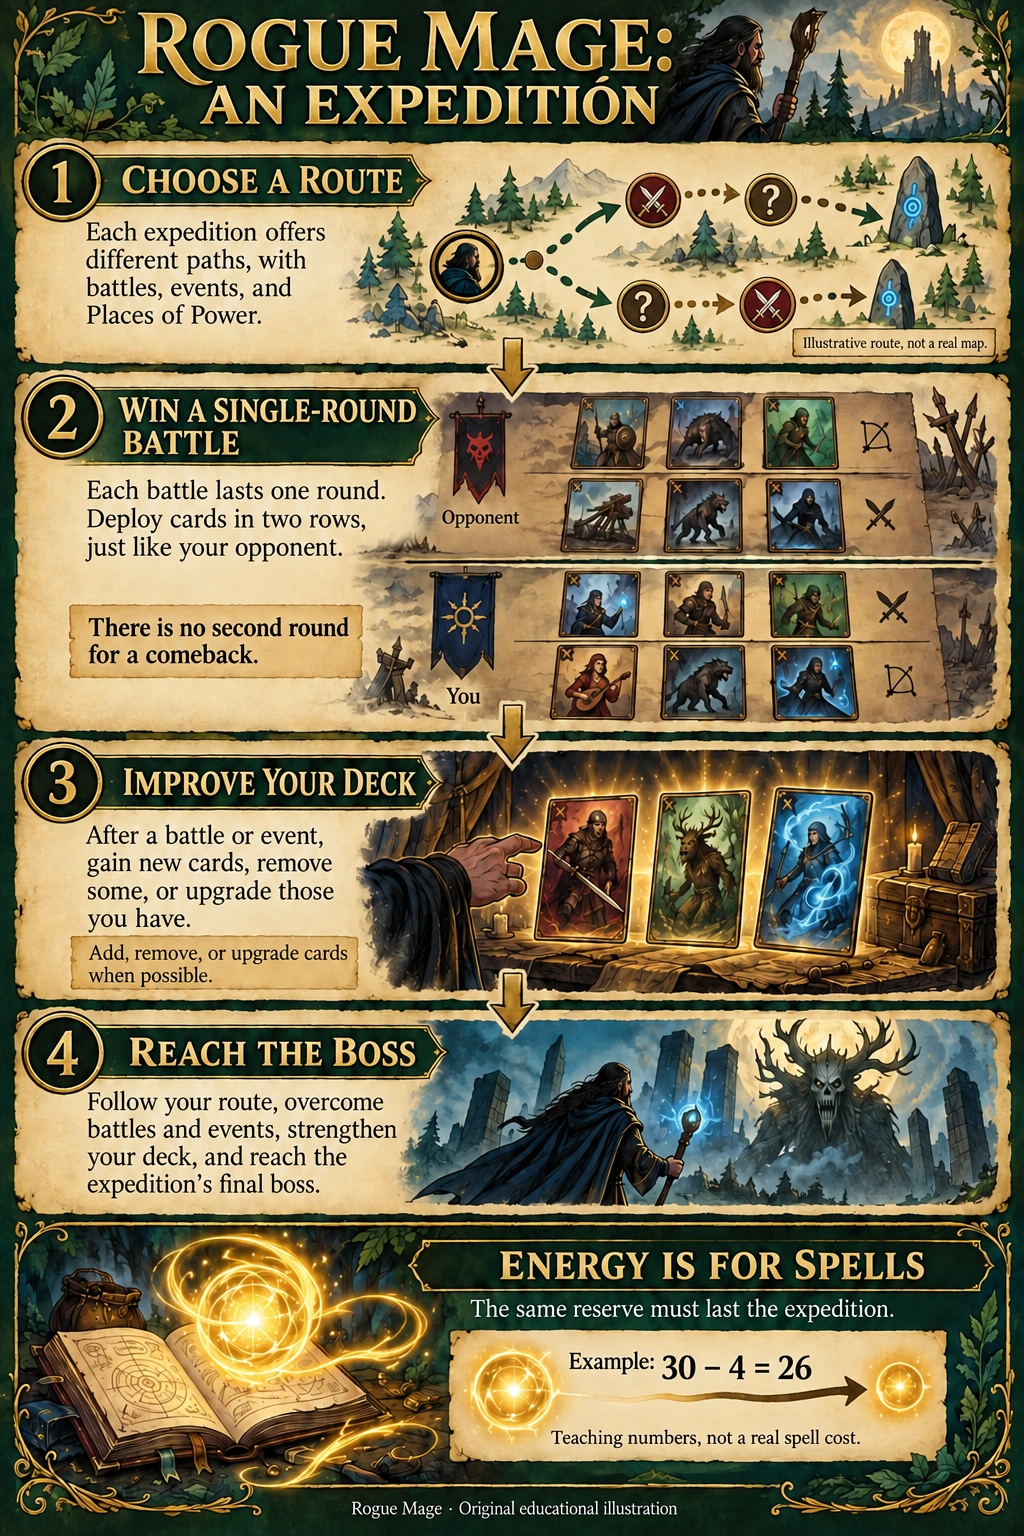
What you do: choose a route, win battles, and improve your deck until you reach the expedition’s boss. You play against the computer. This is a separate application from multiplayer GWENT.
1. Choose your starting setup in the laboratory
Select an unlocked starter deck, its key card, and available spells. The key card is the piece around which that deck works. You do not build a competitive twenty-five-card list here: you start with the expedition’s set and modify it as you travel.
2. Choose the next point on the map
A battle node offers a fight; an event presents a decision; a Place of Power lets you recover energy or use its special option. Elite enemies can upgrade your key card. Your route’s goal is to reach the boss prepared, not visit every node.
3. Play the single-round battle
In basic setup, receive five cards and swap up to two. During your first five turns, draw one per turn, without additional bonuses. The game’s counter shows remaining draws: do not expect to keep drawing indefinitely.
Each player has two rows; add your units’ current power across both for your score. On your turn, play one card from hand, resolve its effects, and activate available Orders, the manual abilities. You can use an Alzur spell if you have energy and it is available. Finish with the coin button so your opponent can respond.
The battle is decided in one round. Once both sides stop playing, you need more points than the enemy. Passing does not save cards for a second round of that battle. Under initial conditions, your opponent has last say: leading before that response does not guarantee victory.
4. Spend energy while saving spells for the boss
Energy is a reserve for the expedition. Casting spells consumes it; it does not automatically refill at the start of each battle. Some events and Places of Power let you recover it.
Calculation example: you have 30 energy and an action costs 4; you have 26 left. Before spending, compare its usefulness now with the battles still ahead. Energy is not a deck-building provision budget or score points.
5. Improve your deck and keep moving
After a normal battle, you can add or remove a card; other rewards offer upgrades. Removing a less useful card helps you find important ones. Unlocking a card for future expeditions does not mean you can freely put it into any starter deck.
If you lose, that expedition ends. Start another using the options you have unlocked, not the same modified deck from the previous attempt. Defeat the boss to obtain the corresponding mutagen and advance the experiments.
Source: official Rogue Mage introduction and FAQ (Spanish).
Source: round and energy rules published by CD PROJEKT RED.
Source: Rogue Mage setup and turns.
Source: expedition map, upgrades, and rewards.
Gwent: The Legendary Card Game, the tabletop edition
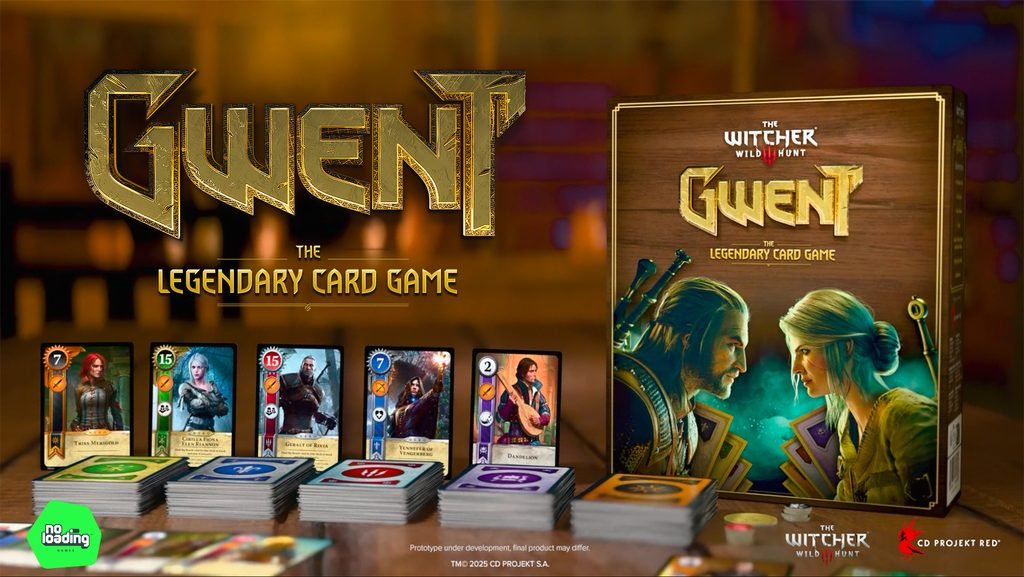
What you do: play another person using paper cards, a board, and tokens. A standard duel has three rows per player. You need your opponent to lose both gems. Start with this mode before trying tournaments or solo play.
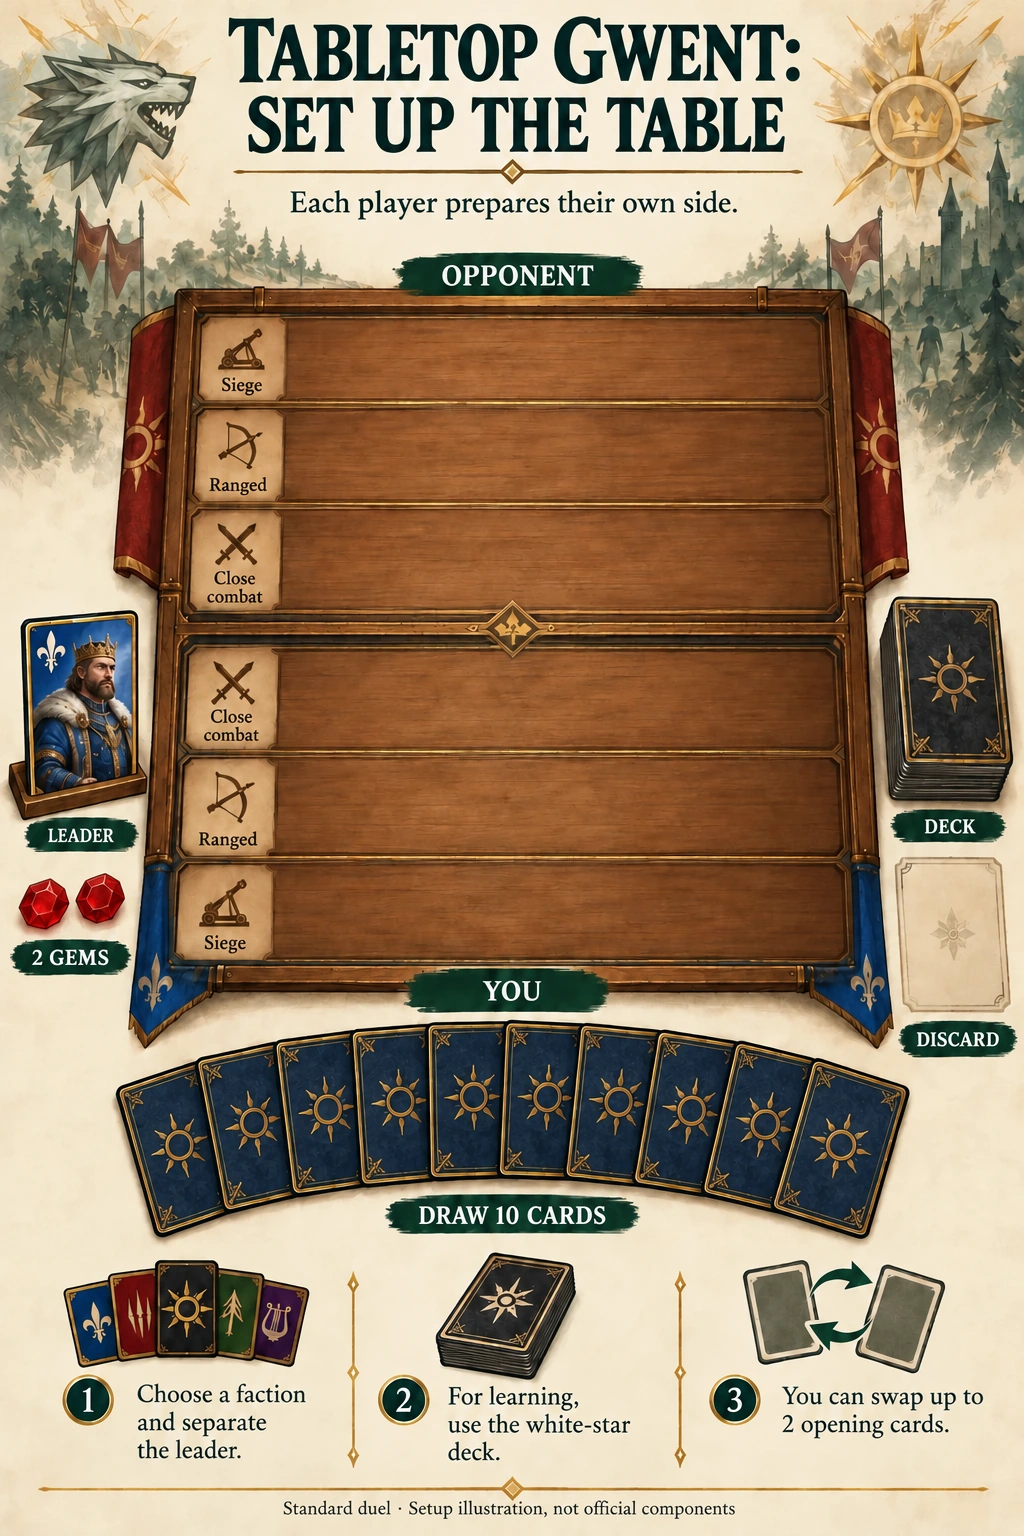
1. Prepare your deck and table
- Choose a faction. For learning, gather its cards marked with a white star in the lower-left corner. For Skellige, leave black-star cards in the sideboard specified by the manual.
- Separate the leader. Place it faceup beside the board; do not shuffle it into the cards you will draw. Take the faction and ability reference aids.
- Place two gems and your scoring tokens. Shuffle the remaining cards. Leave space for your deck and discard pile.
- Decide who starts. Flip the coin; Scoia’tael can choose through its ability.
- Draw ten cards. You can swap up to two. Draw their replacements first; then return the removed cards to the deck and shuffle.
2. Choose one action on your turn
Play a card: a unit goes in its row and adds strength; a special applies its effect. Activate your leader: if it has an unused active ability, resolve it and turn the card over. Pass: announce that you will take no more actions this round. The other player then responds.
Heroes keep their protection, special cards modify play, and reference aids explain every symbol. No computer applies the effects: both players should check strength changes and eligible targets.
3. Track the score with tokens
Add the current strength of all three rows. To mark 34 points, place one token on 30 in the tens and the other on 4 in the ones. Update the total when cards, weather, or boosts change. Do not compare each row separately.
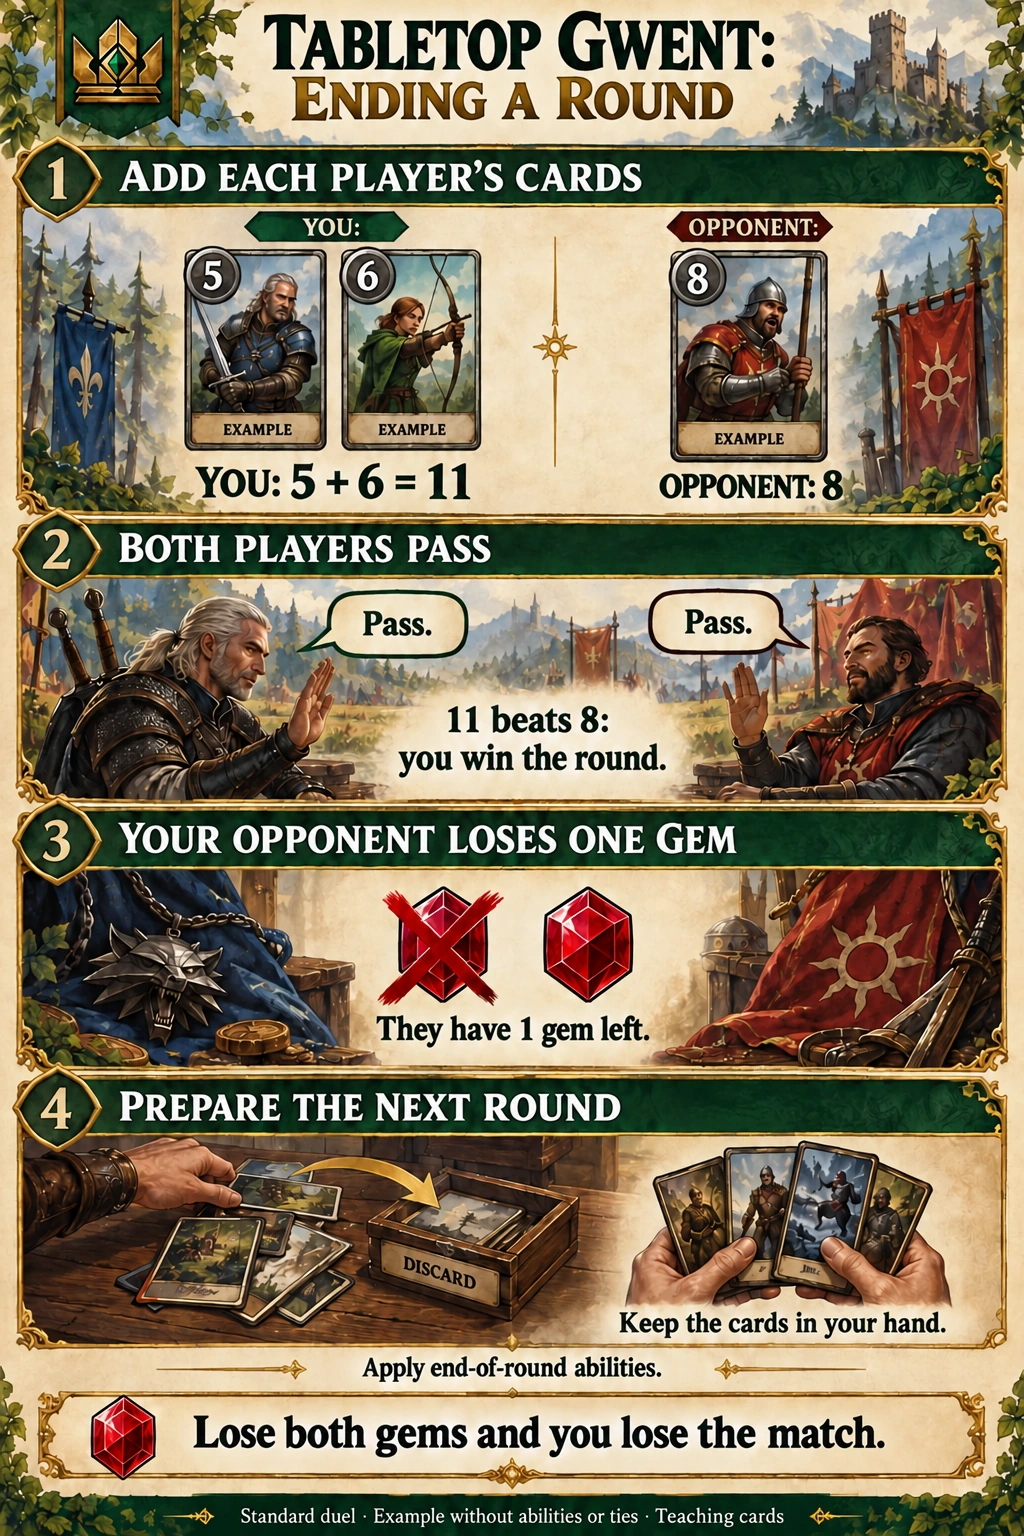
4. Finish the round and prepare the next
After both players pass, compare totals. The loser removes one gem. On a tie, both remove one unless an applicable ability, such as Nilfgaard’s, changes this. Anyone without gems loses; if both lose their last gem at once, the match is a draw.
Move used cards to their discard piles and apply faction or card exceptions. Keep the cards still in your hand. Do not automatically draw three: you only gain new cards when an ability allows it. The round winner starts the next round.
When building your own standard deck later: choose a leader, include at least twenty-two units and no more than ten special cards. Transformation or summon cards designated for the sideboard stay outside the draw deck.
For later: advanced, tournament, teams, and solo play
Six modes, with different deck-building rules
Standard / beginner. Rule: a duel with classic deck building. Start here: use the white-star cards and reference aids.
Advanced. Changed rule: a maximum of five specials, two Spies, and two Medics; total unit strength up to 130, alongside basic requirements. Start here: build within those limits; sideboard cards do not count toward 130.
Tournament. Changed rule: three decks from different factions, using advanced limits; the same Hero cannot appear across multiple lists. Start here: win two full matches out of three; do not reuse a deck that has already won.
Two vs. two. Changed rule: teammates use different factions and share a board, discard pile, and gems. Start here: alternate A1, B1, A2, B2. One player passing does not automatically force their teammate to pass.
Free-for-all, three to five players. Changed rule: each opponent you outscore awards one point; the target is the number of players plus one. Start here: with three players, you need four points. Consult faction and tie exceptions.
Solo. Changed rule: an automated deck plays cards according to its own priorities and modified abilities. Start here: prepare the opposing faction as instructed; your deck excludes weather except Clear Weather. Do not play it like an ordinary duel.
In solo mode, the opponent plays from the top of its deck; if weather appears, resolve it and play another card. When you pass, the automaton performs one final action before the round is resolved. The rules explicitly modify Spies, Muster, Medics, Decoys, and leaders; use pages 24–26 of the rulebook. For example, its Decoy hides a card from the deck to reveal at round end: it is not handled like a Decoy from your hand in the minigame.
The second-edition rulebook brings the modes together, adds scoring examples, and clarifies interactions. The publisher announces its inclusion in a forthcoming late-2026 printing: that does not mean every box sold in October already includes it. Consult the revised PDF for clarifications.
The main tabletop differences are tracking scores manually, preparing sideboards, and choosing a mode’s rules. The manual does not impose competitive GWENT’s nine-card row limit: do not add that limit to the classic tabletop board. Download the complete revised rulebook before debating an interaction.
Sources: Revised tabletop rulebook, second edition, 28 pages · 2026 tabletop rulebook changes · Earlier MNKY tabletop manual
Source: revised tabletop rulebook, pages 4–11 for setup and duels.
Every version: rules and availability
Gwent in The Witcher 3. Launch and documented platforms: 2015; PC, PS4, and Xbox One; also Switch, PS5, Xbox Series, and 2026’s Remastered for PC/PS5/Series/Switch 2. Rules and deck building: 3 rows; at least 22 units; up to 10 specials; opening hand of 10, without general between-round draws. Checked status: part of the RPG. Skellige requires Blood and Wine.
Standalone GWENT. Launch and documented platforms: announced in 2016; PC release in 2018; later iOS and Android. PS4/Xbox One versions existed. Rules and deck building: 2 rows; at least 25 cards and 13 units; provisions; between-round draws. Checked status: official site offers PC/mobile. Console versions are no longer supported and are not recommended as a current entry point.
Thronebreaker. Launch and documented platforms: PC in 2018; PS4/Xbox One in December 2018; later Switch/iOS/Android; backward compatibility on PS5/Series. Rules and deck building: 2 rows; campaign army, recruitment, and puzzles; variable objectives. Checked status: official page and platform newsletter accessible; purchasing and installation not tested in every region.
Rogue Mage. Launch and documented platforms: July 7, 2022; PC, iOS, and Android. Rules and deck building: 2 rows; standard single-round battles; a deck evolving through expeditions; energy for spells. Checked status: PC listing and official page accessible; mobile compatibility depends on store and device.
The Legendary Card Game. Launch and documented platforms: 2025; tabletop game. The UK distributor documents September 1. Rules and deck building: 3 rows; classic rules and six modes; separate advanced and tournament limits. Checked status: revised 2026 rulebook available; local stock and shipping not checked.
Promotional physical decks. Launch and documented platforms: The Witcher 3 collector’s edition and expansions, 2015–2016. Rules and deck building: classic adaptations, without standalone provisions. Checked status: historical products; no claim that they remain available new.
“Available” here means an official page or access listing can still be consulted, not that we installed every version, tested its servers on every platform, or confirmed stock in Colombia. Follow official links and check your device requirements before buying. Digital GWENT expansions grow its collection; they are not separate adaptations with different boards.
Sources: GWENT and Thronebreaker PC/console dates · Console version retirement · GWENT: official introduction · Rogue Mage on Steam, publisher description · Thronebreaker on Android and other platforms · Tabletop Gwent: UK launch · Official The Witcher 3 page, tabletop announcement in August 2025 · Hearts of Stone and two physical decks
History: from literary gwint to the card game
What actually appears in Sapkowski’s books
The documented literary precursor appears in Baptism of Fire, Chrzest ognia in Polish, published by SuperNOWA in 1996. The Polish excerpt consulted, identified as chapter II, shows Zoltan, Yazon Varda, Caleb Stratton, and Percival Schuttenbach playing gwint. Geralt watches and admires the illustrations, although he does not fully understand the rules.
The passage describes bidding and two pairs trying to win tricks. It does not provide a complete rulebook. Barrel appears in references to the English translation; distinguish it from the later commercial name. The book is not credited here with three rows, 15-strength Geralt cards, immune Heroes, or modern deck building. Those systems belong to the video game adaptations.
To find the passage, look for the resting scene with Zoltan’s company: page numbers vary by translation and format. The accessible excerpt supports checking the scene, but does not replace comparing every edition or prove that no other work mentions the game. For the saga’s order, see our Witcher book guide.
Sources: Chrzest ognia, chapter II excerpts · Chrzest ognia, WorldCat record
How CD PROJEKT RED designed it
The manual credits Damien Monnier with design and Rafał Jaki with additional design. Its credits also recognize graphic design and illustration teams: Gwent was more than a rule table invented by one person. The aim was an activity that fit the world and offered a break from the RPG’s combat.
A report on their PAX East 2016 presentation describes a three-day deadline for a prototype and mentions War, Netrunner, and Condottiere among the references considered. This is evidence attributed to that presentation, not an inference from similarities. Comparing games can explain mechanics, but does not by itself prove design influence.
In an August 2016 written interview, Monnier explained that many requests for a standalone version arrived after launch. He also emphasized the need to expand it into a game of its own. That distinction matters: a minigame designed for encounters with RPG characters did not become competitive merely by adding a multiplayer button.
As an editorial interpretation, its integration gave matches rewards beyond the score: you could discover an opponent, improve a collection, or complete a quest along the journey. This explains its design appeal; it is not a measured claim about how many players preferred it to the main story.
Sources: Official classic manual and credits · PAX East: design history, presentation report · Original Damien Monnier interview, August 16, 2016
A documented Gwent timeline
1996. Milestone: publication of Chrzest ognia. Meaning: literary precursor, not the minigame’s rulebook.
May 19, 2015. Milestone: The Witcher 3: Wild Hunt. Meaning: classic Gwent arrives in the RPG on PC, PS4, and Xbox One.
October 13, 2015. Milestone: Hearts of Stone. Meaning: expansion with cards and a limited edition featuring physical decks; not the birth of standalone GWENT.
May 31, 2016. Milestone: Blood and Wine. Meaning: adds the Skellige minigame deck and its Toussaint questline.
June 13, 2016. Milestone: GWENT: The Witcher Card Game announcement. Meaning: standalone project announced, not yet commercially released.
October 25, 2016. Milestone: closed beta. Meaning: a testing phase begins.
May 24, 2017. Milestone: public beta. Meaning: open access and further rules iterations.
2017. Milestone: art books and collections. Meaning: publishing catalog documents Gwent: Art of The Witcher Card Game.
October 23, 2018. Milestone: PC release and Homecoming; Thronebreaker. Meaning: major standalone overhaul and a separate campaign.
December 4, 2018. Milestone: GWENT and Thronebreaker on PS4/Xbox One. Meaning: historical console launch.
January 10, 2019. Milestone: Mulligan Update. Meaning: revised swaps and their relationship to the hand limit; 150 base provisions.
October 29, 2019. Milestone: GWENT on iOS. Meaning: mobile launch, not a new classic version.
December 2019–June 2020. Milestone: console retirement. Meaning: freeze and account-copying window, ending June 9, 2020.
March 24, 2020. Milestone: GWENT on Android. Meaning: wider mobile access.
July 7, 2022. Milestone: Rogue Mage. Meaning: single-player expeditions in a separate application.
October 2023. Milestone: Gwentfinity transition, patch 11.10. Meaning: Balance Council and the end of that developer-content phase.
December 2023. Milestone: last World Masters of that official circuit phase. Meaning: does not mark the disappearance of community matches.
January 12, 2024. Milestone: official Gwentfinity explanation. Meaning: documents voting system and requirements.
2025. Milestone: The Legendary Card Game. Meaning: complete tabletop edition; the RPG website announced August and the UK distributor documents September 1.
September 29, 2026. Milestone: The Witcher 3: Wild Hunt — Remastered. Meaning: RPG update also reaching Switch 2 and adding touch controls for Gwent.
2026. Milestone: second-edition tabletop rulebook. Meaning: revised PDF available and another printing announced for late in the year.
Sources: Chrzest ognia, WorldCat record · Introducing GWENT, June 13, 2016 · Closed beta, October 25, 2016 · Public beta, May 24, 2017 · PC commercial launch, October 23, 2018 · GWENT and Thronebreaker PC/console dates · GWENT for iOS · GWENT for Android · Mulligan Update, January 10, 2019 · Gwentfinity and the Balance Council, official explanation · 2026 tabletop rulebook changes · Tabletop Gwent: UK launch · Hearts of Stone and two physical decks · Blood and Wine developer diary · CDPR corporate history · Gwent: Art of The Witcher Card Game, publisher listing · Last official World Masters of the CDPR phase · The Witcher 3 Remastered: official notes, September 28, 2026 · Remastered available September 29, 2026
October 2026 update: The Witcher 3 — Remastered arrived September 29 on PC, PS5, Xbox Series, and Nintendo Switch 2. Official notes document touch controls for Gwent on Switch 2 and do not list a new minigame rulebook. It includes Hearts of Stone and Blood and Wine; do not confuse this RPG edition with standalone GWENT. Expansions announced for 2027 are outside the content released by this guide’s cutoff date.
Sources: The Witcher 3 Remastered: official notes, September 28, 2026 · Remastered available September 29, 2026
What Homecoming changed and why old guides matter
The betas do not describe the current game exactly. Homecoming reduced the standalone board from three rows to two and reorganized its design. Provisions replaced older color-based limits as the core deck-building constraint; later updates also changed leaders, mulligans, and unit requirements.
A guide imposing six silver cards or treating gold cards as immune may describe a historical phase. Another may use correct names with abilities that have since changed. Before copying a deck, check its date, version, rows, budget, and card text. The official beginner guide published in 2018 before Homecoming is a document of that period, not a sufficient standalone manual for October 2026.
Competition, community, and art books
GWENT Masters built a circuit where contests could require multiple decks and bans, in addition to winning rounds within each match. Its season 5 rules describe four decks from different factions, one opposing ban, and retiring a winning deck during the series. That is a historical tournament format: you do not need four decks for your first ranked match.
The community remains useful for discussing adjustments, studying lists, and comparing decisions. Distinguish community tournaments from an old official calendar still online. The last World Masters of CDPR’s official phase was announced for December 2023; that news is not presented as a future 2026 tournament.
Gwent: Art of The Witcher Card Game, published with Dark Horse, documents the cards’ visual dimension. The publisher listing consulted identifies a 216-page edition from 2017. It is an art reference, not an updated rulebook; this guide did not consult the complete book or extract images from its pages.
Sources: Official GWENT Masters season 5 rules · Gwent: Art of The Witcher Card Game, publisher listing · Last official World Masters of the CDPR phase
Frequently asked questions
Are Gwent and GWENT the same game?
The name covers several adaptations. The Witcher 3’s minigame has three rows; the current standalone has two, provisions, and different cards. Identify the version before checking rules.
Can I play classic Gwent against another person inside The Witcher 3?
The RPG minigame is designed for its computer-controlled characters. For human opponents, use the standalone game or tabletop adaptation; their rules are not identical.
How many cards do I need in The Witcher 3?
At least 22 units, plus a selected leader; you may include up to 10 specials. You do not need to use the maximum number of specials.
Why can’t I play a faction when I already own its leader?
You may not yet have enough units for a valid deck. Check the faction counter and requirements.
Does passing automatically make me lose?
No. You can pass while ahead and win if your opponent cannot overtake you. What is final is that you cannot act again that round.
Do I have to spend all my cards?
No. You can win with cards still in hand. Keeping them between rounds is central to decision-making.
Can Medics bring back Heroes?
In classic Gwent, an ordinary Medic cannot revive Heroes. A Hero with Medic can retrieve other eligible units.
Can a Spy be used twice?
You can reuse regular Spies with Decoys and Medics when they are in zones those effects allow. A Hero Spy keeps its immunity.
Why don’t three Tight Bond cards total what I expected?
Each copy multiplies its base by the number of compatible copies in its row. Then account for weather, Morale Boost, and Horn.
Is Northern Realms always the best faction?
It is the most accessible option at the beginning of the RPG and improves greatly with Spies and siege. Nilfgaard can also be very strong with an advanced collection. It depends on cards, opponents, and version.
Have I missed my chance if I didn’t play the Baron?
Guides for updated versions document his card in his office once he is unavailable. Do not generalize that recovery route to every card.
Do I need Blood and Wine for Collect ’Em All?
Not for that quest’s base collection. You do need it to obtain and play the minigame’s Skellige deck.
Does standalone GWENT charge mana to play each card?
No. Provisions limit deck construction. You do not wait to accumulate that cost during a match.
Does Gwentfinity mean nothing changes anymore?
No. Power and provisions can change through the Balance Council. Competitive lists and recommendations need dates.
Does the tabletop box use exactly the competitive rules?
No: it builds on three-row classic Gwent and offers its own modes. Follow the box’s rulebook and revision, without importing standalone provision budgets or row limits.
A glossary to keep handy while you play
Deck. Meaning: cards selected before the match.
Hand. Meaning: cards you can play now.
Round. Meaning: one part of a match, with its own score.
Match. Meaning: the set of rounds that decides victory.
Discard pile / graveyard. Meaning: the area for used or destroyed cards.
Draw. Meaning: move a card from deck to hand.
Mulligan. Meaning: swap a card from hand during the permitted preparation window.
Tutor. Meaning: an effect that searches for or plays a particular card from your reserve; player terminology.
Synergy. Meaning: an interaction making two effects work better together.
Card advantage. Meaning: a difference in hand resources, considered alongside their usefulness.
Provisions. Meaning: the standalone game’s deck-building budget.
Tempo. Meaning: a play’s immediate points or pressure.
Engine. Meaning: a piece that keeps producing value after being played.
Control. Meaning: tools for slowing or removing opposing pieces.
Strategic bleeding. Meaning: applying pressure in round two to draw out resources.
Carryover. Meaning: value prepared or preserved for a later round.
Banish. Meaning: remove a card from the usual board-and-graveyard cycle.
Meta. Meaning: common strategies and their relationships during a particular period.
Sources and verification method
Manuals, official announcements, a written interview, an accessible Polish passage, publishing catalogs, and specialist guides were cross-checked for the original guide. Both matches are original examples with checked point and hand accounting; they are not presented as matches played in the client. Availability checks cover the stated pages and platforms, without a test purchase.
The Spanish transcript of the official standalone tutorial was consulted, especially its deck-building, hand, and row sections. The classic video linked by the manual was located but offered no exportable transcript: the original guide does not claim to have watched it or attribute details to it. PAX references come from the identified report, not a full viewing of the recording.
- Official classic manual and credits — primary source.
- Chrzest ognia, chapter II excerpts — text reproduced on a site dedicated to the author.
- Chrzest ognia, WorldCat record — bibliographic catalog.
- PAX East: design history, presentation report — developers’ account reported by the press.
- Original Damien Monnier interview, August 16, 2016 — primary source: written interview.
- Introducing GWENT, June 13, 2016 — primary source.
- Closed beta, October 25, 2016 — primary source.
- Public beta, May 24, 2017 — primary source.
- PC commercial launch, October 23, 2018 — primary source.
- GWENT and Thronebreaker PC/console dates — primary source.
- GWENT for iOS — primary source.
- GWENT for Android — primary source.
- Console version retirement — primary source.
- Mulligan Update, January 10, 2019 — primary source.
- Change: minimum of 13 units — primary source.
- Provision design — primary source.
- GWENT: official introduction — primary source.
- Official tutorial in Spanish — primary source: video.
- Official beginner resources (Spanish) — primary source.
- Gwentfinity and the Balance Council, official explanation — primary source.
- Patch notes 11.10 — primary source.
- Elder Bear, game-extracted data — community database using client data.
- Peasant Militia, game data — community database using client data.
- Alzur’s Thunder, game data — community database using client data.
- Swallow, game data — community database using client data.
- Rogue Mage on Steam, publisher description — primary source.
- Rogue Mage launch — primary source.
- Official Thronebreaker page — primary source.
- Thronebreaker on Android and other platforms — primary source.
- Thronebreaker: PC launch — primary source.
- Revised tabletop rulebook, second edition, 28 pages — primary source.
- 2026 tabletop rulebook changes — primary source.
- Tabletop Gwent: UK launch — primary source.
- Official The Witcher 3 page, tabletop announcement in August 2025 — primary source.
- Earlier MNKY tabletop manual — primary source.
- Hearts of Stone and two physical decks — primary source.
- Blood and Wine developer diary — primary source.
- CDPR corporate history — primary source.
- Gwent: Art of The Witcher Card Game, publisher listing — publisher primary source.
- Returning-player guide, Team Leviathan — supplementary source.
- White Orchard Gwent, Gamer Guides — supplementary source.
- Collect ’Em All and locations — supplementary source.
- Prima: deck building — published guide.
- Prima: abilities and card types — published guide.
- Prima: card and value table — published guide.
- Prima: Northern Realms cards — published guide.
- Prima: tactics and factions — published guide.
- Prima: White Orchard players — published guide.
- Official GWENT Masters season 5 rules — primary source.
- High Stakes: requirements and rewards — supplementary source.
- Thronebreaker: specialist guide introduction — supplementary source.
- Rogue Mage: beginner guide — supplementary source.
- Rogue Mage: official Spanish page — primary source.
- Classic Gwent: video linked by the manual — primary source: video located.
- Thronebreaker: deck building — supplementary source.
- Rogue Mage: strengthening your deck — supplementary source.
- Last official World Masters of the CDPR phase — primary source.
- The Witcher 3 Remastered: official notes, September 28, 2026 — primary source.
- Remastered available September 29, 2026 — primary source.
- Historical Balance Council changes, November 10, 2023 — primary source.
- Official classic manual in Spanish — primary source.
- Official standalone FAQ (Spanish) — primary source.
- GWENT glossary: statuses and keywords — supplementary source.
- Marlene: client-extracted definitions — community database using client data.
The guide’s illustrations and diagrams are original. The cover is an artistic setting, not a reproduction of a match or official cards. Diagrams retain names and numbers where they help explain the cross-checked examples. Terms, characters, and games belong to their respective owners.
The tutorials for these versions also cross-checked the guides to Thronebreaker’s board and hand, its battle rules, and Rogue Mage setup. Infographics are educational recreations, not screenshots or official components. Fictional calculations and routes are identified as examples.