To play Gwent: The Legendary Card Game, each player chooses a faction, builds a deck, and draws 10 cards. Players then alternate turns, playing a card, using an active Leader ability, or passing. The higher total Strength wins the round; a player who loses both gems loses the game.
The key decision is how much to spend on one round while keeping enough resources for the next. You do not have to play every card: knowing when to pass is part of the game.
This tutorial covers the physical board game shown in the photographs, released to celebrate the tenth anniversary of The Witcher 3: Wild Hunt. It explains the supplied Rulebook and Game Modes booklets, with illustrations and symbols taken from those photographed copies.
Start with the standard two-player game, then explore the additional modes below. For the other versions of the game, see our complete guide to Gwent.
1. What is in the box and what you need
The manual lists 436 faction cards, 10 Aid Cards, 4 gem tokens, 1 coin, 1 scoring board with 4 score tokens, 1 paper game board, and 2 rulebooks.
For a standard game, each player needs a deck, one Leader, two gems, two Player Aids, and two score tokens. Place the battlefield and scoring board within reach of both players. Keep the Aid Cards nearby to check abilities during play.
2. Choose a faction and prepare your deck
Each player chooses a faction. You can use a starter deck or build your own. The rulebook says that cards in your deck must show the chosen faction’s color.
For your first game, look for the stars
Collect every card with a white star in the bottom-left corner from a single faction to assemble its preconstructed starter deck. Skellige’s black-star cards belong in that starter deck’s side deck.
Building your own deck
- Exactly 1 Leader Card. Choose it before play and put it in the Leader zone.
- At least 22 Unit Cards. Heroes are a type of Unit Card.
- No more than 10 Special Cards. You do not have to include ten.
You may include more than 22 units, but every extra card reduces your chance of drawing a particular card. Your Leader stays separate and is not shuffled into the cards you draw.
The side deck holds summoned and transformed cards
Some abilities summon other cards or transform a unit, such as Skellige’s Berserkers. Keep the corresponding replacement cards outside the main deck, beside the play area, until an ability needs them. They do not begin shuffled into your deck.
3. What each faction does
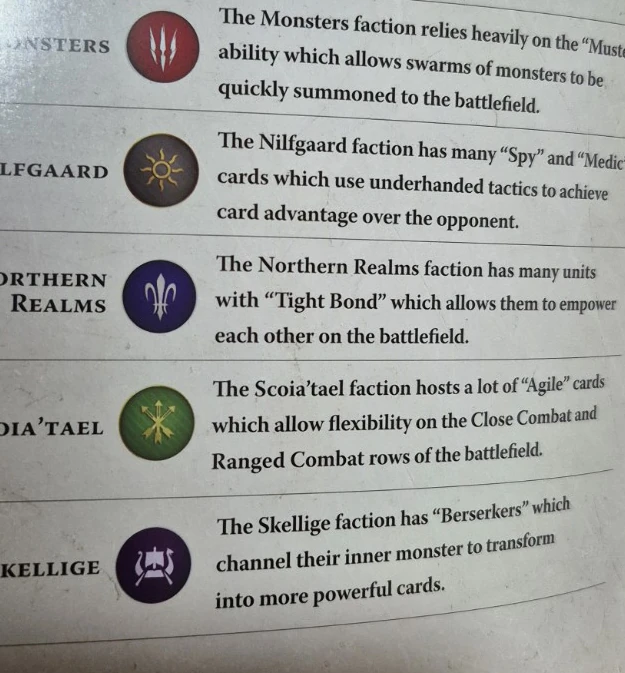
| Faction | Play style | Faction ability |
|---|---|---|
| Monsters | Uses Muster to summon groups of creatures. | After each round, one random unit stays on the battlefield. Shuffle the units you control on the battlefield, excluding Heroes, and choose one at random. |
| Nilfgaard | Uses Spies and Medics to build card advantage. | Wins a round when the total Strength is tied. |
| Northern Realms | Uses Tight Bond to strengthen matching units. | Draws a card from its deck whenever it wins a round. |
| Scoia’tael | Uses Agile units that can enter either the Close Combat or Ranged Combat row. | Decides who goes first at the start of the game. |
| Skellige | Transforms Berserkers into more powerful units. | At the start of the third round, returns two random non-Hero units from its discard pile to the battlefield. Shuffle the discard pile and choose two at random. |
4. Set up the battlefield
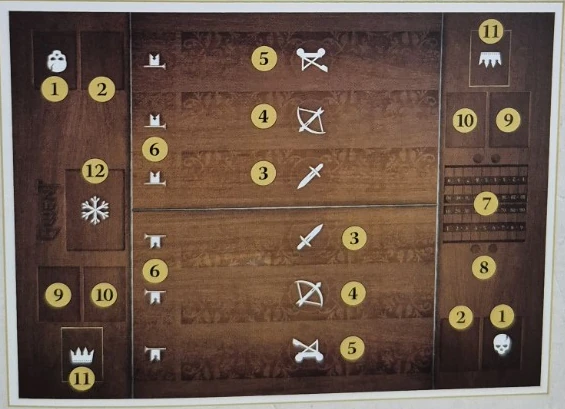
| Number | Zone | Purpose |
|---|---|---|
| 1 | Discard pile | Cards leaving the battlefield under your control go here. |
| 2 | Deck | Your draw pile. |
| 3 | Close Combat row | Units with the sword icon. |
| 4 | Ranged Combat row | Units with the bow icon. |
| 5 | Siege Combat row | Units with the siege-engine icon. |
| 6 | Commander’s Horn | Zone for the Special Card that boosts a row. |
| 7 | Scoring ladder | Tracks total Strength. |
| 8 | Gem counters | Two per player, representing rounds you can lose. |
| 9 and 10 | Player Aids | Reference cards for rules and abilities. |
| 11 | Leader Card | Place your Leader face up here. |
| 12 | Weather Cards | Shared area for weather effects. |
Each player has three combat rows on their side of the battlefield. A unit enters the row matching its range icon; an Agile unit offers a choice of two rows. Weather affects the corresponding rows on both players’ sides.
5. Learn to read the cards
Units
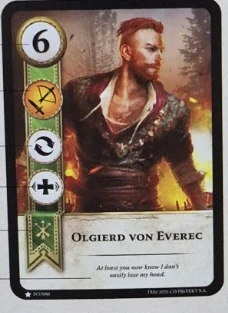
The number at the top left is the card’s Strength, the points it contributes to the side controlling it. Its range icon sits below that number and shows where it can be played. Ability symbols follow, if present. The colored banner identifies its faction, while the name helps identify groups of related units.
A unit’s abilities resolve immediately after it is placed in its row. Apply card effects whenever possible.
Heroes
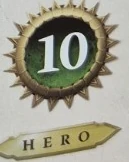
These units have Hero printed above their names and a spiked Strength icon filled with their faction’s color. Special abilities do not affect Heroes, whether they come from Special Cards, Unit Cards, or Leaders. Weather does not reduce a Hero’s Strength, a Horn does not double it, and a Medic cannot recover it.
Leaders
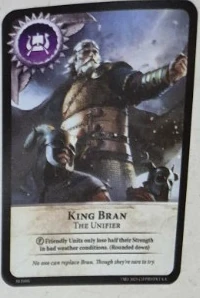
Choose a Leader before the battle and place it face up in its zone. Its ability is either Active or Passive. An Active ability can be used once per game and takes your turn. A Passive ability stays in use without spending a turn to activate it. The faction symbol appears at the top left.
Special Cards
These do not have Strength of their own. They produce effects such as modifying units, removing cards, or changing the weather. Look for the ability icon. Some enter a combat row, others enter the Weather area, and others are discarded after resolving. Follow the card and its Player Aid.
6. Draw your starting hand
- Determine the starting player. Flip the coin unless a Leader or faction ability determines who begins.
- Each player shuffles their deck and draws 10 cards.
- You may exchange up to two cards. This is optional: set aside a card from your hand and draw a replacement. You may exchange them one at a time, up to two cards.
- Shuffle the set-aside cards back into the deck. They do not go into the battlefield’s discard pile.
- Put out your two gems. You are ready to begin.
Those ten cards are your hand for the game. You do not automatically draw at the beginning of a turn or round. Extra draws happen only when an ability allows them, such as Spy or the Northern Realms faction ability.
7. Choose one of three actions on your turn
A. Play a card
Choose a card from your hand and put it in the correct area. A unit goes in the row matching its icon; a Special Card follows its own instructions. Resolve its abilities and update the score. Your opponent then takes a turn.
B. Use your active Leader ability
Resolve your Leader’s effect if you have not already used it. This takes your entire turn: you do not also play a card from hand as a second action unless the ability itself instructs you to play one.
C. Pass
Passing means sitting out the rest of the round. You cannot resume playing during that round. Your opponent may continue playing, one card per turn, until they also pass.
If you pass with 18 points while your opponent has 15, they can still play a 4-Strength unit, reach 19, and pass to win. The round ends when both players have passed.
8. Calculate Strength and use the scoring board
Add the current Strength of every unit and Hero on your side after applying active effects. Count what the cards are worth now, rather than only their printed numbers.
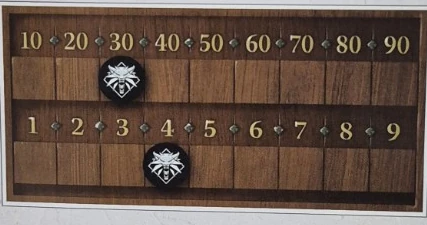
Use one token for tens and another for ones. When your score reaches 100, flip the tokens to show their 100 sides and keep marking tens and ones. The example of 34 uses 30 on the upper track and 4 on the lower track.
Apply Strength modifiers in order
When several effects apply, the rulebook gives this order:
- Weather.
- Tight Bond.
- Morale Boost.
- Commander’s Horn.
Example: three matching Tight Bond units with printed Strength 4 are worth 12 each, or 36 total. If weather reduces their base Strength to 1, they become worth 3 each, or 9 total. If a Horn also affects them, they are worth 6 each, or 18 total. This example assumes no other modifiers or Heroes.
Weather, Tight Bond, Morale Boost, Commander’s Horn, and Mardroeme have ongoing effects while their cards remain on the battlefield. Recalculate when the board changes.
9. Resolve the round and determine the winner
- Once both players pass, compare total Strength.
- The lower total loses a gem. On a tie, both players lose a gem unless an ability changes the result, such as Nilfgaard’s.
- Remove battlefield cards and put them in their controller’s discard pile. This includes Special Cards and Spies. Apply ability exceptions, such as the unit Monsters keeps.
- The winner starts the next round. Apply relevant end-of-round and start-of-round abilities, including Northern Realms’ draw and Skellige’s recovery at the beginning of round three.
The game ends when a player runs out of gems. A player with gems remaining wins. If both players lose their last gem at the same time, the game is a draw.
A standard game normally lasts two or three rounds. Track remaining gems carefully: a tied round can remove one from both players at once.
Where discarded Spies go
A card leaving the battlefield goes to the discard pile of the player who controlled it on the battlefield. If you play a Spy onto your opponent’s side, it goes to their discard pile when removed.
The golden rule
When a card’s text contradicts the general rules, the card takes precedence.
10. Every Unit Card ability and icon
Match the symbols on your cards to the original icons below. Heroes remain immune to special abilities.
| Icon | Ability | How it works |
|---|---|---|
 | Agile | Play it in either the Close Combat or Ranged Combat row. Once placed, it cannot move under the standard rules. |
 | Commander’s Horn on a unit | Doubles the Strength of all other units in its row unless a Horn already affects that row. It does not double its own Strength. |
 | Medic | Choose a non-Hero Unit Card from the discard pile and play it immediately. |
 | Morale Boost | Adds 1 Strength to all other units in its row. It does not boost itself. |
 | Muster | Find all specified cards in your hand and deck, play them immediately, then shuffle the deck. |
 | Tight Bond | Multiply this unit’s Strength by the number of matching allied units in play, including itself. Two copies with Strength 4 are worth 8 each; three are worth 12 each. |
 | Scorch on a unit | If the opponent has at least 10 total Strength in the opposite row, discard the strongest non-Hero unit or units in that row. If several share the highest Strength, remove them all. See the Clan Dimun Pirate exception below. |
 | Spy | Play it on the opponent’s side: its Strength counts for them. In return, draw two cards from your deck. |
 | Summon | When this card is discarded from the battlefield, including at the end of a round, replace it with the corresponding side-deck card. |
 | Berserker | When transformed, play its specified replacement from the side deck. Remove the original Berserker from the game entirely; it does not go to the discard pile. |
 | Mardroeme | Triggers the transformation of all Berserkers in its row. |
11. How to use Special Cards
| Icon | Card | Effect |
|---|---|---|
 | Commander’s Horn | Doubles the Strength of units in its row. Only one Special Card Horn may be played per row; Heroes do not benefit. |
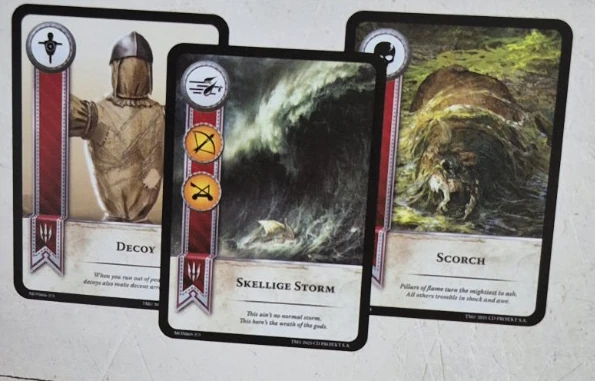
 | Decoy | Replace a non-Hero unit on your side of the battlefield and return that unit to your hand. Decoy stays in its place with Strength 0. You can retrieve a Spy your opponent placed on your side. |
| Mardroeme | Place it on a combat row to transform all Berserkers in that row. |
 | Scorch | Discard the unit or units with the highest current Strength across the entire battlefield, excluding Heroes. This includes your own side. Then discard Scorch itself. It has no 10-Strength threshold like the standard Unit Card ability. |
Scorch example: you have a 10-Strength unit and your opponent has two 10-Strength units. If no other non-Hero unit has higher Strength, all three are discarded. A 15-Strength Hero is neither discarded nor counted when selecting the strongest eligible units.
12. How Weather Cards work
Put Weather Cards face up in the shared Weather area. They set affected units’ base Strength to 1 on both players’ sides, before subsequent modifiers apply. Heroes are unaffected.
| Icon | Weather | Affected rows |
|---|---|---|
 | Biting Frost | Close Combat |
 | Impenetrable Fog | Ranged Combat |
 | Torrential Rain | Siege Combat |
 | Skellige Storm | Ranged Combat and Siege Combat |
| Icon | Card | Effect |
|---|---|---|
 | Clear Weather | Discard every Weather Card currently on the battlefield and cancel their effects. Then discard Clear Weather itself. |
Several Weather Cards can be active at once. For example, Frost and Rain can affect Close Combat and Siege Combat simultaneously. Clear Weather removes both.
13. A sample game, step by step
This teaching example uses simple Strength values without abilities changing the results. Both players begin with two gems and ten cards.
- Round one. Anna plays a 5-Strength unit. Ben answers with a 4. Anna adds another 5, reaching 10. Ben passes at 4. Anna also passes, wins 10 to 4, and Ben loses one gem.
- Clear the battlefield. Anna has eight cards left in hand; Ben has nine. They do not draw back up to ten. They keep the cards they did not use.
- Round two. Anna starts because she won. She plays a 3 and Ben plays an 8. Anna passes, then Ben passes. Ben wins 8 to 3 and Anna loses one gem.
- Round three. Each player has one gem. Ben starts. They play their remaining resources until both pass.
- Result. If Anna finishes at 24 and Ben at 21, Ben loses his last gem and Anna wins. If they tie and no ability changes the result, both lose their last gem and the game is a draw.
Anna won the first round, but Ben spent fewer cards. Balancing points against remaining cards drives many of Gwent’s decisions.
14. Advanced mode: deck-building limits
Advanced mode keeps the gameplay rules but restricts deck composition to make matchups more balanced.
- Exactly 1 Leader.
- At least 22 Unit Cards.
- No more than 5 Special Cards.
- No more than 2 Spy Cards.
- No more than 2 Medic Cards.
- Combined Strength of all units in the deck cannot exceed 130.
Spies and Medics are not extra slots: they still count as units. Check these limits before shuffling.
15. Tournament mode: win with different factions
- Each player builds three decks from three different factions.
- Every deck follows Advanced limits: 1 Leader, at least 22 units, no more than 5 Special Cards, 2 Spies, 2 Medics, and 130 combined unit Strength.
- The same Hero cannot appear in multiple decks.
- Before game one, flip a coin to decide who selects their first deck first.
- Win two complete games to take the best-of-three tournament.
- For games two and three, the previous winner chooses a new deck first. The previous loser then decides whether to keep their deck or switch.
- A winning deck cannot be used again.
A round is not a complete game: a game is the full contest resolved through gem losses. A tournament consists of multiple complete games.
16. Free For All: 3–5 players
Turns move clockwise. Each player plays one card per turn until they pass; the round ends when everyone passes. There is no two- or three-round limit.
At the end of each round, score one point for each opponent whose Strength you exceed. More than one player can earn points in the same round. Ties do not count as wins unless Nilfgaard’s ability applies.
| Players | Points to win |
|---|---|
| 3 | 4 |
| 4 | 5 |
| 5 | 6 |
Four-player example: total Strengths are 30, 24, 18, and 10. The player at 30 scores 3 points; the player at 24 scores 2; the player at 18 scores 1; the player at 10 scores none. Five points wins this four-player game.
Randomly determine who begins the game. In subsequent rounds, the player who scored the most points in the previous round starts.
| Ability | Change in this mode |
|---|---|
| Spy | Choose which opponent receives the Spy. |
| Unit Scorch | Affects each opponent individually. |
| Nilfgaard | If two Nilfgaard players tie, each scores one point for that tie. |
| Northern Realms | Draw a card if your Strength exceeds that of at least two opponents. |
| Scoia’tael | If two players use this faction, randomly determine which of them chooses who starts. |
17. Two versus two: team play
Make two teams of two. Standard rules apply with these changes:
- Teammates cannot use the same faction.
- Teammates may look at each other’s hands.
- They share one side of the battlefield.
- They share a discard pile and only two gems per team.
- Played cards contribute to the total Strength of the team controlling that side.
Turns alternate between teams and players: A1 → B1 → A2 → B2, then repeat. If B1 passes, everyone else keeps their relative order: A1 → A2 → B2 → A1. One player passing does not force their teammate to pass.
| Card or ability | How it applies |
|---|---|
| Medic | Can recover a unit from the whole team’s shared discard pile. |
| Commander’s Horn | Affects the entire team’s units in that row. |
| Decoy | Can target a unit played by either teammate. |
| Monsters | The unit remaining in play must be a Monsters card or an enemy Spy. |
| Nilfgaard | If both teams use Nilfgaard, its faction ability has no effect. |
| Scoia’tael | If both teams use it, flip a coin between the Scoia’tael players to determine who chooses the starting player. |
| Skellige | Recovered cards must be Skellige cards or enemy Spies. |
| Emhyr var Emreis: The White Flame | Cancels every Leader ability. |
18. Gwent Solo: setup and automated opponent
The manual credits this mode to Martin Montreuil, @lasocietedesjeux. You follow standard rules while the opponent is automated by revealing cards from its deck.
Set up the game
- Choose a faction for yourself and another for the opponent.
- Combine every card in each faction to form its deck. Keep side decks separate and organize Leaders separately.
- Shuffle the enemy deck and place it across the battlefield.
- Remove all Weather Cards except Clear Weather from your own deck, then shuffle and place it in its zone.
- Choose your Leader and put it in your Leader zone.
- Shuffle all enemy faction Leaders into a face-down pile in the enemy Leader zone.
- Set out gems normally and draw your starting hand as in a standard game.
How the opponent takes turns
- It has no hand. It reveals and plays the top card of its deck on its turn.
- It starts every round, subject to the faction exceptions below.
- It takes a turn after each of your turns.
- If it reveals weather, resolve the effect and immediately give it another turn. This can chain, with no limit on the number of cards it can play in that turn.
- Play its cards as effectively as possible, choosing the option that benefits it most.
- When you pass, it takes one final turn, then the round ends. Resolve any effects that instruct it to play additional cards.
After that final turn, compare Strength and remove gems normally.
Solo variants
Deck building: you may build your deck using standard Gwent deck-building rules instead of combining the entire faction. Keep the mode’s weather restrictions.
Leader variant: when calculating the final score of a round, if your Strength exceeds the opponent’s, reveal the top Leader from its pile and resolve its ability in the most effective way for the opponent. You win only if your Strength still exceeds its total afterward.
19. Solo ability changes
Factions
| Faction | Change |
|---|---|
| Northern Realms | If the opponent wins a round as Northern Realms, it plays a second card on its first turn of the next round. |
| Scoia’tael | If you control this faction, you start the first round and the round after you win a round. |
Automated opponent’s cards
| Icon | Ability | Solo rule |
|---|---|---|
| Commander’s Horn | Place it on the most beneficial row. On a tie, choose the row with the most cards. |
| Scorch | Affects only your side of the battlefield. |
| Muster | Find the first specified card in its deck, play it, and shuffle the deck. |
| Spy | Place it on your side as usual. The opponent draws and immediately plays two cards. |
| Agile | May move as a free additional action during the opponent’s turn if a card effect, such as weather or a Horn, makes another row more beneficial. |
| Medic | Choose the non-Hero unit from the discard pile that adds the most Strength, accounting for Tight Bond, weather, and Horn effects. |
| Decoy | Does not replace a unit. Without looking, put the top card of the opponent’s deck under Decoy. That card and its abilities take effect when the round ends. |
20. Solo: resolving enemy Leaders
These are the enemy Leader adaptations listed in the Solo booklet. They apply to the automated opponent rather than replacing normal card text in a game between people.
| Faction | Leader | Solo effect |
|---|---|---|
| Monsters | Eredin: Destroyer of Worlds | The opponent draws a card and plays it immediately. |
| Monsters | Eredin: King of the Wild Hunt | Find the first Weather Card in the opponent’s deck, play it immediately, then shuffle the deck. |
| Monsters | Eredin: Bringer of Death | Choose the card from the opponent’s discard pile that gives it the greatest advantage and play it immediately. It cannot be a Hero. |
| Nilfgaard | Emhyr var Emreis: Invader of the North | Randomly choose a non-Hero unit from the opponent’s discard pile and play it immediately. |
| Nilfgaard | Emhyr var Emreis: The Emperor of Nilfgaard | Discard a card of your choice from your hand. |
| Nilfgaard | Emhyr var Emreis: The Relentless | Choose the card in your discard pile that gives the opponent the greatest advantage and play it immediately on its side. |
| Nilfgaard | Emhyr var Emreis: The White Flame | Your Leader has no ability for the rest of the game. |
| Scoia’tael | Francesca Findabair: Daisy of the Valley | The opponent draws a card and plays it immediately. |
| Scoia’tael | Francesca Findabair: Hope of the Aen Seidhe | Every Agile unit the opponent controls gains 1 Strength. |
| Skellige | Arnjolf: The Patricide | Find the Tight Bond unit in the opponent’s deck that gives it the greatest Strength boost, play it, and shuffle the deck. |
| Skellige | Harald an Craite: The Cripple | Find a Mardroeme in the opponent’s deck and play it on the row that produces the greatest Strength increase. |
| Skellige | King Bran | The opponent’s units lose only half their Strength from Weather effects. |
21. Manual clarifications and common questions
Does Clan Dimun Pirate use the standard Unit Card Scorch rule?
No. The FAQ says its Scorch follows the Special Card rules, affecting the entire battlefield on both sides.
What does Eredin: Bringer of Death recover in a normal game?
A Unit Card or Special Card of your choice from your discard pile. General restrictions still apply, including Hero immunity. Use the separate adaptation above for the automated Solo opponent.
What does Emhyr var Emreis: The Relentless allow in a normal game?
Take a Unit Card or Special Card of your choice from the opponent’s discard pile. Solo has its own adaptation, listed above.
How many cards do I draw each turn?
None automatically. You start with ten and draw additional cards only when an ability tells you to.
Can I play again after passing?
Not during that round. You can act again in the next round if the game continues.
Does weather weaken Heroes?
No. Heroes are immune to special abilities, including weather.
Do two Horns multiply Strength by four?
No. A unit’s Horn ability does not apply if a Horn already affects the row, and only one Special Card Horn can be played per row.
Do I keep my hand between rounds?
Yes. Keep the cards you have not used. Played cards normally go to the discard pile at the end of the round, subject to ability exceptions.
What happens on a tie?
In standard play, both players lose one gem unless an ability changes the result. If both lose their last gem at once, the game ends in a draw.
22. A quick reference for the table
- Standard deck: 1 Leader, at least 22 units, no more than 10 Special Cards.
- Setup: draw 10 cards, exchange up to 2, set out 2 gems.
- Turn: play a card, use your active Leader, or pass.
- Pass: sit out the remainder of that round.
- Round end: compare Strength once both players pass.
- Losing: remove one gem. A tie normally removes one from both players.
- Next round: keep your remaining hand; do not automatically draw.
- Victory: have a gem remaining when your opponent has none.
- Strength order: Weather → Tight Bond → Morale Boost → Horn.
- Golden rule: card text takes precedence.
Source: the photographed Rulebook and Game Modes booklets for Gwent: The Legendary Card Game, © 2025 CD PROJEKT S.A. Explanations and examples written for this tutorial. Photographs supplied by Sebastián; game illustrations and symbols belong to the game materials.